How to configure RAID6 in centos 7
To configure RAID6 in centos 7
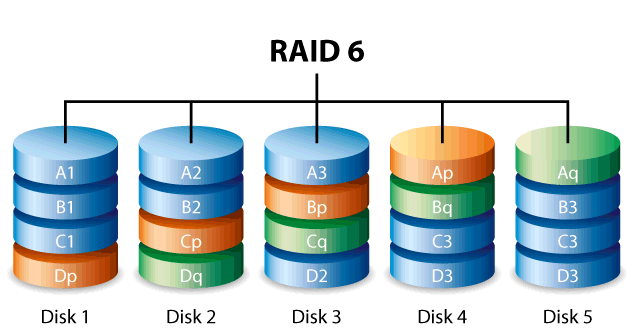
RAID 6 is essentially an extension of RAID 5 that allows for additional fault tolerance by using a second independent distributed parity scheme (dual parity). Even if one of the hard disk drives fails during the data recovery process, the system continues to be operational, with no data loss. RAID6 provides for extremely high data fault tolerance by sustaining multiple simultaneous drive failures. It handles the loss of any two devices without data loss. Accordingly, it requires N+2 drives to store N drives worth of data. It requires a minimum of 4 devices. The performance for RAID 6 is slightly lower but comparable to RAID 5 in normal mode and single disk failure mode. It is very slow in dual disk failure mode.
Features
- No data loss, even after two disk fails. We can rebuild from parity after replacing the failed disk.
- Reading will be better than RAID 5, because it reads from multiple disk, But writing performance will be very poor without dedicated RAID Controller
- RAID 6 is expensive, as it requires two independent drives are used for parity functions
First, before you proceed, you need to install the l mdadm package and that shall be done by making use of the following command.
[root@server2 ~]# yum install mdadm -y
And then use the following command to check the block details and see if they are all configured.
[root@server2 Desktop]# mdadm -E /dev/sd[b-e]1
mdadm: No md superblock detected on /dev/sdb1.
mdadm: No md superblock detected on /dev/sdc1.
mdadm: No md superblock detected on /dev/sdd1.
mdadm: No md superblock detected on /dev/sde1.
After checking, you need to proceed with the creation of the md device and select raid levels.
[root@server2 Desktop]# mdadm --create /dev/md6 --level=6 --raid-devices=4 /dev/sd[b-e]1
mdadm: Defaulting to version 1.2 metadata
mdadm: array /dev/md5 started.
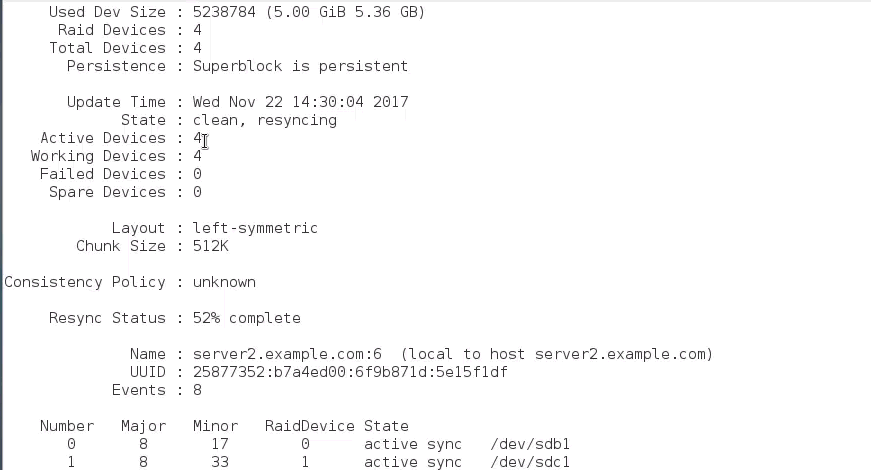
Once it is done, you need to verify the md device status by using the following command.
[root@server2 Desktop]# mdadm -D /dev/md6
Afterwards, you need to create file system for raid devices and for that you need to make use of the following command.
[root@server2 Desktop]# mkfs.ext4 /dev/md6
You should now permanently mount the RAID device using UUID by making use of the mkdir command in the following manner to create a directory.
[root@server2 Desktop]# mkdir /raid6
For mount now going to generate UUID by using the following command. You’ ll get an output with the following UUID. Copy that line.
[root@server2 raid1]# blkid /dev/md6
/dev/md5: UUID=" f9b3c56f-6c86-4456-99d2-571b1cb8eb95"  TYPE=" ext4"
Open the fstab and paste the copies UUID in it.
[root@server2 raid1]# vim /etc/fstab
UUID=f9b3c56f-6c86-4456-99d2-571b1cb8eb95    /raid6    ext4    defaults 0 0
You shall now execute mount command and check the status as follows.
[root@server2 ~]# mount -a
[root@server2 ~]# df -h
Filesystem      Size   Used   Avail  Use% Mounted on
/dev/sda2        15G   4.6G       11G  31%   /
devtmpfs        741M     0      741M   0%   /dev
tmpfs              749M  140K  749M   1%   /dev/shm
tmpfs              749M  8.9M  741M   2%   /run
tmpfs              749M     0      749M   0%   /sys/fs/cgroup
/dev/sda1        497M  116M  382M  24% /boot
/dev/md6        9.8G      37M    9.2G   1% /raid6
Now switch to mount point.
[root@server2 ~]# cd /raid6/
Create a directory in that place.
[root@server2 ~]# mkdir dir1
And also create a file.
[root@server2 ~]# touch fail.txt
You can check and see, there are a directory and a file in this location.
[root@server2 raid5]# ls -l
total 24
drwxr-xr-x. 2 root root  4096 Nov 20 13:20 dir1
-rw-r--r--. 1 root root    25 Nov 20 13:20 fail.txt
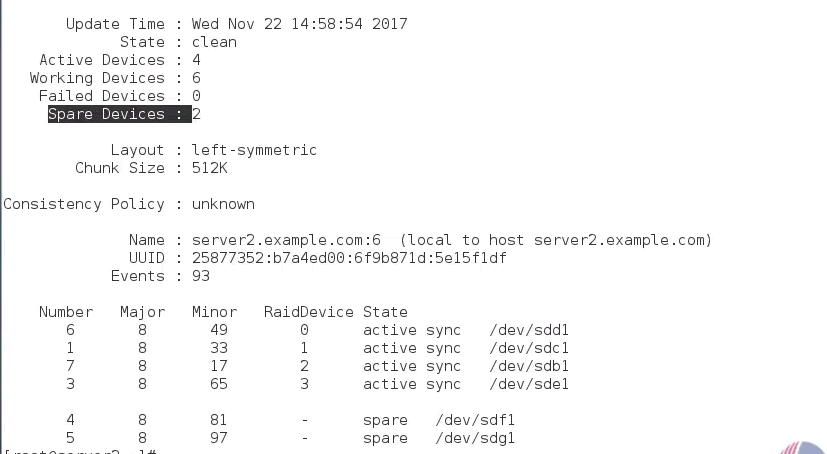
Afterwards, add the two spare disks in RAID devices to check fault-tolerance.
[root@server2 ~]# mdadm --manage --add /dev/md6 /dev/sd[f-g]1
And then check the availability of spare disk by making use of the following command.
[root@server2 ~]# mdadm -D /dev/md6
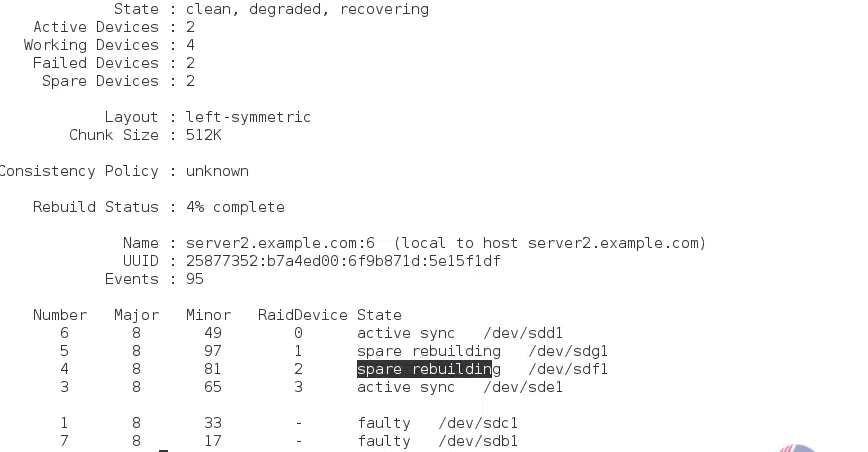
It is also time to check fault-tolerance so let us manually fail any one or two disk from the raid device. Run the following command. In the output, you can see the faulty disks, which we have just manually failed.
[root@server2 ~]# mdadm --manage --fail /dev/md6 /dev/sd[b-c]1
mdadm: set /dev/sdb1 faulty in /dev/md6
mdadm: set /dev/sdc1 faulty in /dev/md6
You can see the rebuilding space disks status.
[root@server2 ~]# mdadm -D /dev/md6
After completing the rebuilding process, go to mount point and check the data’ s availability.
[root@server2 ~]# cd /raid6/
root@server2 raid6]# ls -l
total 24
drwxr-xr-x. 2 root root  4096 Nov 20 13:20 dir1
-rw-r--r--. 1 root root    25 Nov 20 13:20 fail.txt
Finally, save the raid configuration.
[root@server2 raid6]# mdadm --detail --scan --verbose > > /etc/mdadm.conf
With this, the method to configure RAID6 in CentOS 7 comes to an end.
Comments ( 0 )
No comments available