How To install Adminer on Ubuntu 17.04
To install Adminer on Ubuntu 17.04
Adminer is a database management tool with a clear and consistent user interface. It is built based on PHP and is a very similar to PHPMyAdmin in functionality. It is developed to improve security, user experience, performance etc. It is very lightweight but at the same time it is very powerful. Adminer is available for MySQL, PostgreSQL, SQLite, MS SQL and Oracle. In this tutorial, you will learn about the method to install Adminer on Ubuntu 17.04
Features
- Export views, database, data,routines, structure to CSV or SQL
- Basic functions are add/modify/remove databases.
- Display permissions and users.
- Databases can be exported and imported.
- List data in tables.
- It shows process and also kill them.
- It supports multiple languages.
- Searching through multiple columns.
Uses of Adminer
- Performance is high
- It comsumes less size
- It is Highly secured
- User friendly interface
Pre-requisite
Install LAMP (apache, php , mariadb-server)
In mariadb (create database , user and give privilages to user)
Php modules (php libapache2-mod-php php-curl php-cli php-mysql php-gd)
Installing Adminer
Before you begin with installation process, make sure you create a new directory for Adminer as follows.
root@linuxhelp:~# mkdir /usr/share/adminer
Now you should download Adminer package and save it in the newly created directory.
root@linuxhelp:~#  wget " https://www.adminer.org/latest.php"  -O /usr/share/adminer/latest.php
--2017-11-20 18:59:45--  https://www.adminer.org/latest.php
Resolving www.adminer.org (www.adminer.org)... 54.79.123.29
Connecting to www.adminer.org (www.adminer.org)|54.79.123.29|:443... connected.
HTTP request sent, awaiting response... 302 Found
Location: static/download/4.3.1/adminer-4.3.1.php [following]
--2017-11-20 19:00:12--  https://www.adminer.org/static/download/4.3.1/adminer-4.3.1.php
Reusing existing connection to www.adminer.org:443.
HTTP request sent, awaiting response... 200 OK
Length: 436227 (426K) [application/octet-stream]
Saving to: ‘ /usr/share/adminer/latest.php’

/usr/share/adminer/l 100%[====================> ] 426.00K  76.5KB/s    in 5.6s

2017-11-20 19:00:18 (76.5 KB/s) - ‘ /usr/share/adminer/latest.php’  saved [436227/436227]
And then, create a symbolic link for downloading the latest PHP file by using following command.
root@linuxhelp:~# ln -s /usr/share/adminer/latest.php /usr/share/adminer/adminer.php
Later, you are required to create a new .conf file for adminer and also you need to add alias configuration. For that, you need to run the following command.
root@linuxhelp:~# echo " Alias /adminer.php /usr/share/adminer/adminer.php"  | sudo tee /etc/apache2/conf-available/adminer.conf
Alias /adminer.php /usr/share/adminer/adminer.php
After that, you need to enable newly created .conf file using following command.
root@linuxhelp:~# a2enconf adminer.conf
Enabling conf adminer.
To activate the new configuration, you need to run:
  service apache2 reload
Later, you should restart the Apache service by running the following command.
root@linuxhelp:~# systemctl restart apache2
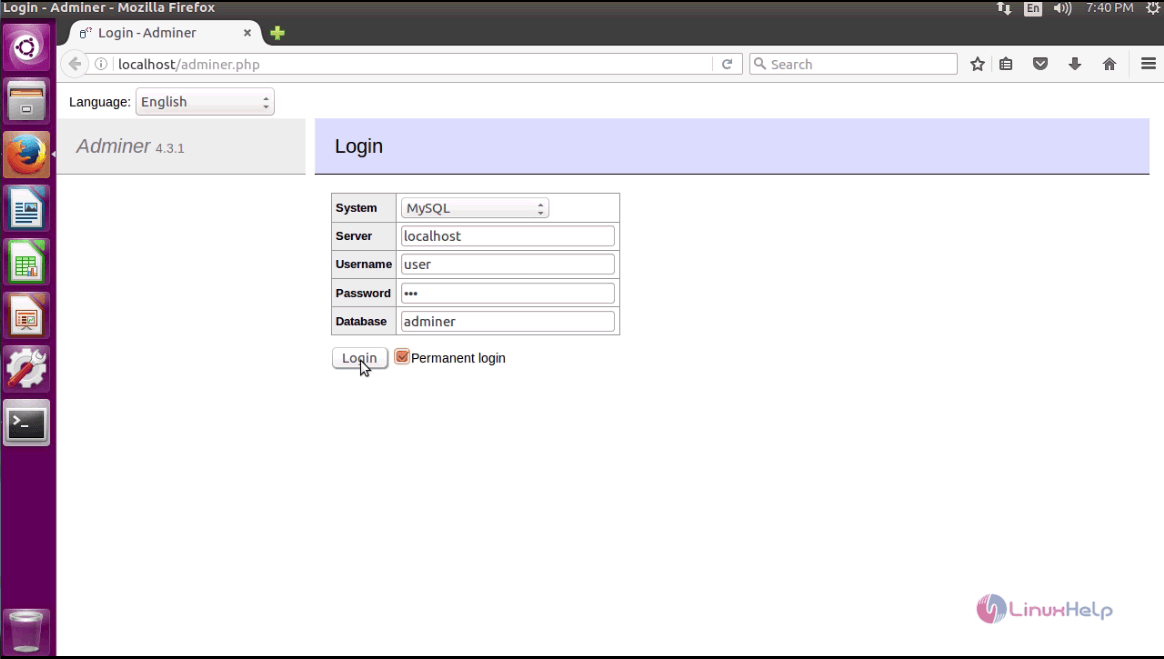
You can now proceed with the installation process graphically. So, open your browser and give htttp://localhost/adminer.php as the URL. The installation procedure of Adminer appears on your screen. Fill the database details and click Login.
After you login, the Home page of Adminer appears on the screen.

The data is displayed in table format.

With this, the installation of Adminer comes to an end.
Comments ( 0 )
No comments available