How To Install and Configure Messaging/Chat Server In Linux
To Install and Configure your own Chat Server for Instant Messaging by using Openfire in Linux
Openfire
Openfire is also known as Wildfire and Jive Messenger is a Group chat server and Instant Messaging. It is written in Java and licensed under Apache. It is developed by Jive Software and IgniteRealtime.org. This tutorial illustrates how to set up your own chat server using Openfire.
Features
- Platform Independent.
- Can support more than 50,000 concurrent users.
- LDAP connectivity.
- Web Based Admin control.
- User Friendly.
- Supports SSL/TLS.
- Full integration with Spark (XMPP client).
- Plugin interface is available.
To Install Openfire
Use the following link to download the Openfire and sparkweb package relevant to your architecture and OS.
http://www.igniterealtime.org/downloads/index.jsp
You can also use wget command to download the package and install using dpkg or rpm command.
On Debian/Ubuntu/Linux Mint
# wget http://www.igniterealtime.org/downloads/download-landing.jsp?file=openfire/openfire_4.0.2_all.deb
# dpkg -i openfire_4.0.2_all.deb
# wget http://www.igniterealtime.org/downloads/download-landing.jsp?file=sparkweb/sparkweb_0_9_0.tar.gz
On CentOS/RedHat
[root@linuxhelp ~]# wget http://www.igniterealtime.org/downloads/download-landing.jsp?file=openfire/openfire-4.0.2-1.i386.rpm
[root@linuxhelp ~]# rpm -ivh openfire-4.0.2-1.i386.rpm
Preparing...                     ########################################### [100%]
1:openfire-4.0.2-1               ########################################### [100%]
[root@linuxhelp ~]# wget http://www.igniterealtime.org/downloads/download-landing.jsp?file=sparkweb/sparkweb_0_9_0.tar.gz
Now install the Required library Package for Openfire by running the following command.
[root@linuxhelp ~]# yum install glibc.i686 -y
Loaded plugins: fastestmirror, langpacks
Loading mirror speeds from cached hostfile
 * base: centos.webwerks.com
 * extras: centos.webwerks.com
 * updates: centos.webwerks.com
Resolving Dependencies
-->  Running transaction check
--->  Package glibc.i686 0:2.17-106.el7_2.4 will be installed
.
.
.
Installed:
  glibc.i686 0:2.17-106.el7_2.4                                                                                                             Dependency Installed:
  nss-softokn-freebl.i686 0:3.16.2.3-14.2.el7_2
Dependency Updated:
  glibc.x86_64 0:2.17-106.el7_2.4       glibc-common.x86_64 0:2.17-106.el7_2.4       nss-softokn-freebl.x86_64 0:3.16.2.3-14.2.el7_2
Complete!
Now the installation of Openfire is successfully completed.
Start the openfire service by running the following command.
[root@linuxhelp ~]# systemctl start openfire.service
[root@linuxhelp ~]# systemctl status openfire.service
openfire.service - SYSV: Openfire is an XMPP server, which is a server that facilitates XML based communication, such as chat.
   Loaded: loaded (/etc/rc.d/init.d/openfire)
   Active: active (running) since Thu 2016-05-05 13:55:18 IST  7s ago
  Process: 39831 ExecStart=/etc/rc.d/init.d/openfire start (code=exited, status=0/SUCCESS)
 Main PID: 39844 (java)
   CGroup: /system.slice/openfire.service
           ? 39844 /opt/openfire/jre/bin/java -server -DopenfireHome=/opt/openfire -Dopenfire.lib.dir=/opt/openfire/lib -classpath /opt/o...
May 05 13:55:16 linuxhelp systemd[1]: Starting SYSV: Openfire is an XMPP server, which is a server that facilitates XML based com...chat....
May 05 13:55:17 linuxhelp su[39841]: (to daemon) root on none
May 05 13:55:17 linuxhelp openfire[39831]: Starting openfire:
May 05 13:55:18 linuxhelp systemd[1]: Started SYSV: Openfire is an XMPP server, which is a server that facilitates XML based comm...s chat..
Hint: Some lines were ellipsized, use -l to show in full.
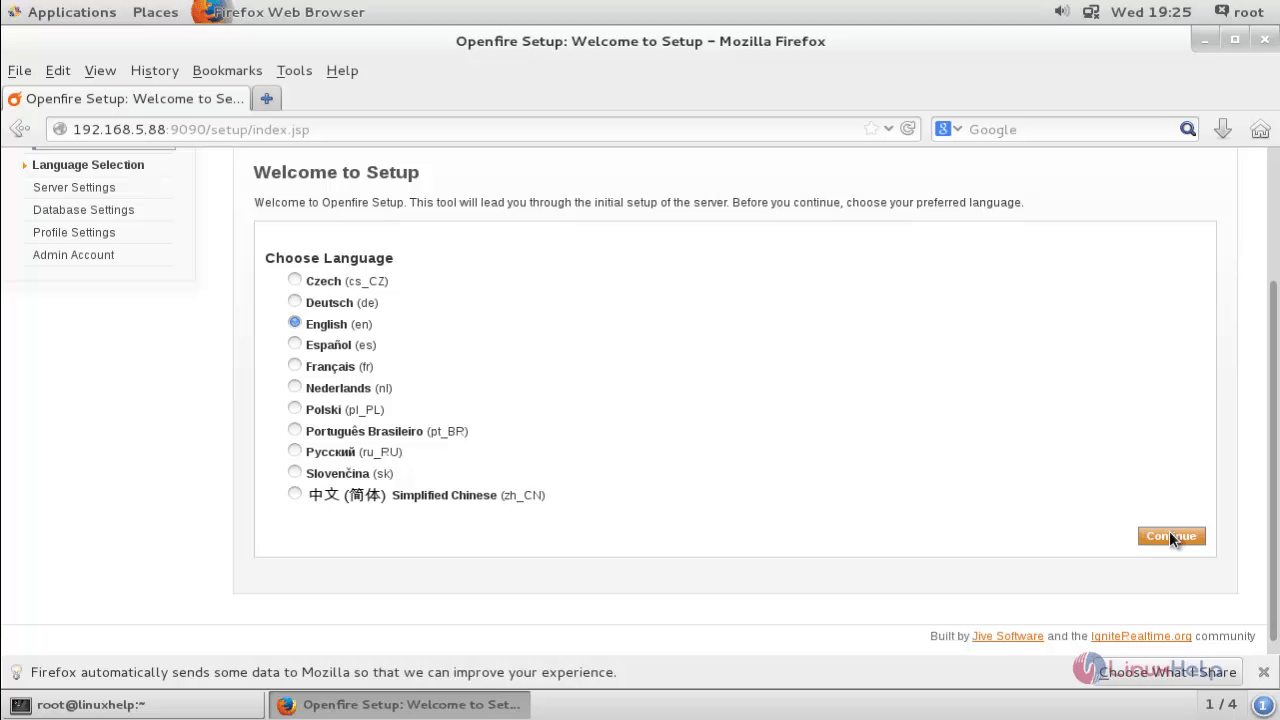
In the browser ,type ' http://localhost:9090' or ' http://192.168.5.88:9090' to install Openfire.
Now Select your preferred language.
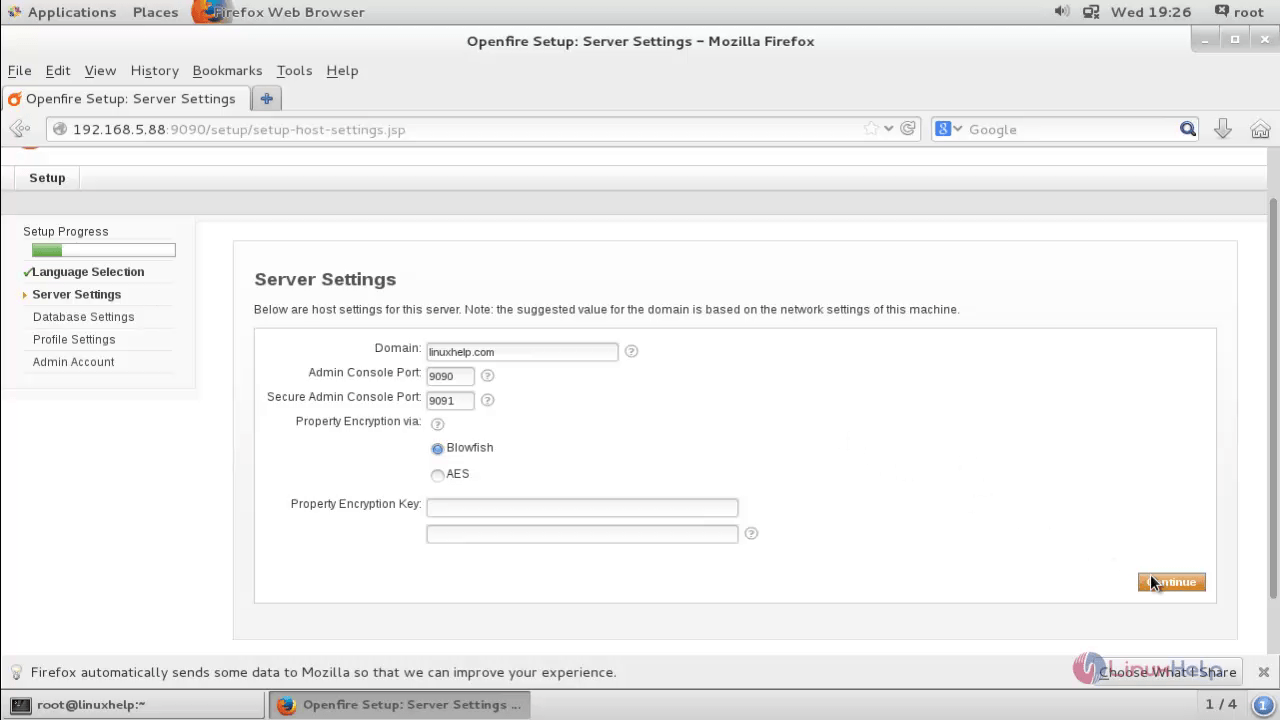
Choose the Domain name, Admin port and Secure Admin port details.
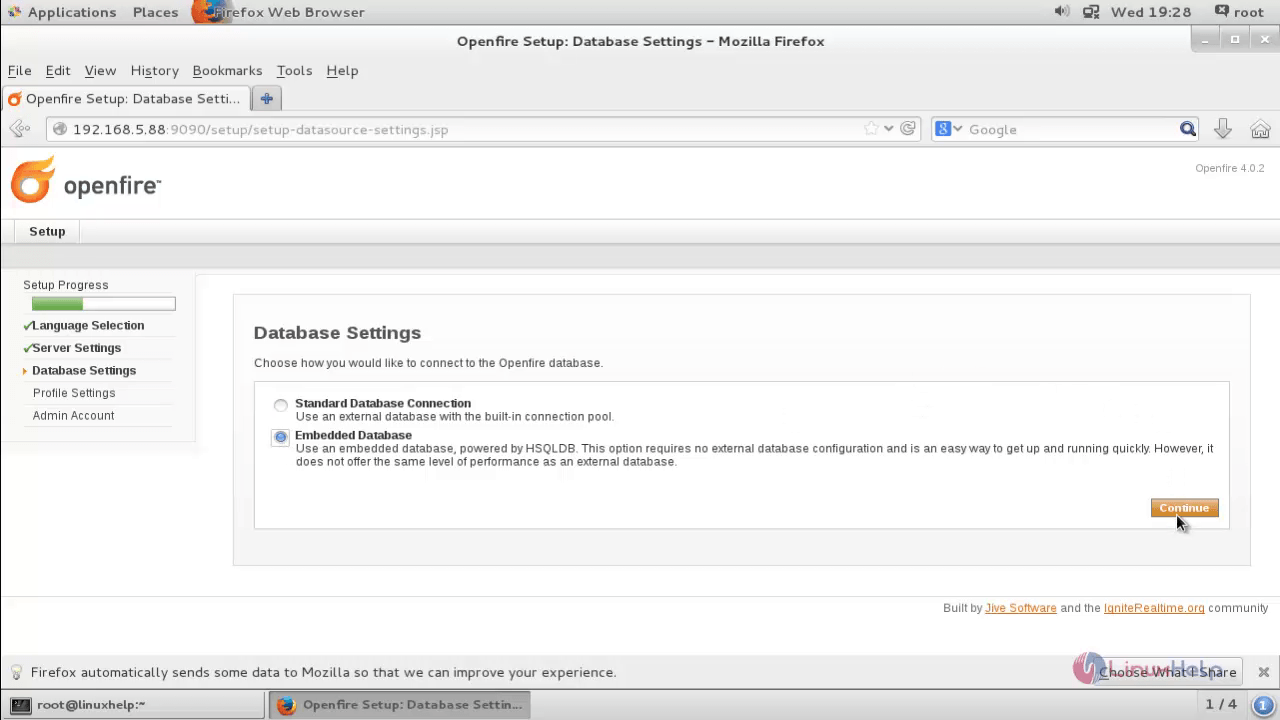
Now choose the database settings as per your requirements.
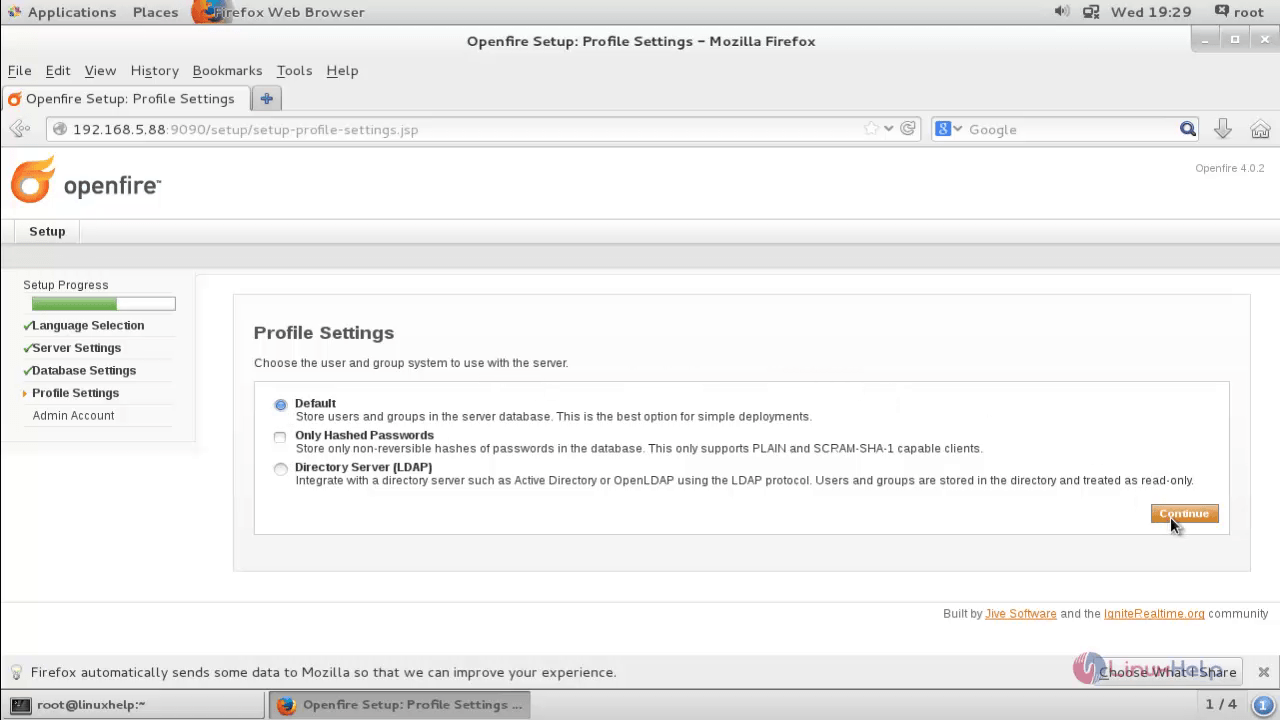
Now you can set the profile setting. Choose default settings for simple deployment of openfire server.
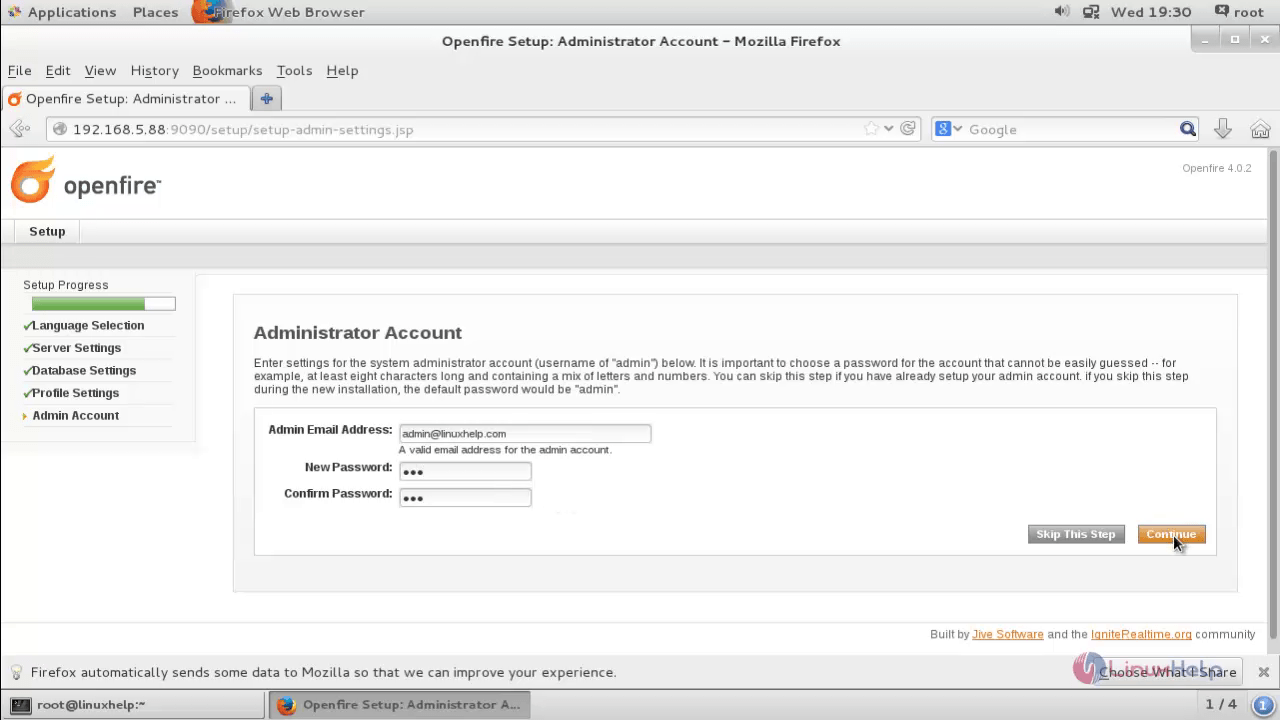
Setup Admin password and email address.
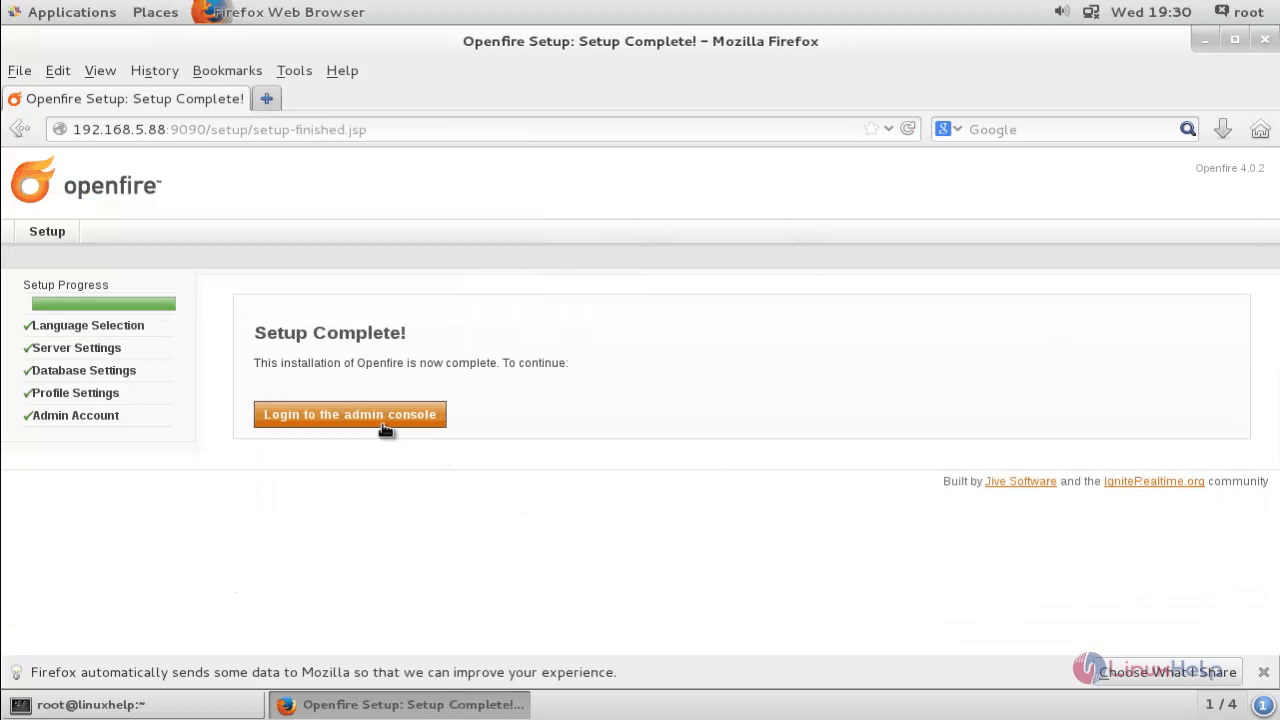
After the Setup is completed, the confirmation message will be displayed.
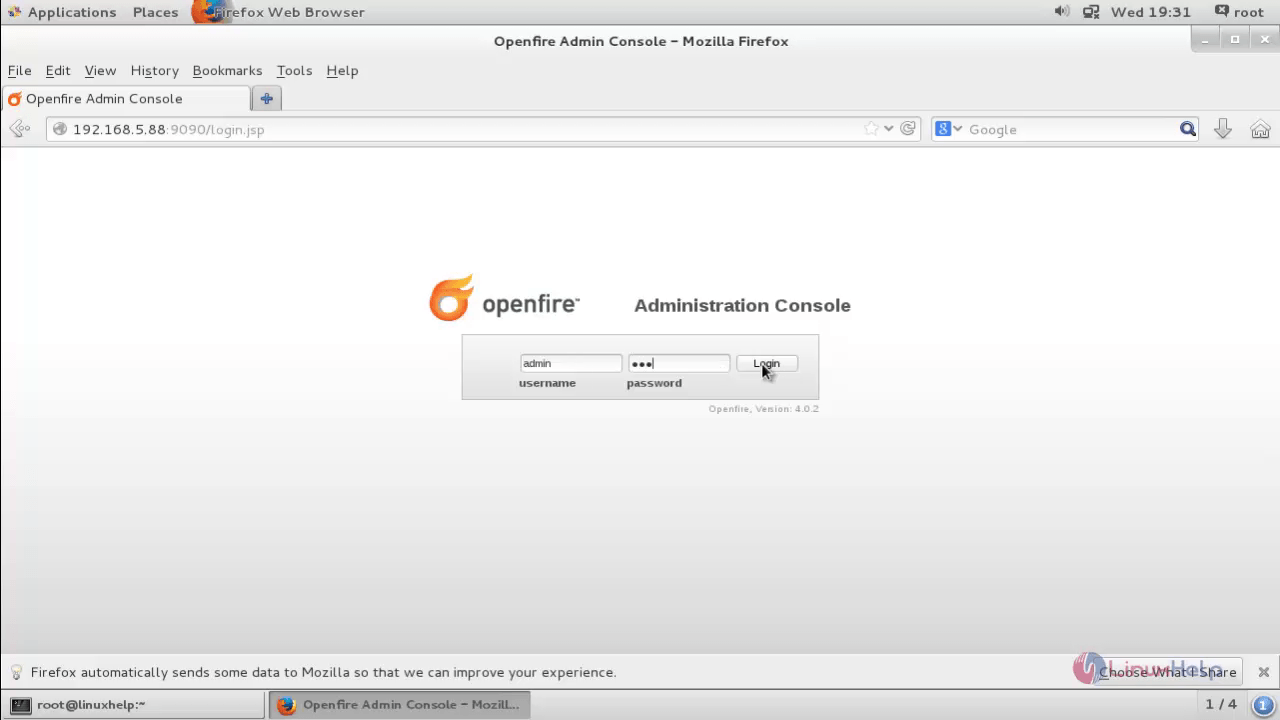
Login to Openfire Admin using your username and password.
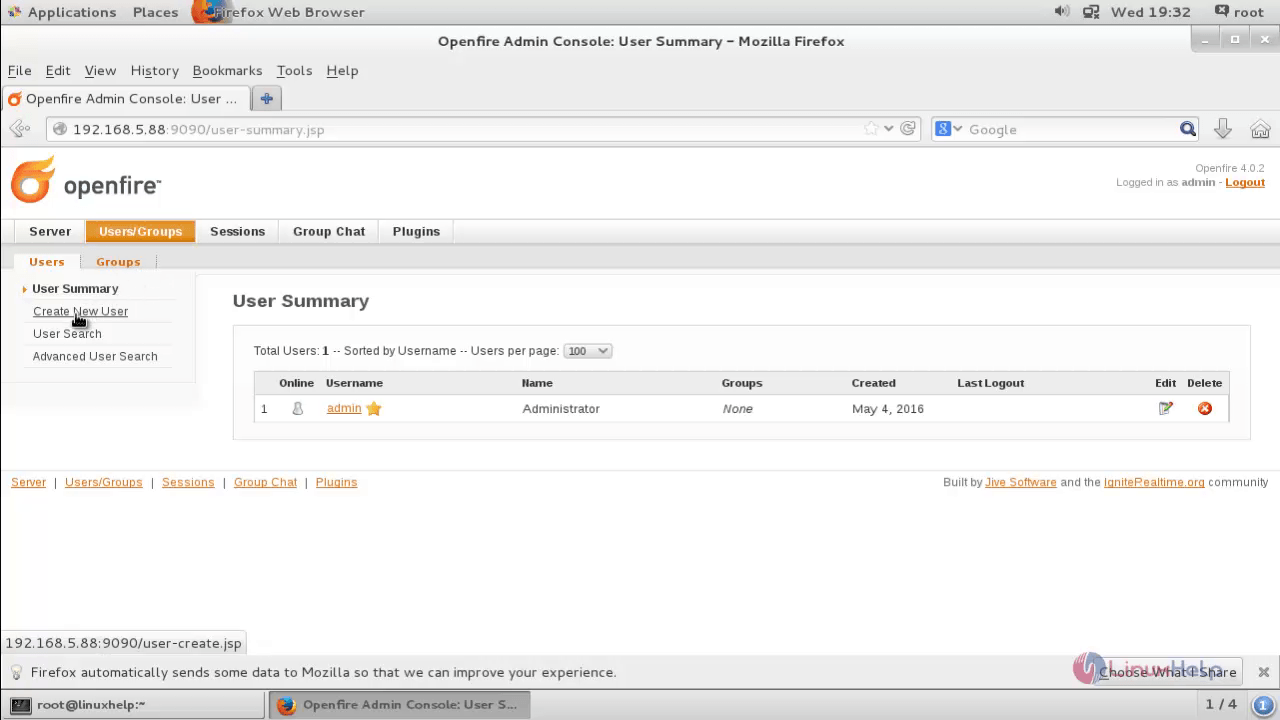
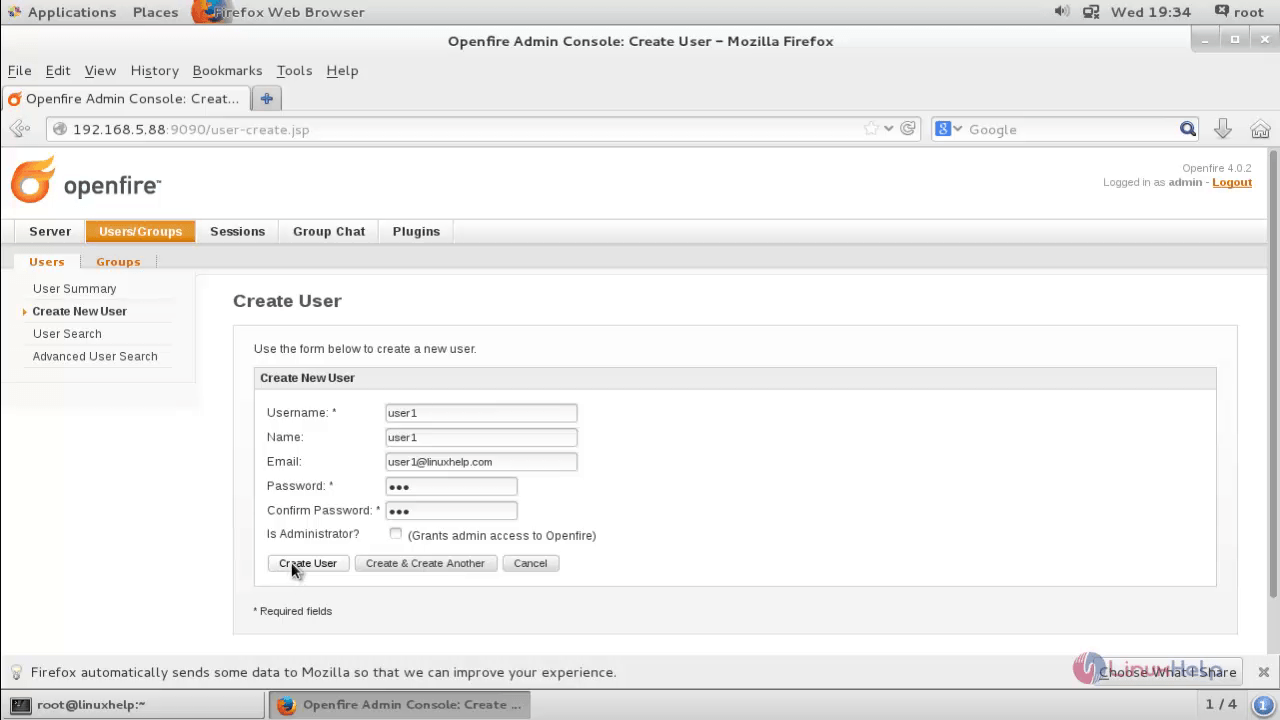
Click create a new user tab.
Set username, name, email and password to create a new user .
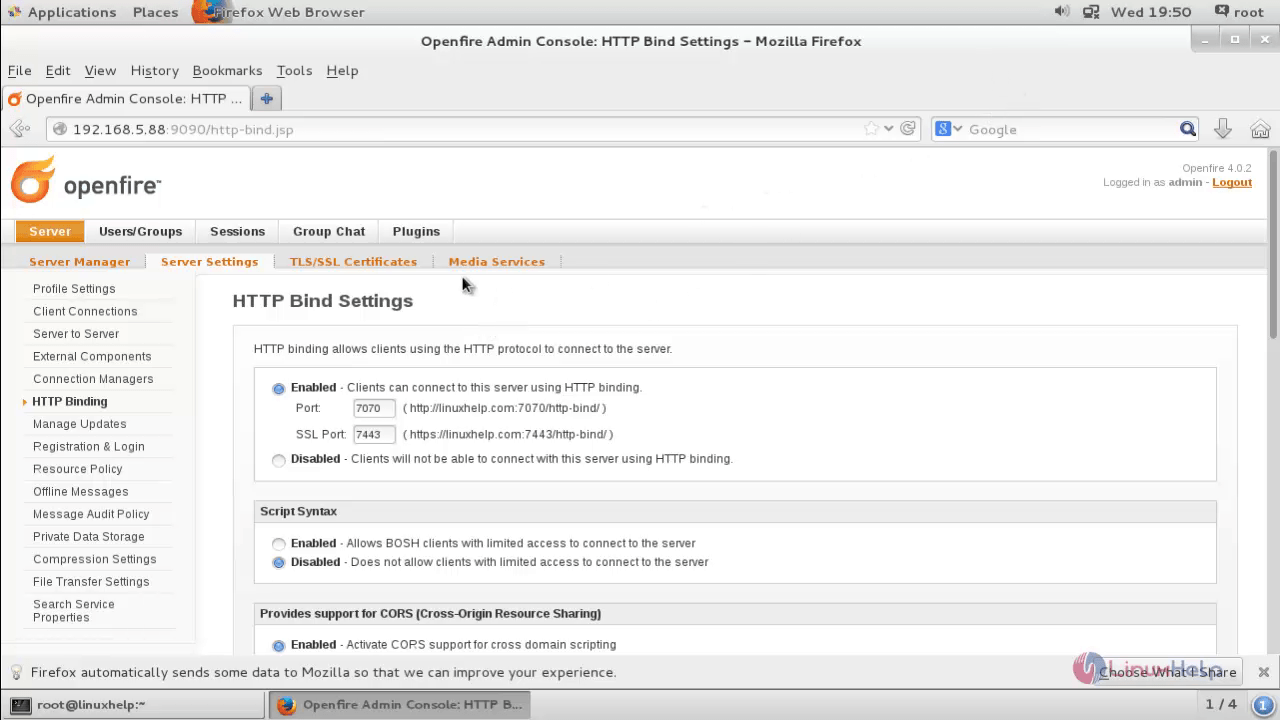
Now the server setup is completed. Add users, groups, contacts and plugins. Go to HTTP Bind Settings inside the Server Settings and enable all the settings to make our client to access the Openfire server.
To install and Configure Sparkweb
Sparkweb is Web-based XMPP Client, used to connect to your XMPP server like Openfire. Sparkweb should be installed on the same machine where you are running the Openfire server. Now extract the sparkweb package using tar command. After extracting, a new sparkweb directory will be placed under the current working directory.
[root@linuxhelp ~]# ls -l
total 95252
-rw-------. 1 root root     1356 Apr 26 19:37 anaconda-ks.cfg
drwxr-xr-x. 2 root root        6 Apr 26 14:25 Desktop
drwxr-xr-x. 2 root root        6 Apr 26 14:25 Documents
drwxr-xr-x. 2 root root        6 Apr 26 14:25 Downloads
-rw-r--r--. 1 root root     1407 Apr 26 14:25 initial-setup-ks.cfg
drwxr-xr-x. 2 root root        6 Apr 26 14:25 Music
-rwxrw-rw-. 1 root root 96879347 May  4 12:08 openfire-4.0.2-1.i386.rpm
drwxr-xr-x. 2 root root        6 Apr 26 14:25 Pictures
drwxr-xr-x. 2 root root        6 Apr 26 14:25 Public
-rwxrw-rw-. 1 root root   645375 May  4 14:35 sparkweb_0_9_0.tar.gz
drwxr-xr-x. 2 root root        6 Apr 26 14:25 Templates
drwxr-xr-x. 2 root root        6 Apr 26 14:25 Videos
[root@linuxhelp ~]# tar -zxf sparkweb_0_9_0.tar.gz
[root@linuxhelp ~]# ls -l
total 95256
-rw-------. 1 root root     1356 Apr 26 19:37 anaconda-ks.cfg
drwxr-xr-x. 2 root root        6 Apr 26 14:25 Desktop
drwxr-xr-x. 2 root root        6 Apr 26 14:25 Documents
drwxr-xr-x. 2 root root        6 Apr 26 14:25 Downloads
-rw-r--r--. 1 root root     1407 Apr 26 14:25 initial-setup-ks.cfg
drwxr-xr-x. 2 root root        6 Apr 26 14:25 Music
-rwxrw-rw-. 1 root root 96879347 May  4 12:08 openfire-4.0.2-1.i386.rpm
drwxr-xr-x. 2 root root        6 Apr 26 14:25 Pictures
drwxr-xr-x. 2 root root        6 Apr 26 14:25 Public
drwxrwxr-x. 2  402  402     4096 Jul 15  2008 sparkweb
-rwxrw-rw-. 1 root root   645375 May  4 14:35 sparkweb_0_9_0.tar.gz
drwxr-xr-x. 2 root root        6 Apr 26 14:25 Templates
drwxr-xr-x. 2 root root        6 Apr 26 14:25 Videos
Now move to the sparkweb directory and rename the SparkWeb.html file into index.html
[root@linuxhelp sparkweb]# ls -l
total 664
-rw-r--r--. 1 402 402   7948 Apr 28  2008 AC_OETags.js
-rw-r--r--. 1 402 402   3638 Apr 28  2008 favicon.ico
-rw-r--r--. 1 402 402   1272 Apr 28  2008 history.htm
-rw-r--r--. 1 402 402   1292 Apr 28  2008 history.js
-rw-r--r--. 1 402 402   2656 Apr 28  2008 history.swf
-rw-r--r--. 1 402 402   2518 Apr 28  2008 osxmousewheel.js
-rw-r--r--. 1 402 402    657 Apr 28  2008 playerProductInstall.swf
-rw-r--r--. 1 402 402  15151 Apr 29  2008 SparkWeb.html
-rw-r--r--. 1 402 402 629979 Apr 29  2008 SparkWeb.swf
[root@linuxhelp sparkweb]# mv SparkWeb.html index.html
[root@linuxhelp sparkweb]# ls -l
total 664
-rw-r--r--. 1 402 402   7948 Apr 28  2008 AC_OETags.js
-rw-r--r--. 1 402 402   3638 Apr 28  2008 favicon.ico
-rw-r--r--. 1 402 402   1272 Apr 28  2008 history.htm
-rw-r--r--. 1 402 402   1292 Apr 28  2008 history.js
-rw-r--r--. 1 402 402   2656 Apr 28  2008 history.swf
-rw-r--r--. 1 402 402  15151 Apr 29  2008 index.html
-rw-r--r--. 1 402 402   2518 Apr 28  2008 osxmousewheel.js
-rw-r--r--. 1 402 402    657 Apr 28  2008 playerProductInstall.swf
-rw-r--r--. 1 402 402 629979 Apr 29  2008 SparkWeb.swf
Open the index.html file and edit it.
[root@linuxhelp sparkweb]# vim index.html
Add the following entry by changing the server ip and xmlsocket
Entry:
server: " 192.168.5.88" ,
connectionType: " socket" ,
port: " 5222" ,
autoLogin: " false"           policyFileURL:" xmlsocket://192.168.15.47:5229"
Now save the file.
Now copy the entire ' sparkweb' directory inside the ' openfire webapp' directory.
[root@linuxhelp ~]# cp -r sparkweb /opt/openfire/plugins/admin/webapp/
@linuxhelp ~]# cd /opt/openfire/plugins/admin/webapp/
[root@linuxhelp webapp]# ls -l
total 32
-rw-r--r--. 1 daemon daemon 1150 Mar 21 23:27 favicon.ico
drwxr-xr-x. 2 daemon daemon 8192 May  5 13:42 images
-rw-r--r--. 1 daemon daemon  115 Mar 21 23:27 index.html
drwxr-xr-x. 4 daemon daemon 4096 May  5 13:42 js
drwxr-xr-x. 2 daemon daemon   28 May  5 13:42 setup
drwxr-xr-x. 2 root   root   4096 May  5 14:51 sparkweb
drwxr-xr-x. 2 daemon daemon   89 May  5 13:42 style
drwxr-xr-x. 5 daemon daemon 4096 May  5 13:42 WEB-INF
Now change the ownership for the sparkweb directory as daemon user and daemon group to make it executable for all user.
[root@linuxhelp webapp]# chmod -R 777 sparkweb
[root@linuxhelp webapp]# chown -R daemon:daemon sparkweb
[root@linuxhelp webapp]# ls -l
total 32
-rw-r--r--. 1 daemon daemon 1150 Mar 21 23:27 favicon.ico
drwxr-xr-x. 2 daemon daemon 8192 May  5 13:42 images
-rw-r--r--. 1 daemon daemon  115 Mar 21 23:27 index.html
drwxr-xr-x. 4 daemon daemon 4096 May  5 13:42 js
drwxr-xr-x. 2 daemon daemon   28 May  5 13:42 setup
drwxrwxrwx. 2 daemon daemon 4096 May  5 14:51 sparkweb
drwxr-xr-x. 2 daemon daemon   89 May  5 13:42 style
drwxr-xr-x. 5 daemon daemon 4096 May  5 13:42 WEB-INF
Open the ports ' 9090' and ' 5222' for our clients, by using ' iptables or firewall-cmd' command to allow your client to access the openfire server by using sparkweb.
[root@linuxhelp webapp]# firewall-cmd --permanent --add-port=9090/tcp
success
[root@linuxhelp webapp]# firewall-cmd --permanent --add-port=5222/tcp
success
[root@linuxhelp webapp]# firewall-cmd --reload
success
[root@linuxhelp webapp]# firewall-cmd --list-ports
5222/tcp 9090/tcp
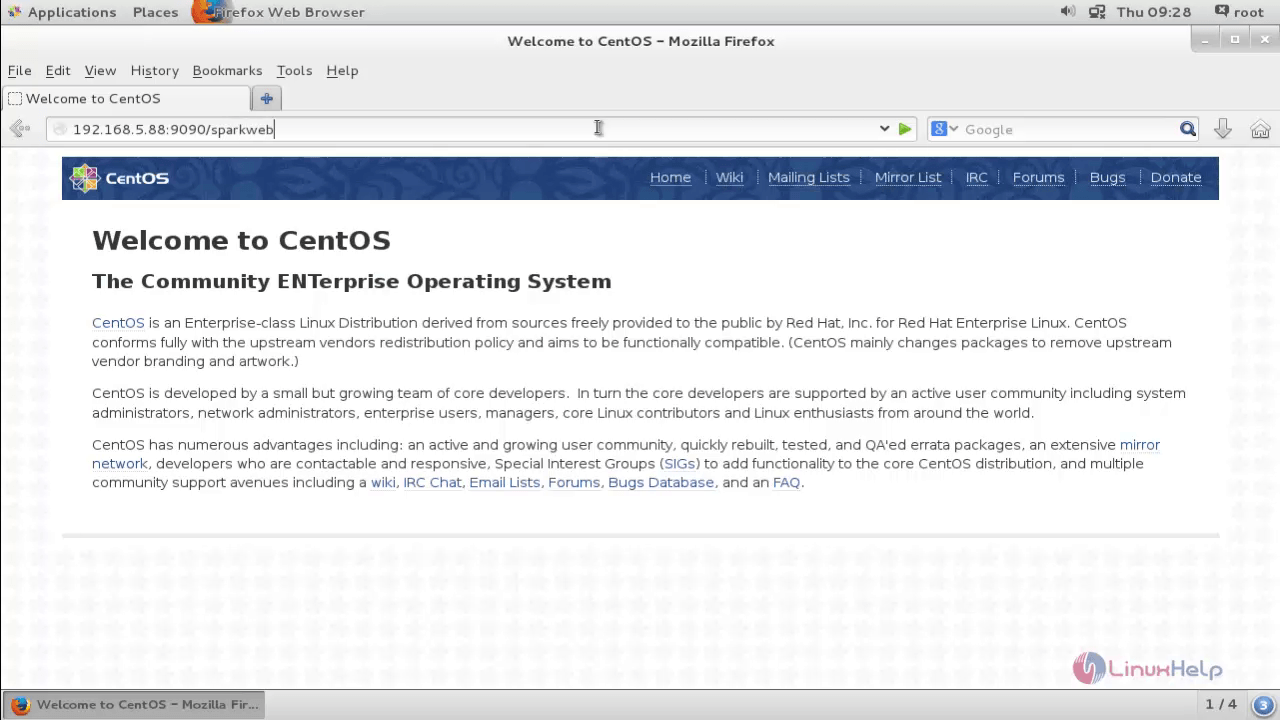
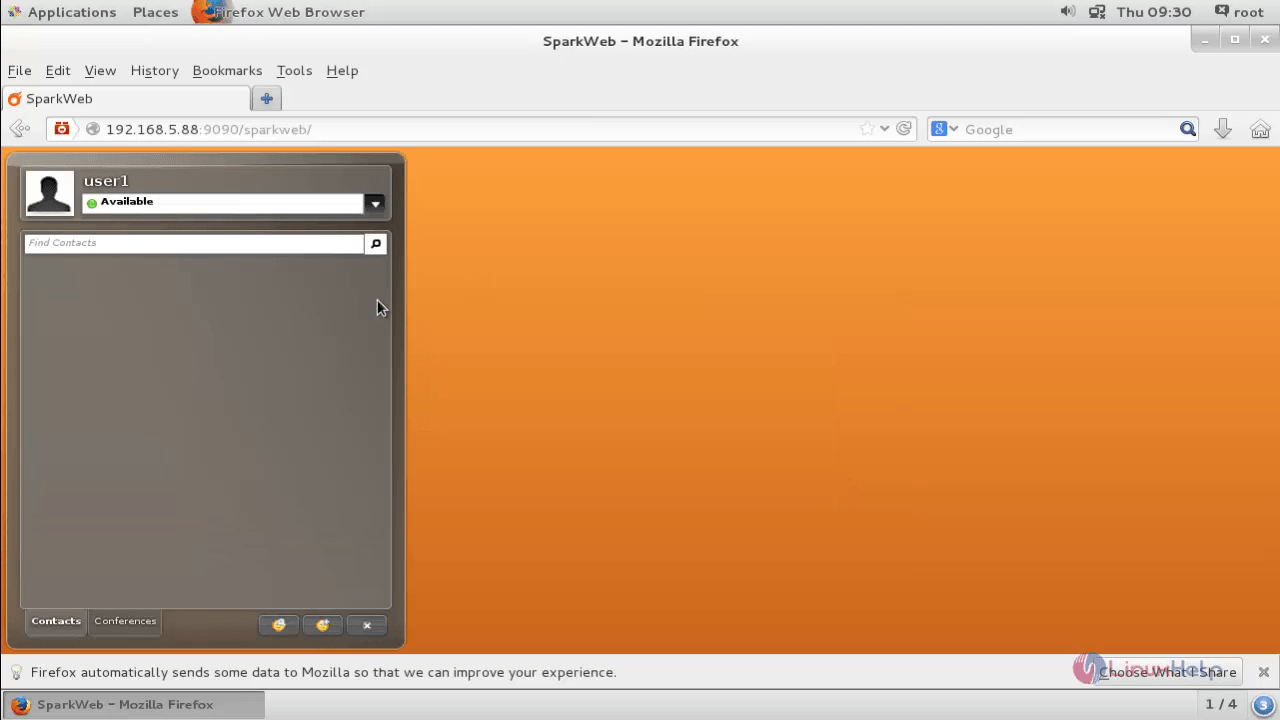
Now switch over to the client side and try to login using the: http://192.168.5.88:9090/sparkweb
Now enter your credentials with openfire server ip address to login to the chat server for instant messaging.
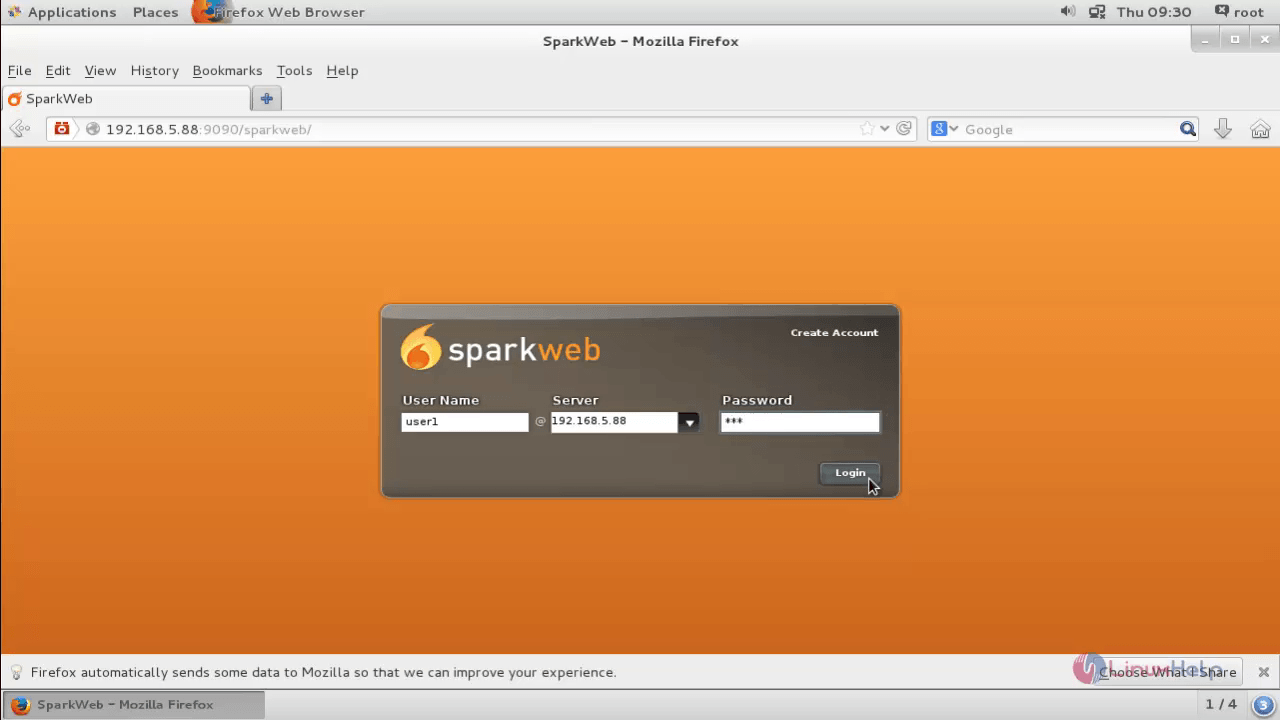
Login as new user and start chatting.
Comments ( 1 )