How to Install Eclipse 4.7 Oxygen on CentOS 7
To Install Eclipse 4.7 Oxygen on CentOS 7
Eclipse is a powerful IDE for various programming languages and is used to build JAVA based web applications. In this tutorial, we are going to cover the method to install Eclipse Oxygen 4.7 on CentOS 7 in an easy and simple manner.
Installing Eclipse 4.7 Oxygen
First, make sure have installed Java before you proceed with the installation of Eclipse. So, get the latest Java version.
[root@linuxhelp ~]# wget --no-cookies --no-check-certificate --header " Cookie: oraclelicense=accept-securebackup-cookie"   >    http://download.oracle.com/otn-pub/java/jdk/9.0.4+11/c2514751926b4512b076cc82f959763f/jdk-9.0.4_linux-x64_bin.tar.gz
-2018-02-09 15:32:31--  http://download.oracle.com/otn-pub/java/jdk/9.0.4+11/c2514751926b4512b076cc82f959763f/jdk-9.0.4_linux-x64_bin.tar.gz
Resolving download.oracle.com (download.oracle.com)... 23.211.208.37
Connecting to download.oracle.com (download.oracle.com)|23.211.208.37|:80... connected.
HTTP request sent, awaiting response... 302 Moved Temporarily
Location: https://edelivery.oracle.com/otn-pub/java/jdk/9.0.4+11/c2514751926b4512b076cc82f959763f/jdk-9.0.4_linux-x64_bin.tar.gz [following]
.
.
2018-02-09 15:38:53 (912 KB/s) - ‘ jdk-9.0.4_linux-x64_bin.tar.gz’  saved [354635831/354635831]
Once it is done, you need to extract the Java file by making use of the following command.
[root@linuxhelp ~]# tar zxf jdk-9.0.4_linux-x64_bin.tar.gz -C /usr/local
After extracting archive file use alternatives command to install it.
[root@linuxhelp ~]# cd /usr/local/jdk-9.0.4/
[root@linuxhelp jdk-9.0.4]# alternatives --install /usr/bin/java java /usr/local/jdk-9.0.4/bin/java 2
And then, you need to configure it.
[root@linuxhelp jdk-9.0.4]# alternatives --config java
There are 2 programs which provide ' java' .

Selection    Command
-----------------------------------------------
*+ 1           java-1.8.0-openjdk.x86_64 (/usr/lib/jvm/java-1.8.0-openjdk-1.8.0.131-11.b12.el7.x86_64/jre/bin/java)
2           /usr/local/jdk-9.0.4/bin/java

Enter to keep the current selection[+], or type selection number: 2
At this point, JAVA 9 has been successfully installed on your system. We also recommend to setup javac and jar commands path using alternatives commands in the following manner.
[root@linuxhelp jdk-9.0.4]# alternatives --install /usr/bin/jar jar /usr/local/jdk-9.0.4/bin/jar 2
[root@linuxhelp jdk-9.0.4]# alternatives --install /usr/bin/javac javac /usr/local/jdk-9.0.4/bin/javac 2
[root@linuxhelp jdk-9.0.4]# alternatives --set jar /usr/local/jdk-9.0.4/bin/jar
[root@linuxhelp jdk-9.0.4]# alternatives --set javac /usr/local/jdk-9.0.4/bin/javac
And once it is done, you need to check the installed version.
[root@linuxhelp jdk-9.0.4]# java -version
java version " 9.0.4"
Java(TM) SE Runtime Environment (build 9.0.4+11)
Java HotSpot(TM) 64-Bit Server VM (build 9.0.4+11, mixed mode)
Once it is done, you need to setup JAVA_HOME Variable as an environment variable.
[root@linuxhelp jdk-9.0.4]# export JAVA_HOME=/usr/local/jdk-9.0.4
You should also create a PATH Variable.
[root@linuxhelp jdk-9.0.4]# export PATH=$PATH:/usr/local/jdk-9.0.4/bin
Now, you can go on board with the download of Eclipse. You can do that from its official site: https://www.eclipse.org/downloads/eclipse-packages/?osType=linux& release=undefined
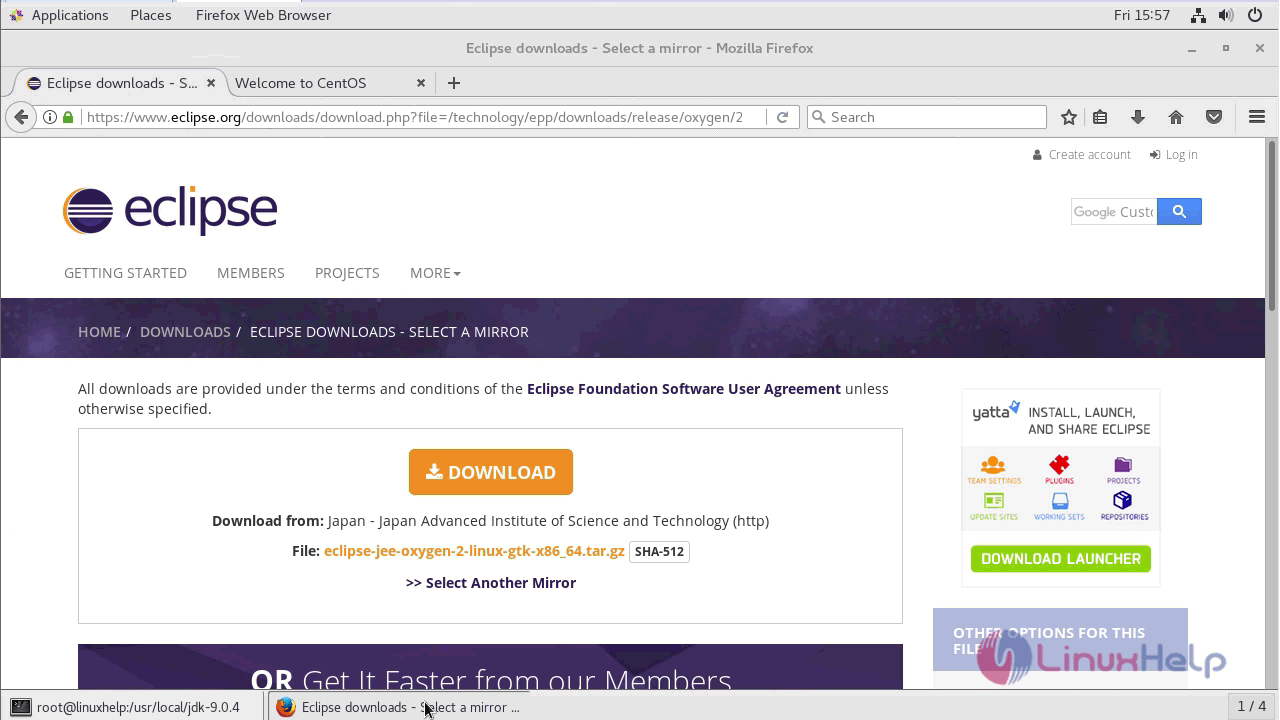
Once the file is downloaded, you need to extract the archive.
[root@linuxhelp Downloads]# tar -zxvf eclipse-jee-oxygen-2-linux-gtk-x86_64.tar.gz -C /usr/local/
eclipse/
eclipse/p2/
eclipse/p2/org.eclipse.equinox.p2.engine/
eclipse/p2/org.eclipse.equinox.p2.engine/profileRegistry/
eclipse/p2/org.eclipse.equinox.p2.engine/profileRegistry/epp.package.jee.profile/
eclipse/p2/org.eclipse.equinox.p2.engine/profileRegistry/epp.package.jee.profile/1513587876936.profile.gz
eclipse/p2/org.eclipse.equinox.p2.engine/profileRegistry/epp.package.jee.profile/.lock
eclipse/p2/org.eclipse.equinox.p2.engine/profileRegistry/epp.package.jee.profile/.data/
.
.
eclipse/configuration/org.eclipse.equinox.simpleconfigurator/bundles.info
eclipse/configuration/config.ini
eclipse/configuration/org.eclipse.update/
eclipse/configuration/org.eclipse.update/platform.xml
Now, for configuration, you need to create an eclipse binary symbolic link to make it accessible system-wide.
[root@linuxhelp Downloads]# ln -s /usr/local/eclipse/eclipse /usr/bin/eclipse
Type eclipse on command prompt to launch the Eclipse IDE. Follow the next step to create an Eclipse desktop launcher. The Eclipse IDE is accessible from the command line. In this step create a desktop launcher for the Eclipse. In this step simply create an eclipse.desktop file on your system at below location.
[root@linuxhelp Downloads]# vim /usr/share/applications/eclipse.desktop
And make the following modification.
[Desktop Entry]
Name=Eclipse
Comment=Eclipse IDE
Type=Application
Encoding=UTF-8
Exec=/usr/bin/eclipse
Icon=/usr/local/eclipse/icon.xpm
Categories=GNOME Application Development
Terminal=false
StartupNotify=true
~
~
~
~
~
~
" /usr/share/applications/eclipse.desktop"  10L, 212C     10,1          All
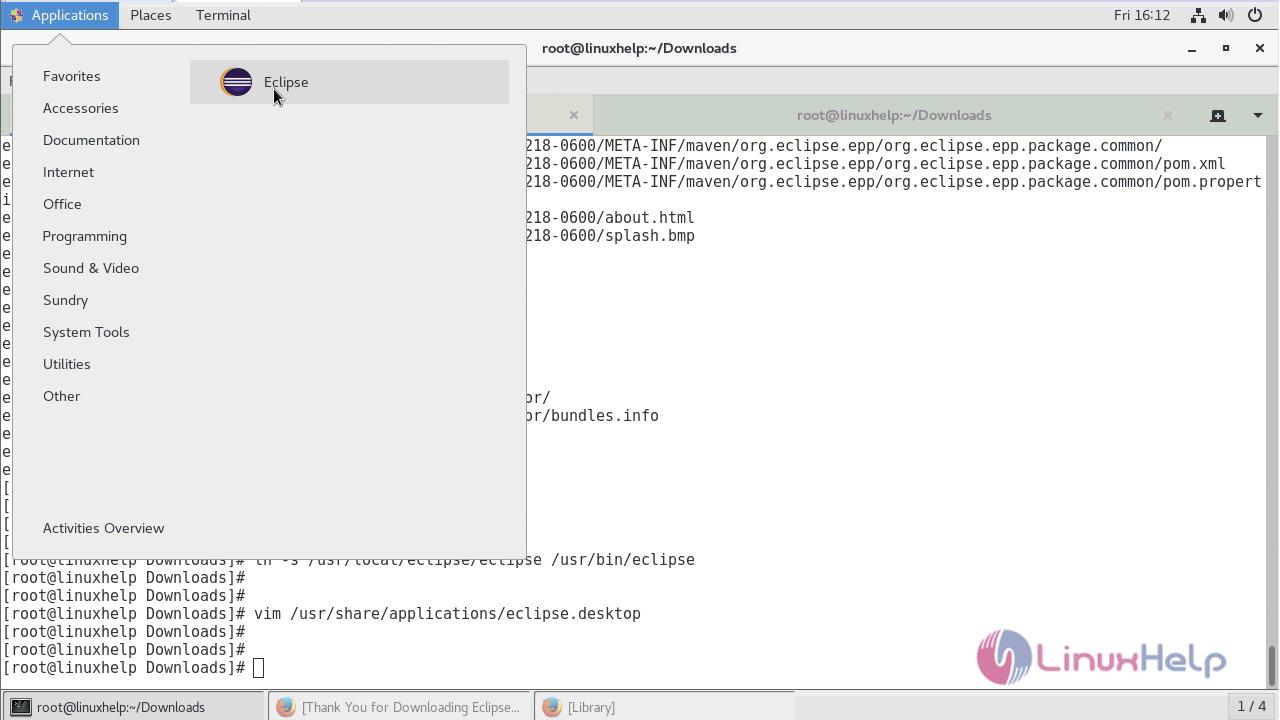
Now, you need to go to the application and choose Programming and then choose Eclipse.
With this, the installation of Eclipse comes to an end.
Comments ( 0 )
No comments available