How To Install GLPI Tool in Linux
To Install GLPI Tool with Fusion Inventory in Debian Linux
Installation and configuration of GLPI tool is discussed in this article. GLPI is an important information-resource management software which can be installed to track company resources. It has several commercial pieces of software such as LanSweeper, EasyVista and ManageEngine.
Features of GLPI
- Support for Fusion Inventory and OCS Inventory
- Computer peripherals inventory such as monitors, scanners, telephones, etc
- Hardware/Software inventory
- Network and printing hardware inventory
- Reporting to PDF, CSV, PNG, SVG, etc
- Help-desk Ticketing System
- SLA Management
- Change Management
- Project Management
To Install GLPI/Fusion Inventory Server
Install the Dependency packages like Apache2, MySQL, and some PHP using the Apt meta-packager.
root@linuxhelp:~# apt-get install apache2 mysql-server-5.5 php5 php5-mysql php5-gd -y
Reading package lists... Done
Building dependency tree
Reading state information... Done
The following extra packages will be installed:
  apache2-data apache2-utils libaio1 libapache2-mod-php5 libdbd-mysql-perl
  libdbi-perl libhtml-template-perl libmysqlclient18 libonig2 libqdbm14
  libterm-readkey-perl mysql-client-5.5 mysql-common mysql-server-core-5.5 php5-cli
  php5-common php5-json php5-readline
Suggested packages:
  apache2-doc apache2-suexec-pristine apache2-suexec-custom php-pear libclone-perl
  libmldbm-perl libnet-daemon-perl libsql-statement-perl libipc-sharedcache-perl
.
.
.
Creating config file /etc/php5/mods-available/readline.ini with new version
php5_invoke: Enable module readline for apache2 SAPI
php5_invoke: Enable module readline for cli SAPI
Processing triggers for systemd (215-17+deb8u4) ...
Processing triggers for libc-bin (2.19-18+deb8u4) ...
Processing triggers for libapache2-mod-php5 (5.6.20+dfsg-0+deb8u1) ...
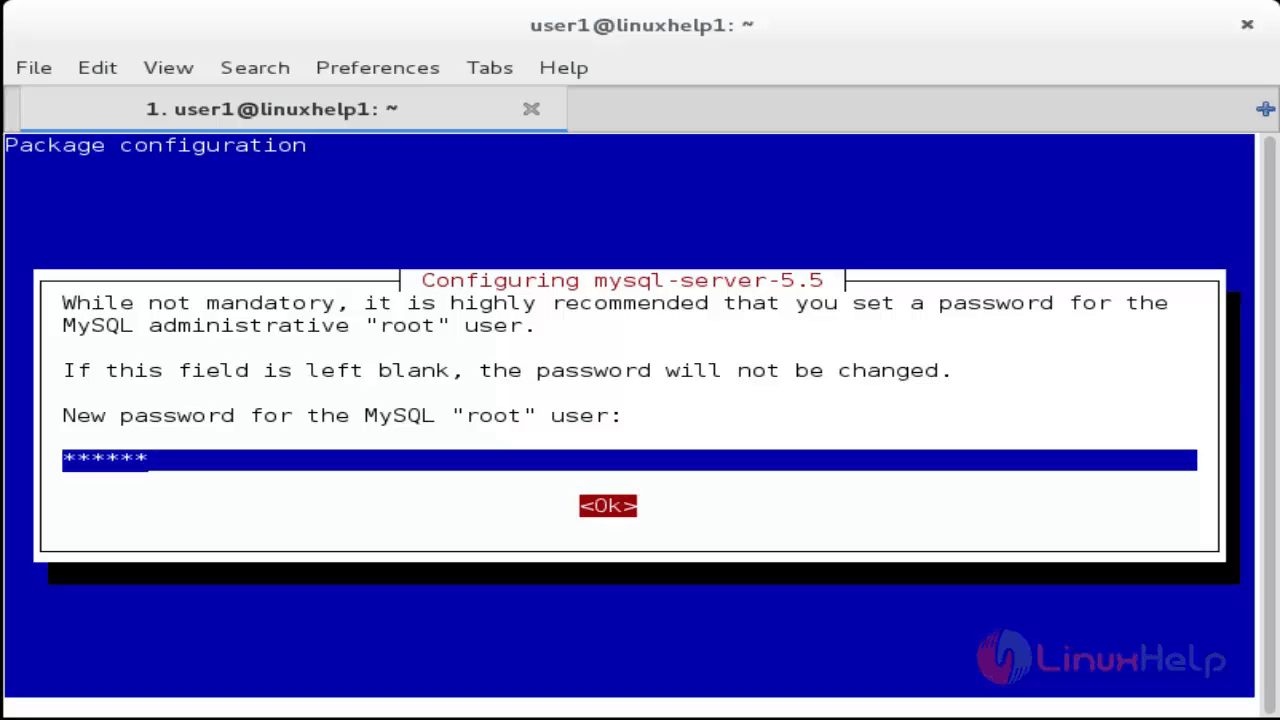
Install the necessary packages and start the basic services. Set the MySQL root password during MySQL installation.
Evaluate the system to see what services are listening on what ports with the help of ‘ lsof‘ utility.
root@linuxhelp:~# lsof -i :80
COMMAND  PID     USER   FD   TYPE DEVICE SIZE/OFF NODE NAME
apache2 9108     root    4u  IPv6  30922      0t0  TCP *:http (LISTEN)
apache2 9111 www-data    4u  IPv6  30922      0t0  TCP *:http (LISTEN)
apache2 9112 www-data    4u  IPv6  30922      0t0  TCP *:http (LISTEN)
apache2 9113 www-data    4u  IPv6  30922      0t0  TCP *:http (LISTEN)
apache2 9114 www-data    4u  IPv6  30922      0t0  TCP *:http (LISTEN)
apache2 9115 www-data    4u  IPv6  30922      0t0  TCP *:http (LISTEN)
root@linuxhelp:~# lsof -i :3306
COMMAND  PID    USER    FD   TYPE DEVICE SIZE/OFF NODE NAME
mysqld   7892   mysql    10u IPv4  28828      0t0  TCP localhost:mysql (LISTEN)
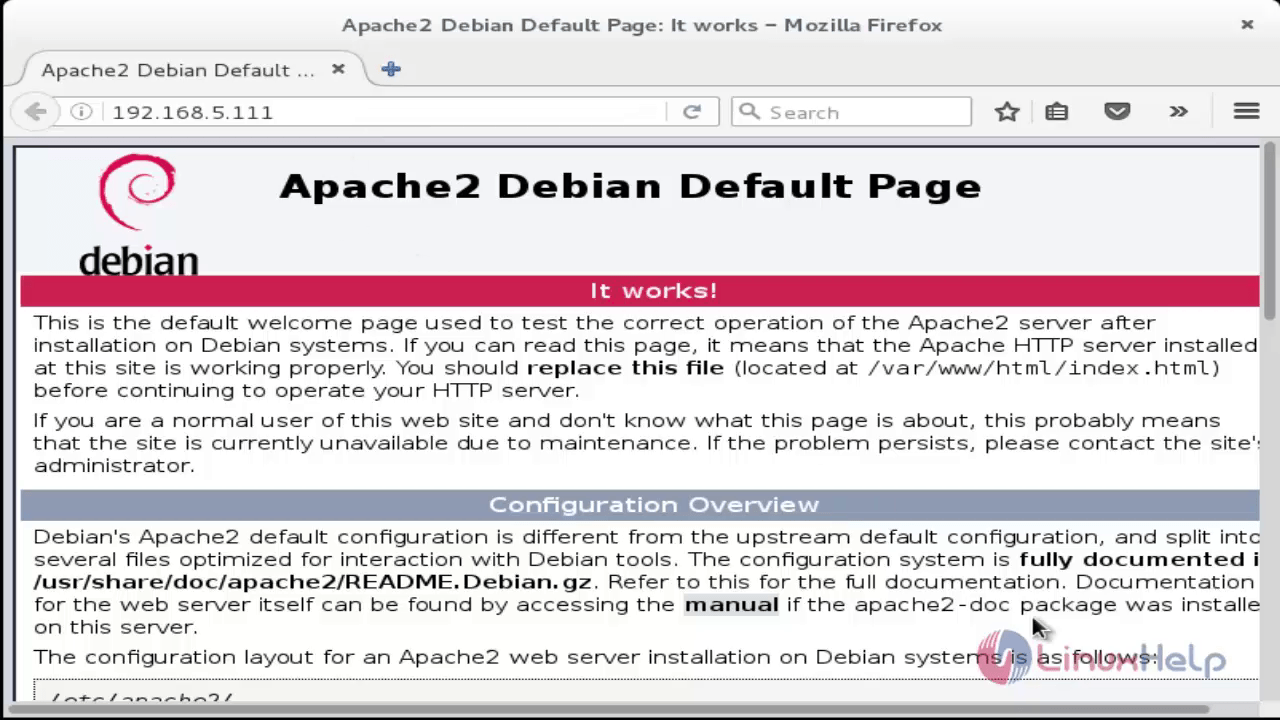
Alternate you can also open a web browser and navigate to http:/< IP_address> /. If Apache2 is working, it returns the “ default” Apache2 page.
First prepare the MySQL database and then configure Apache2 to GLPI server.
To Configure MySQL
Log into the MySQL command line interface using the ‘ mysql‘ command. Create a new MySQL user and assign them permissions to the ‘ glpi‘ database and grant all privileges for that database.
root@linuxhelp:~# mysql -u root -p
Enter password:
Welcome to the MySQL monitor.  Commands end with   or g.
Your MySQL connection id is 43
Server version: 5.5.49-0+deb8u1 (Debian)

Copyright (c) 2000, 2016, Oracle and/or its affiliates. All rights reserved.

Oracle is a registered trademark of Oracle Corporation and/or its
affiliates. Other names may be trademarks of their respective
owners.

Type ' help '  or ' h'  for help. Type ' c'  to clear the current input statement.

mysql>  create database glpi
Query OK, 1 row affected (0.00 sec)

mysql>  show databases
+--------------------+
| Database           |
+--------------------+
| information_schema |
| glpi               |
| mysql              |
| performance_schema |
+--------------------+
4 rows in set (0.00 sec)
mysql>  create user glpi@localhost
Query OK, 0 rows affected (0.00 sec)

mysql>  grant all privileges on glpi.* to glpi@localhost identified by ' linuxc'
Query OK, 0 rows affected (0.00 sec)

mysql>  flush privileges
Query OK, 0 rows affected (0.00 sec)

mysql>  exit
Bye
Now MySQL is ready and it' s time to obtain the GLPI software.
To Obtain and Prepare GLPI for Installation
Visit the project’ s home page and Download GLPI Software.
root@linuxhelp:~# wget -c http://forge.indepnet.net/attachments/download/2020/glpi-0.85.4.tar.gz
--2016-06-14 00:38:59--  https://forge.glpi-project.org/attachments/download/2020/glpi-0.85.4.tar.gz
Resolving forge.glpi-project.org (forge.glpi-project.org)... 185.10.252.133
Connecting to forge.glpi-project.org (forge.glpi-project.org)|185.10.252.133|:443... connected.
HTTP request sent, awaiting response... 200 OK
Length: 18044470 (17M) [application/x-gzip]
Saving to: ‘ glpi-0.85.4.tar.gz’

glpi-0.85.4.tar.gz    100%[==========================> ]  17.21M   149KB/s   in 2m 37s

2016-06-14 00:41:37 (112 KB/s) - ‘ glpi-0.85.4.tar.gz’  saved [18044470/18044470]
Extract all the contents into the ‘ /var/www/html/glpi‘ directory. And then run the chown command to change the owner and primary group ownership for all of the files in /var/www/html/glpi to www-data.
root@linuxhelp:~# tar xzf glpi-0.85.4.tar.gz
root@linuxhelp:~# mv glpi /var/www/html/
root@linuxhelp:~# chown -R www-data:www-data /var/www/html/glpi/
Apache2 will need to be reconfigured, to serve the newly extracted GLPI contents.
To Configure the Apache2 to serve GLPI
Switch to the Apache2 configuration directory located in ' /etc/apache2/sites-available' .
root@linuxhelp:~# cd /etc/apache2/sites-available/
The following command will copy the configuration of the default site into a new configuration file for GLPI.
root@linuxhelp:/etc/apache2/sites-available# cp 000-default.conf glpi.conf
Modify the new GLPI configuration file so that apache2 knows where the files to serve for GLPI reside. Now open the ' glpi.conf' with a text editor and proceed to configure.
root@linuxhelp:/etc/apache2/sites-available# nano glpi.conf
Add the following line to the glpi.conf file.
DocumentRoot /var/www/html/glpi
Apache2 has to use the new GLPI site. To accomplish this, we use the two tools a2ensite and a2dissite.
| a2dissite 000-default.conf | to disable the default website Apache2 serves. |
| a2ensite glpi.conf | to enable the newly created GLPI website configuration. |
| service apache2 reload | necessary for Apache2 to stop/start serving the above changes. |
root@linuxhelp:/etc/apache2/sites-available# a2dissite 000-default.conf
Site 000-default disabled.
To activate the new configuration
root@linuxhelp:/etc/apache2/sites-available# service apache2 reload
root@linuxhelp:/etc/apache2/sites-available# a2ensite glpi.conf
Enabling site glpi.
Now run the GLPI installer.
To Install and Configure the GLPI
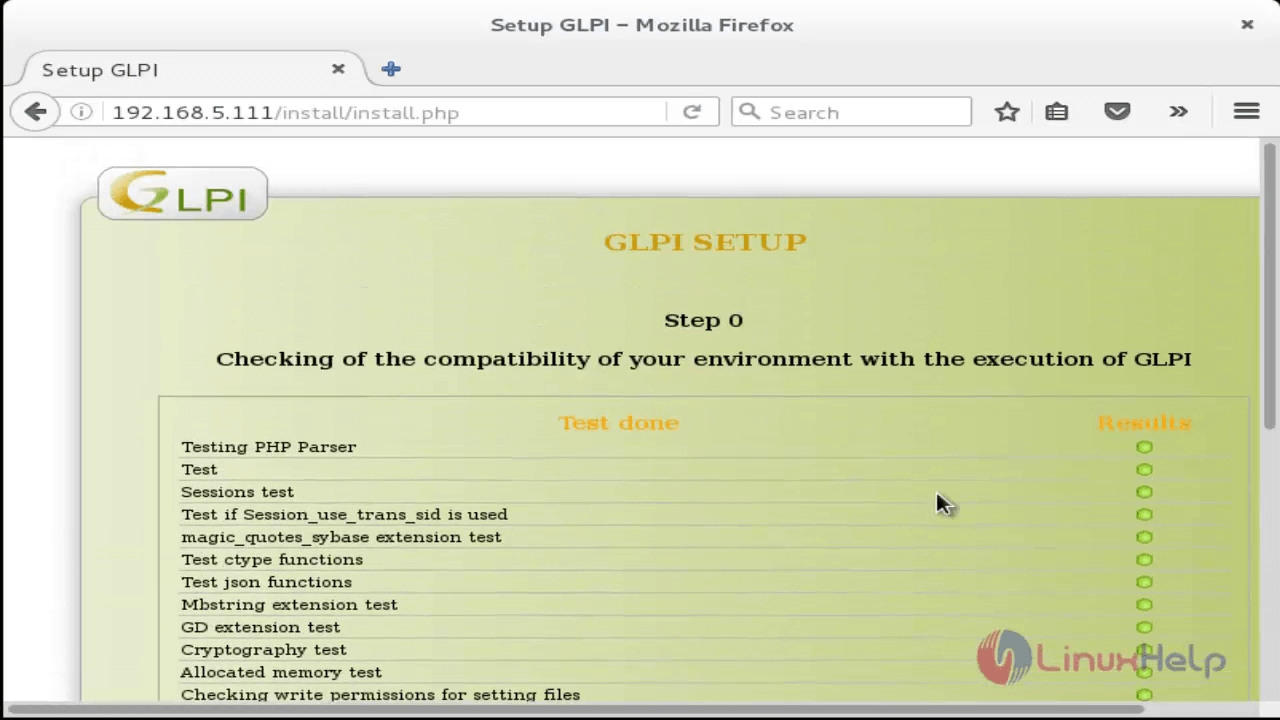
Navigate to http://< IP_address> /install/install.php to start the installation of Apache2.
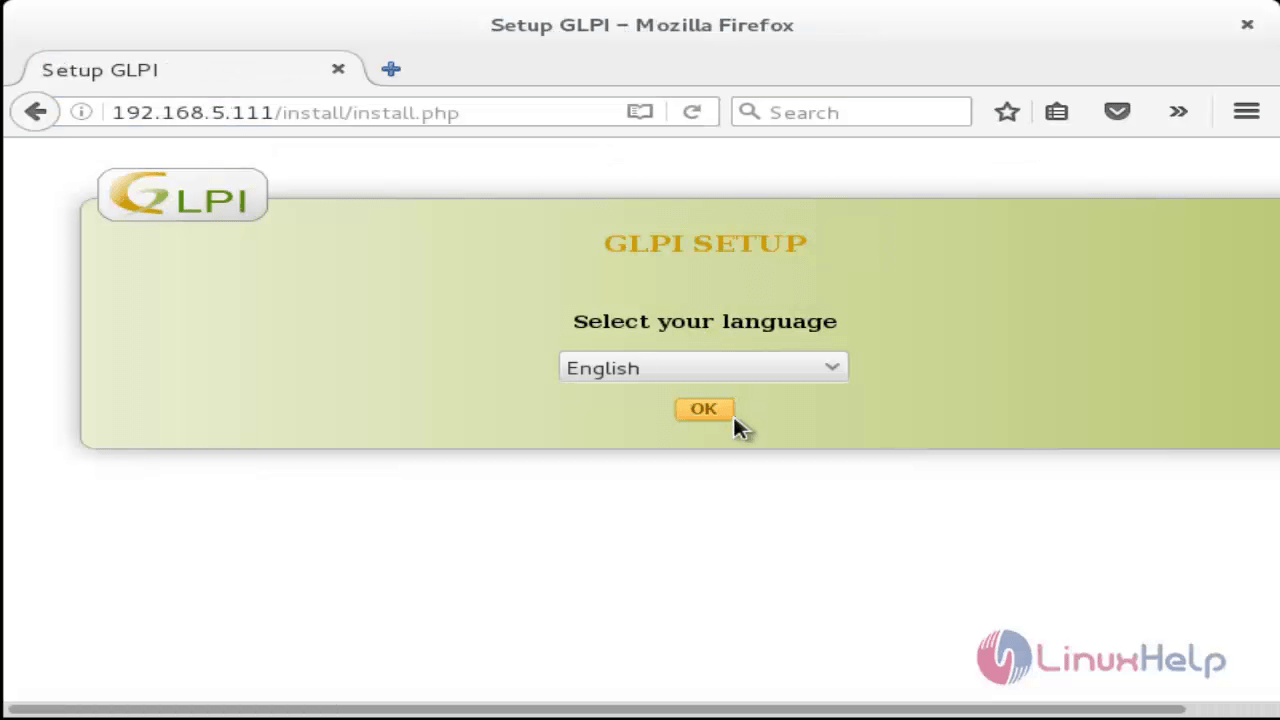
Select the appropriate language and click ‘ OK‘ . The next prompt will ask to upgrade or fresh installation.
Now it will check the dependency. Everything on next page should come back with a green checkbox. Re-Configure the server if anything shown in red checkbox.
When all the checkbox are green, inform the GLPI installer where the MySQL database is as well as the credentials to access the database.
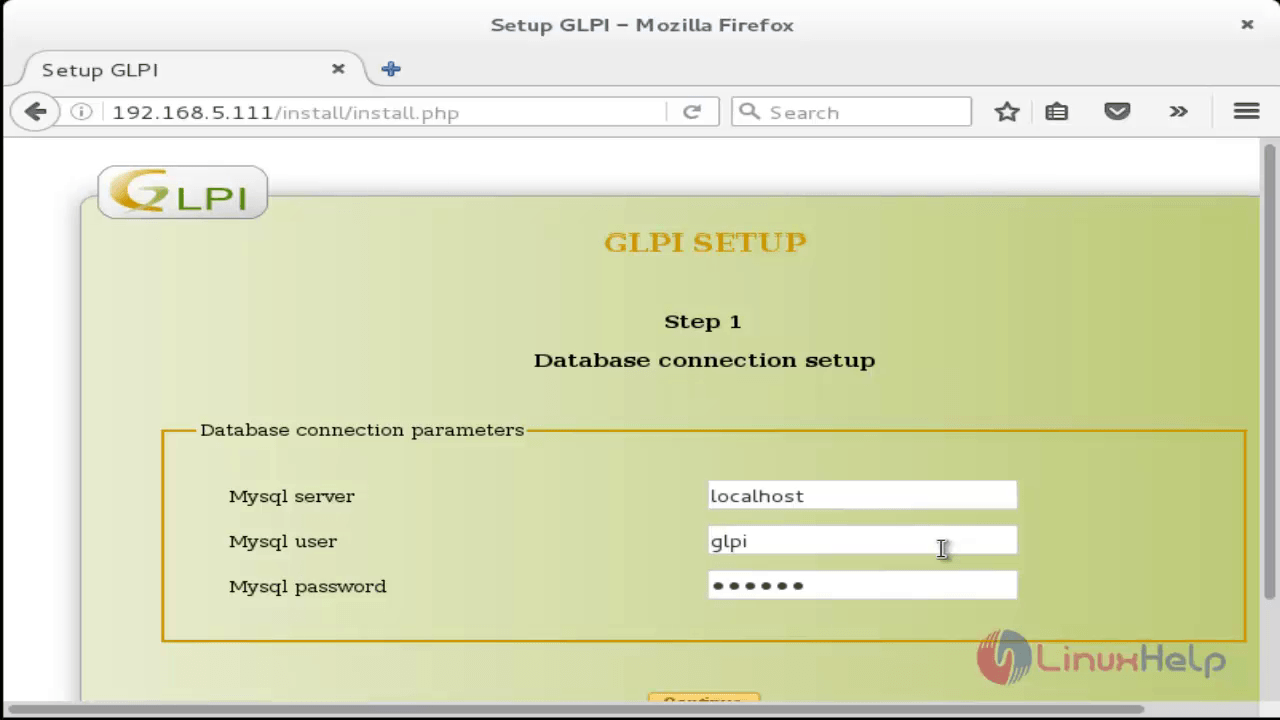
The server name of ‘ localhost‘ can be used in this example which is running from the same server as the MySQL server.
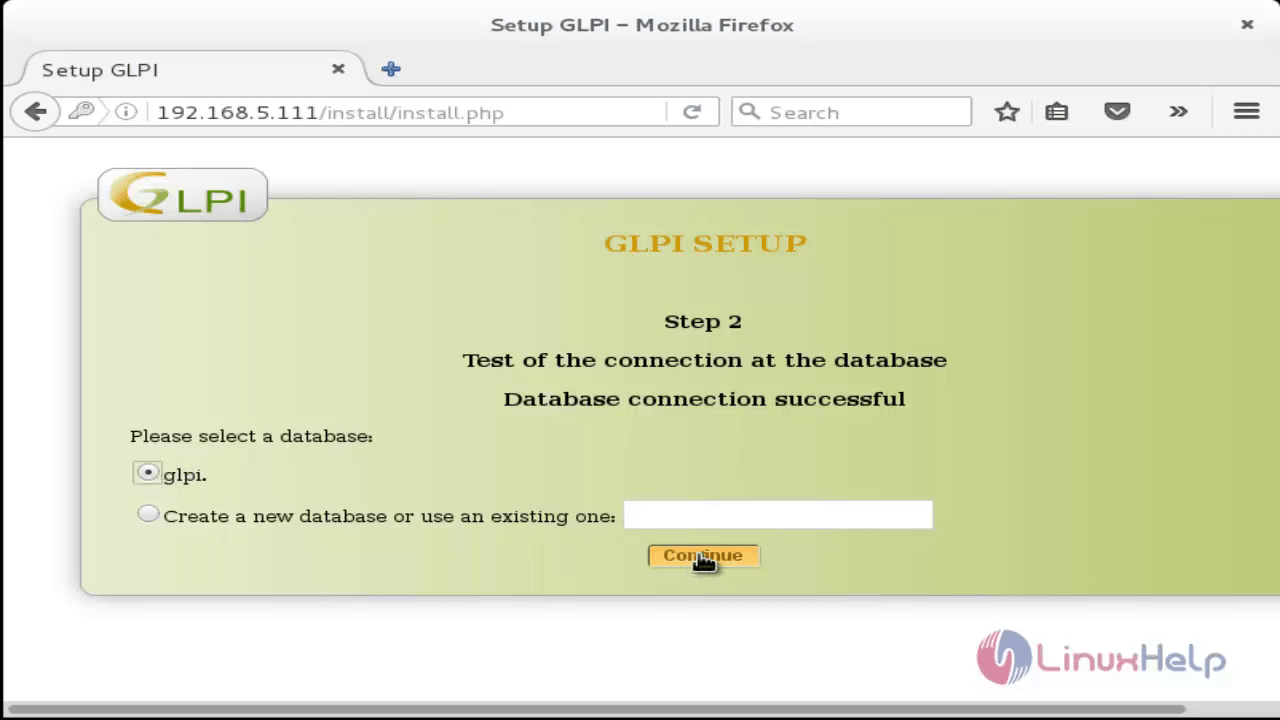
Now click continue after the three fields are filled. Then the GLPI installer will run a SQL check to make sure that it can make contact with the SQL database. Be sure to select that database in this step.
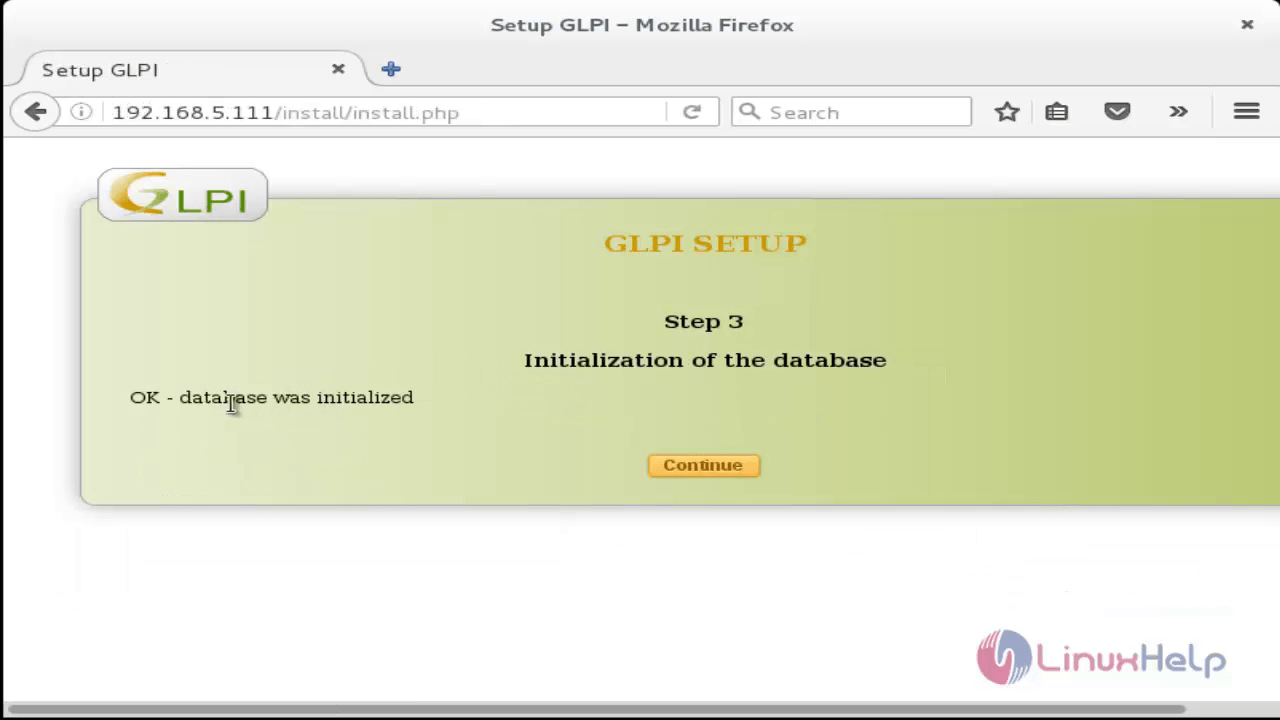
This process will take some time depending on the speed of the MySQL server. GLPI installer will show the default username/password page in the final page.
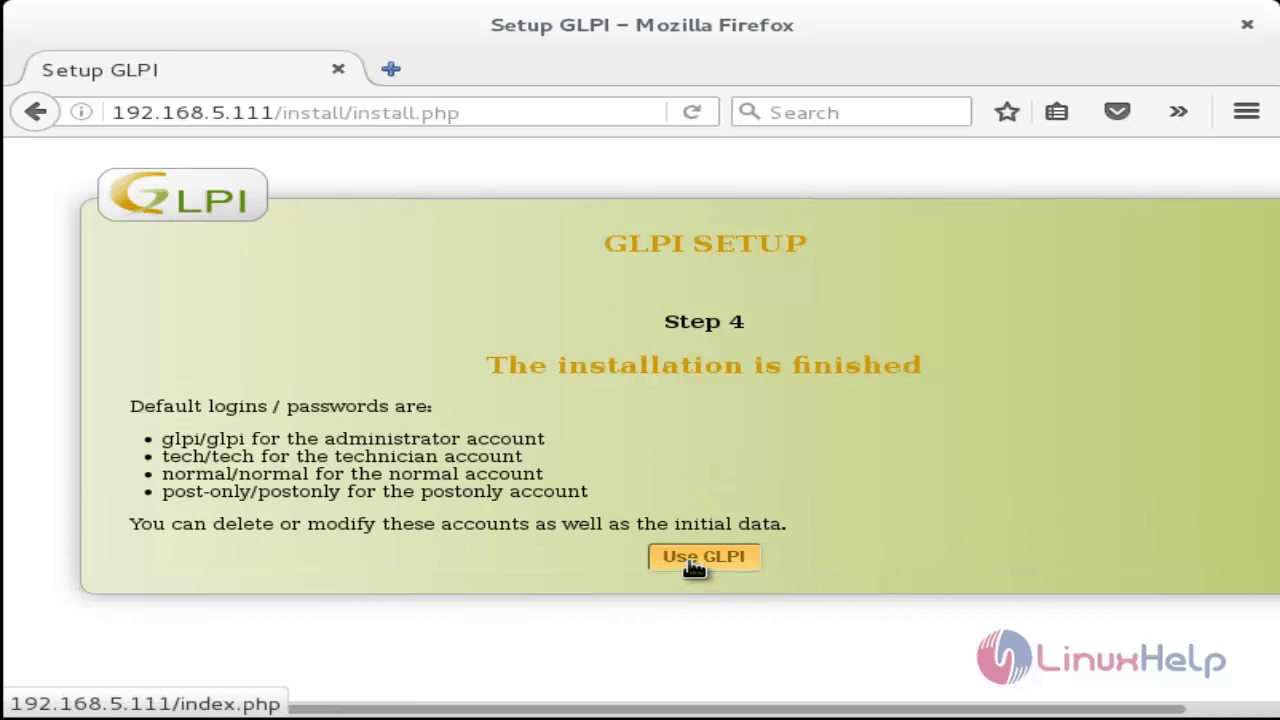
At this point, GLPI is ready for usage. Next, click the ' Use GLPI' button and log in as the administrator. After login into the GLPI, it will show some warnings about the user-name above having the default passwords configured.
Remove the installer file by running the following command on the Debian server.
root@linuxhelp:~# rm /var/www/html/glpi/install/install.php
Now the users can start adding inventory, creating tickets, creating a document library and many other tasks.
To Install and Configure Fusion Inventory
Add the Fusion Inventory plug-in while the GLPI is running. The Fusion Inventory plugin can be obtained with another wget command.
root@linuxhelp:~# cd /var/www/html/glpi/plugins/
root@linuxhelp:/var/www/html/glpi/plugins# wget -c http://forge.fusioninventory.org/attachments/download/1755/fusioninventory-for-glpi_0.85+1.1.tar.gz
--2016-06-14 00:53:31-- http://forge.fusioninventory.org/attachments/download/1755/fusioninventory-for-glpi_0.85+1.1.tar.gz
Resolving forge.fusioninventory.org (forge.fusioninventory.org)... 93.93.45.68
Connecting to forge.fusioninventory.org (forge.fusioninventory.org)|93.93.45.68|:80... connected.
HTTP request sent, awaiting response... 200 OK
Length: unspecified [application/x-gzip]
Saving to: ‘ fusioninventory-for-glpi_0.85+1.1.tar.gz’

fusioninventory-for-g [ < =>  ] 7.00M 153KB/s in 44s

2016-06-14 00:54:15 (163 KB/s) - ‘ fusioninventory-for-glpi_0.85+1.1.tar.gz’  saved [7339693]
After the Fusion Inventory is downloaded, the contents of the tarball is extracted and change the ownership for Apache2.
root@linuxhelp:/var/www/html/glpi/plugins# tar xzf fusioninventory-for-glpi_0.85+1.1.tar.gz
root@linuxhelp:/var/www/html/glpi/plugins# chown -R www-data:www-data fusioninventory
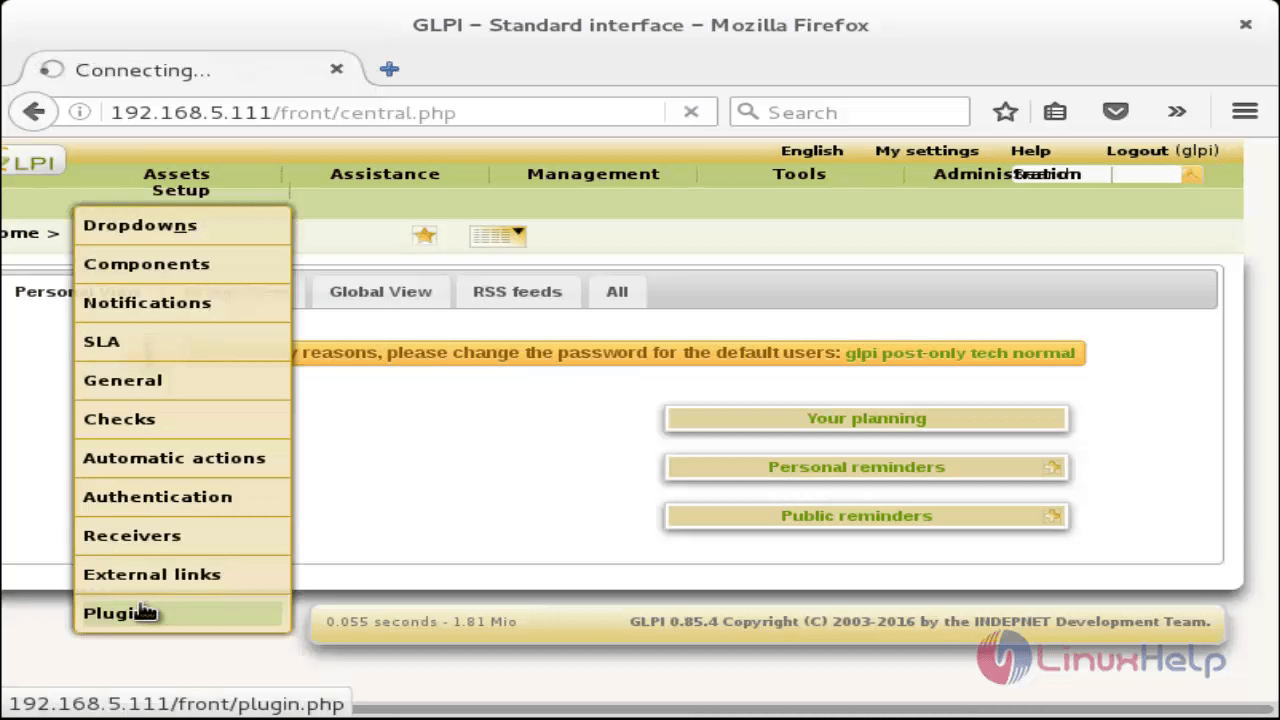
At this point all of the files are ready for GLPI to install the Fusion Inventory module. Next, go to the second computer and log-in to GLPI. In the top of the screen, several menu options will display. In the Setup dropdown option at the bottom will be a ‘ plug-ins‘ option.
This page will show the pending plug-ins to be installed.
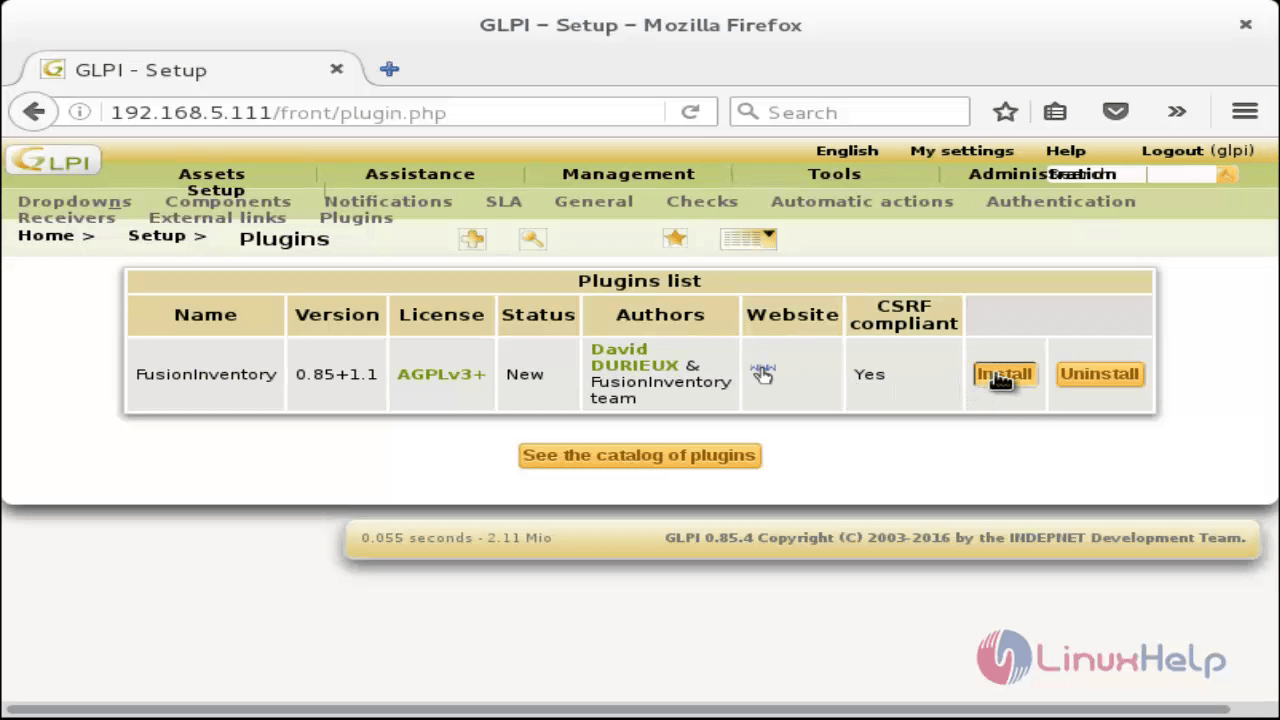
Hit the ‘ Install‘ button to install Fusion Inventory into GLPI. Refresh the page and enable the Fusion Inventory by clicking the newly visible ‘ enable‘ button.
Here the ' Status' field for Fusion will say ‘ Installed/not activated‘ until the ‘ Enable‘ button is selected.
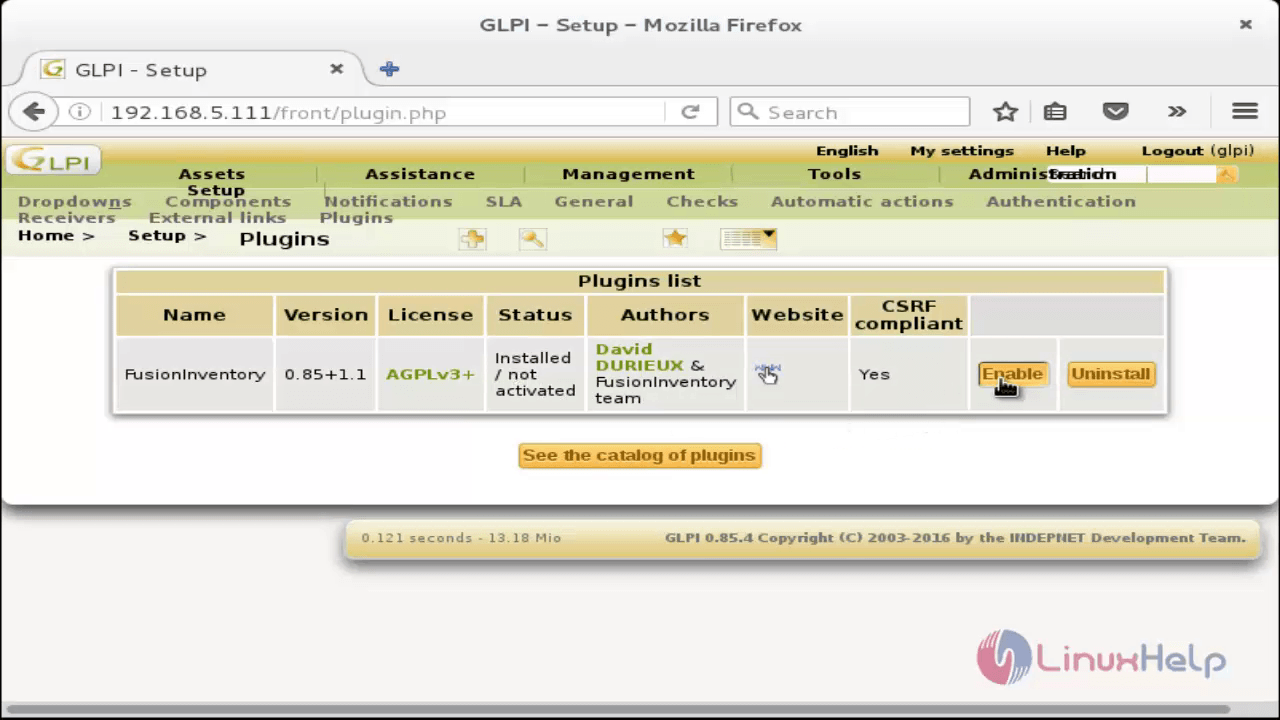
Once the ‘ Enable‘ button is selected, the Fusion Inventory plug-in will be activated and ready for configuration.
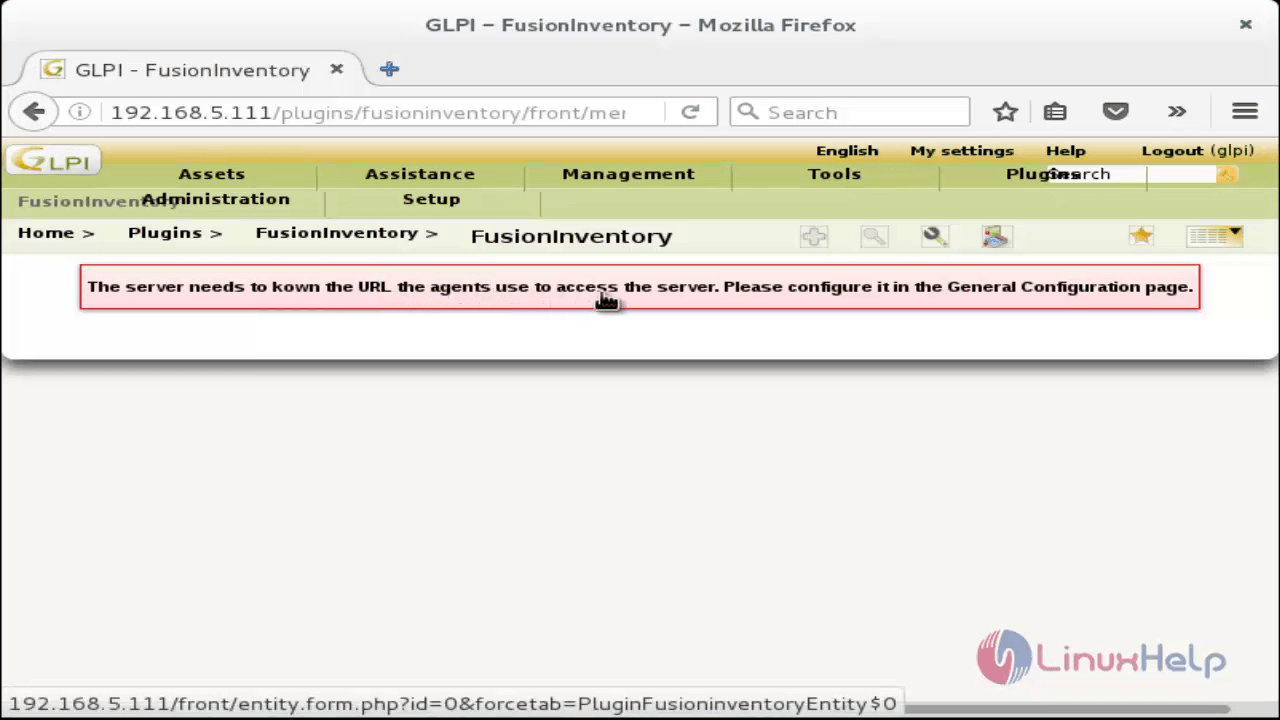
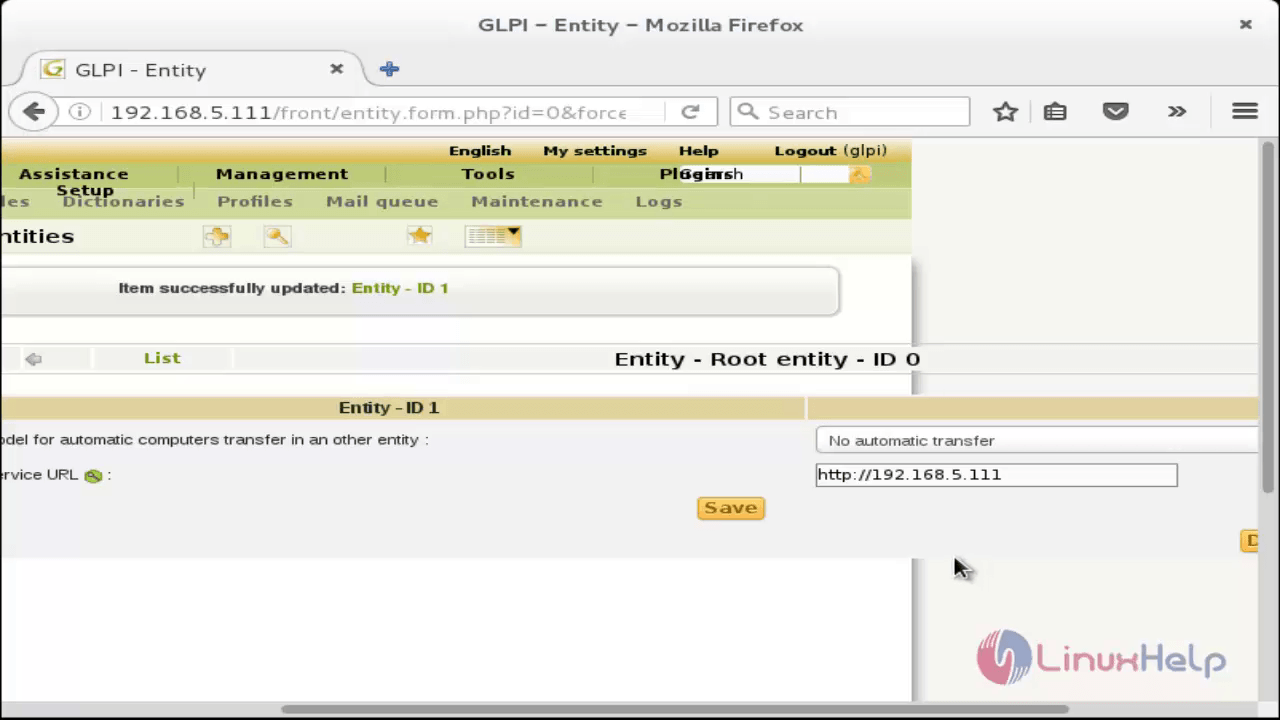
To fix the error over the ‘ Administration‘ menu option, select the ‘ Entities‘ dialog when the drop down menu. When page loads, select ‘ Root Entity‘ and then on the left side of the webpage finally select the ‘ FusionInventory‘ selection.
Finally, GLPI and Fusion are ready to go. Now start importing inventory into the system.
To Install Fusion Inventory Agent
Install the ' fusioninventory-agent' by executing the following command. This will install all the necessary dependencies as well as the necessary configuration file for Fusion Inventory.
root@linuxhelp:~# apt-get install fusioninventory-agent
Reading package lists... Done
Building dependency tree
Reading state information... Done
The following extra packages will be installed:
hdparm libcommon-sense-perl libfile-which-perl libjson-perl libjson-xs-perl
libnet-cups-perl libnet-ip-perl libparse-edid-perl libproc-daemon-perl
libproc-pid-file-perl libproc-processtable-perl libsocket-getaddrinfo-perl
libuniversal-require-perl libxml-treepp-perl libyaml-libyaml-perl libyaml-perl
powermgmt-base
Suggested packages:
smartmontools read-edid apmd libyaml-shell-perl
.
.
.
Setting up libxml-treepp-perl (0.39-1) ...
Setting up libyaml-libyaml-perl (0.41-6) ...
Setting up libyaml-perl (1.13-1) ...
Setting up powermgmt-base (1.31+nmu1) ...
Setting up fusioninventory-agent (1:2.3.10.1-1) ...
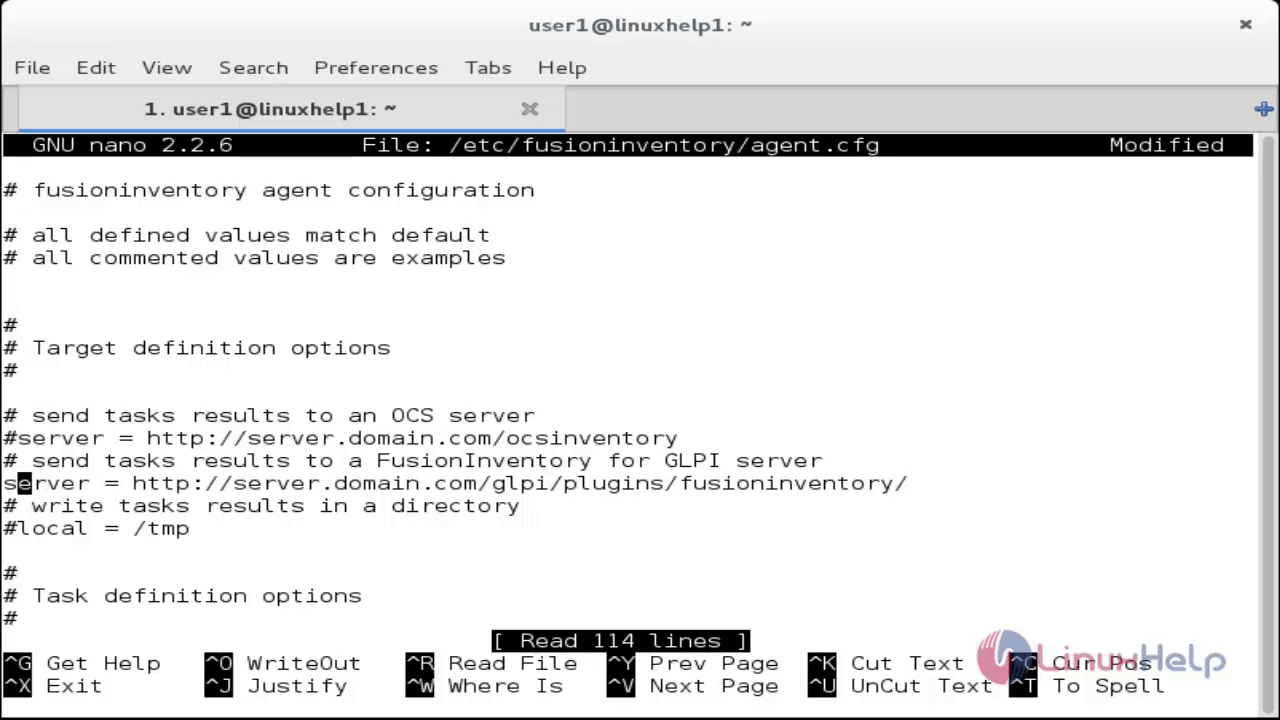
Modify the configuration file in order to tell the agent where the Fusion server resides. The configuration file is located at ‘ /etc/fusioninventory/agent.cfg‘ .
root@linuxhelp:~# nano /etc/fusioninventory/agent.cfg
To get a machine inventoried, change the particular file and that is the ' server =' line.
For example the server line should be configured as follows.
Run the agent using the ' fusioninventory-agent' command. After running this command, the command line returns to the normal prompt and check the GLPI/Fusion to see if the machine was inventoried.
root@linuxhelp:~# fusioninventory-agent
[info] ESX support disabled server side.
[info] task WakeOnLan execution not requested
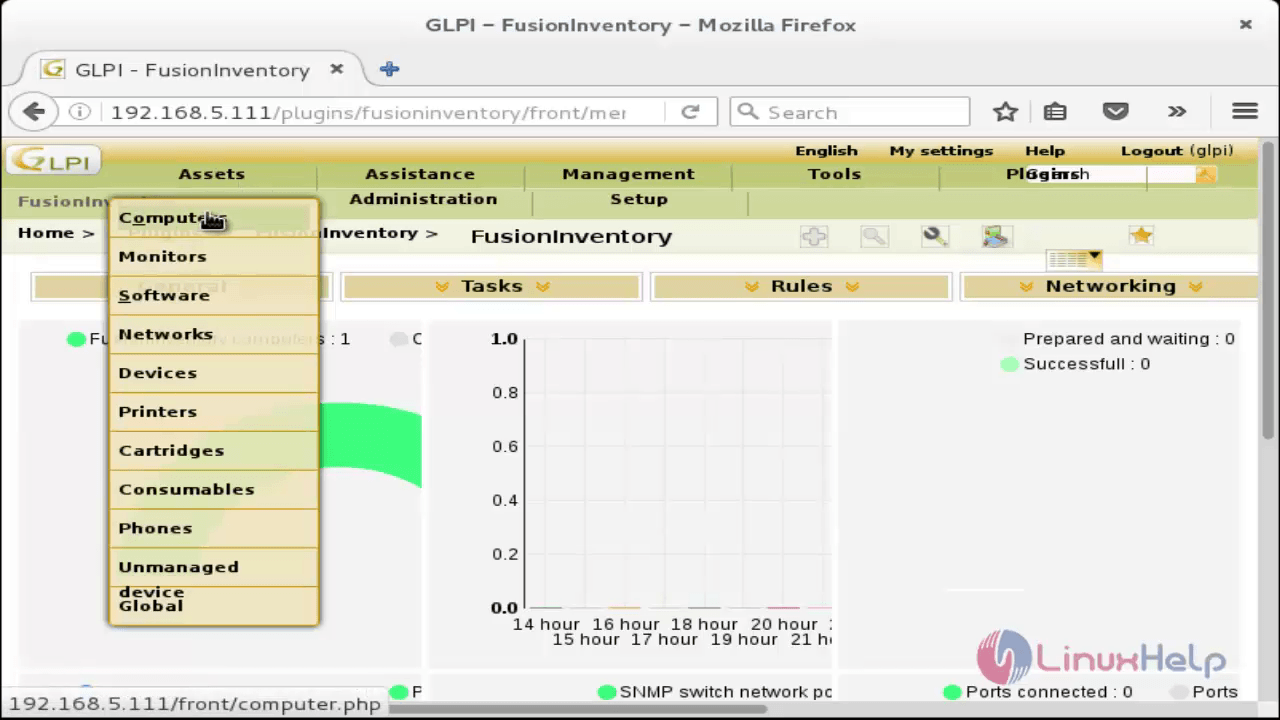
To check whether the client actually connected to the server, click on the following menu options: Plugins - FusionInventory - Agent.
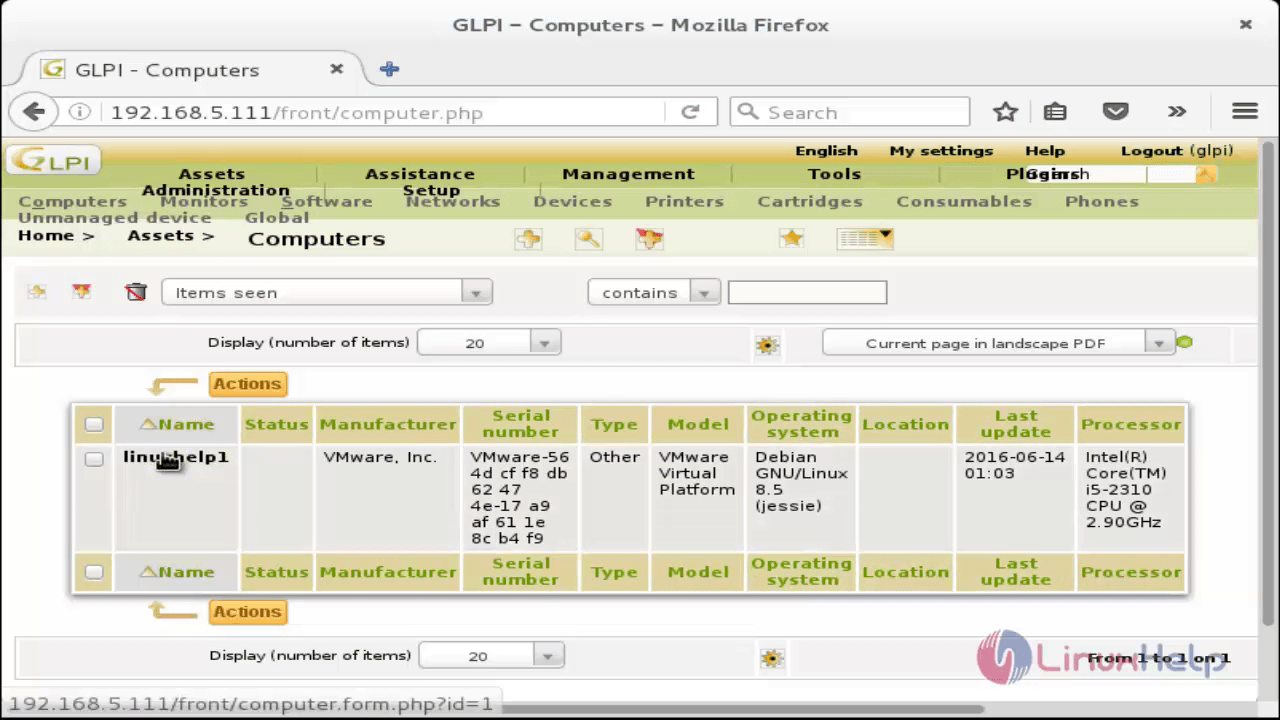
This page shows the Fusion Inventory agent successfully connected to the server from the Linux Mint machine. To access the menu, simply go to ‘ Assets‘ menu in the top left of the web browser and then select ‘ computers‘ when the drop down menu appears.
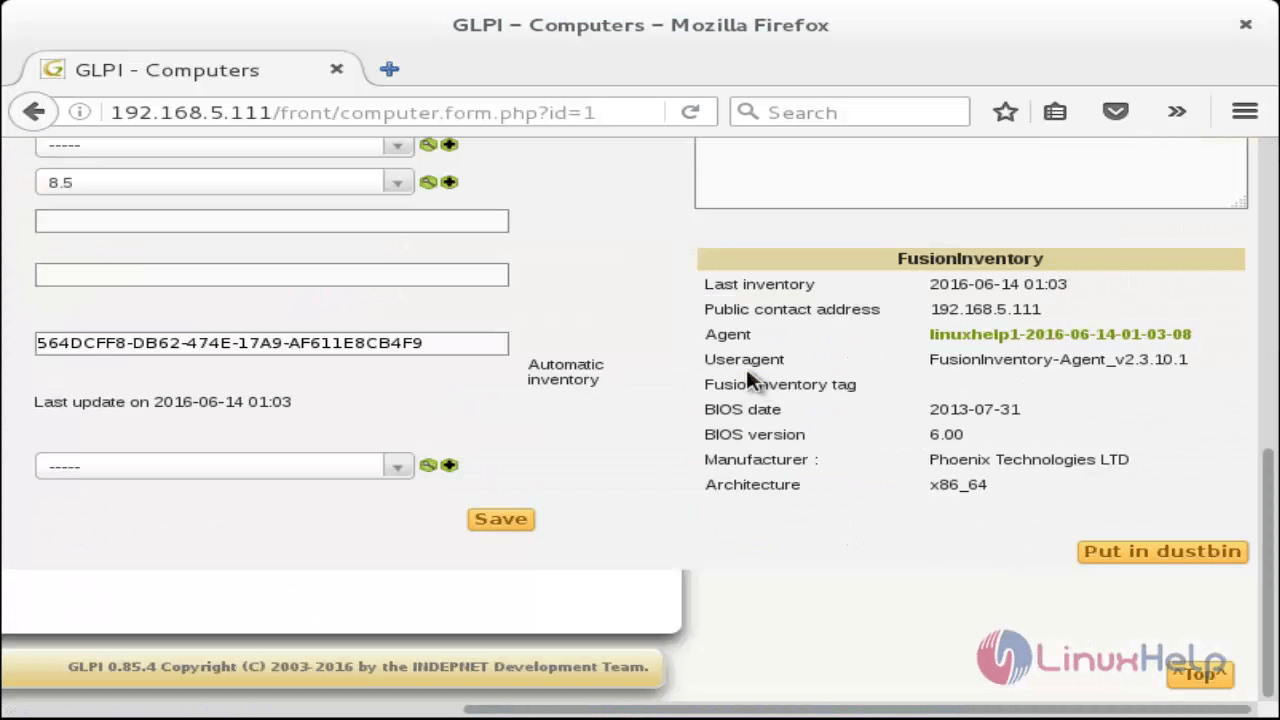
To view more complex details about this machine, click on the Name of the Machine in the left column.
Comments ( 0 )
No comments available