How to install Laravel with Nginx on CentOS 6.8
How to install Laravel with Nginx on CentOS 6.8
Laravel is a free and open source PHP web framework used to develop web applications. It follows the Model-View-Controller (MVC) architecture pattern. It supports modular packaging system with a dedicated dependency manager, different ways for accessing relational databases. This tutorial covers the installation procedure of Laravel with Nginx on CentOS.
Installation procedure
To start the installation procedure, Laravel requires the LAMP or LEMP environment to run the application.
To Setup Nginx
To setup Nginx, install and enable epel repository for Nginx and press y to continue with the installation.
[root@linuxhelp ~]# yum install epel-release -y
Loaded plugins: fastestmirror, refresh-packagekit, security
Setting up Install Process
Loading mirror speeds from cached hostfile
 * base: mirror.fibergrid.in
 * extras: mirror.fibergrid.in
 * updates: mirror.fibergrid.in
Resolving Dependencies
-->  Running transaction check
--->  Package epel-release.noarch 0:6-8 will be installed
-->  Finished Dependency Resolution
.
.
.
Running rpm_check_debug
Running Transaction Test
Transaction Test Succeeded
Running Transaction
  Installing : epel-release-6-8.noarch                                                                                                                                                                          1/1
  Verifying  : epel-release-6-8.noarch                                                                                                                                                                          1/1
Installed:
  epel-release.noarch 0:6-8
Complete!
Now install Nginx using the following command and press y to continue.
[root@linuxhelp ~]# yum install nginx -y
Loaded plugins: fastestmirror, refresh-packagekit, security
Setting up Install Process
Loading mirror speeds from cached hostfile
 * base: mirror.fibergrid.in
 * epel: epel.mirror.angkasa.id
 * extras: mirror.fibergrid.in
 * updates: mirror.fibergrid.in
Resolving Dependencies
-->  Running transaction check
--->  Package nginx.x86_64 0:1.10.2-1.el6 will be installed
-->  Processing Dependency: nginx-filesystem = 1.10.2-1.el6 for package: nginx-1.10.2-1.el6.x86_64
-->  Processing Dependency: nginx-all-modules = 1.10.2-1.el6 for package: nginx-1.10.2-1.el6.x86_64
-->  Processing Dependency: nginx-filesystem for package: nginx-1.10.2-1.el6.x86_64
-->  Running transaction check
--->  Package nginx-all-modules.noarch 0:1.10.2-1.el6 will be installed
-->  Processing Dependency: nginx-mod-stream = 1.10.2-1.el6 for package: nginx-all-modules-1.10.2-1.el6.noarch
.
.
.
nginx-all-modules.noarch 0:1.10.2-1.el6              nginx-filesystem.noarch 0:1.10.2-1.el6
  nginx-mod-http-geoip.x86_64 0:1.10.2-1.el6      nginx-mod-http-image-filter.x86_64 0:1.10.2-1.el6      nginx-mod-http-perl.x86_64 0:1.10.2-1.el6            nginx-mod-http-xslt-filter.x86_64 0:1.10.2-1.el6
  nginx-mod-mail.x86_64 0:1.10.2-1.el6            nginx-mod-stream.x86_64 0:1.10.2-1.el6
Complete!
Start and enable the Nginx service by executing the following command.
[root@linuxhelp ~]# service nginx start
Starting nginx:                                            [  OK  ]
[root@linuxhelp ~]# chkconfig nginx on
To Setup PHP 5.6
The Laravel needs PHP version 5.6 to run the application. Use the below command to install remi repository.
[root@linuxhelp ~]# wget http://rpms.famillecollet.com/enterprise/remi-release-6.rpm
--2017-04-24 23:43:18--  http://rpms.famillecollet.com/enterprise/remi-release-6.rpm
Resolving rpms.famillecollet.com... 195.154.241.117, 2001:bc8:33a1:100::1
Connecting to rpms.famillecollet.com|195.154.241.117|:80... connected.
HTTP request sent, awaiting response... 200 OK
Length: 8344 (8.1K) [application/x-rpm]
Saving to: “ remi-release-6.rpm”
100%[==========================================================================================================================================================================> ] 8,344       8.04K/s   in 1.0s
2017-04-24 23:43:19 (8.04 KB/s) - “ remi-release-6.rpm”  saved [8344/8344]
Now install the RPM package by executing the following command.
[root@linuxhelp ~]# rpm -Uvh remi-release-6*.rpm
warning: remi-release-6.rpm: Header V4 DSA/SHA1 Signature, key ID 00f97f56: NOKEY
Preparing...                ########################################### [100%]
   1:remi-release           ########################################### [100%]
Then goto /etc/yum.repos.d/ directory to enable remi repository. Edit remi.repo file and enable remi’ s main repository and the enable remi56 repository in order to install PHP version 5.6
[root@linuxhelp ~]# cd /etc/yum.repos.d/
[root@linuxhelp yum.repos.d]# ll
total 52
-rw-r--r--. 1 root root 1991 May 19  2016 CentOS-Base.repo
-rw-r--r--. 1 root root  647 May 19  2016 CentOS-Debuginfo.repo
-rw-r--r--. 1 root root  289 May 19  2016 CentOS-fasttrack.repo
-rw-r--r--. 1 root root  630 May 19  2016 CentOS-Media.repo
-rw-r--r--. 1 root root 6259 May 19  2016 CentOS-Vault.repo
-rw-r--r--. 1 root root  957 Nov  5  2012 epel.repo
-rw-r--r--. 1 root root 1056 Nov  5  2012 epel-testing.repo
-rw-r--r--. 1 root root  457 Feb 10 18:57 remi-php54.repo
-rw-r--r--. 1 root root 1316 Feb 10 18:57 remi-php70.repo
-rw-r--r--. 1 root root 1316 Feb 10 18:57 remi-php71.repo
-rw-r--r--. 1 root root 2609 Feb 10 18:57 remi.repo
-rw-r--r--. 1 root root  751 Feb 10 18:57 remi-safe.repo
[root@linuxhelp yum.repos.d]# vim remi.repo
Change value enabled = 1 for [remi] and [remi56] section on remi.repo file
Now use the below command to install PHP and PHP extensions.
[root@linuxhelp yum.repos.d]# yum install php php-fpm php-opcache php-devel php-mbstring php-mcrypt php-mysql php-mysqlnd php-phpunit-PHPUnit php-pecl-xdebug php-pecl-xhprof -y
Loaded plugins: fastestmirror, refresh-packagekit, security
Setting up Install Process
Loading mirror speeds from cached hostfile
 * base: mirror.fibergrid.in
 * epel: kartolo.sby.datautama.net.id
 * extras: mirror.fibergrid.in
 * remi: mirrors.thzhost.com
 * remi-php56: mirrors.thzhost.com
 * remi-safe: mirrors.thzhost.com
 * updates: mirror.fibergrid.in
Package php-mysql is obsoleted by php-mysqlnd, trying to install php-mysqlnd-5.6.30-1.el6.remi.x86_64 instead
Resolving Dependencies
-->  Running transaction check
--->  Package php.x86_64 0:5.6.30-1.el6.remi will be installed
-->  Processing Dependency: php-common(x86-64) = 5.6.30-1.el6.remi for package: php-5.6.30-1.el6.remi.x86_64
-->  Processing Dependency: php-cli(x86-64) = 5.6.30-1.el6.remi for package: php-5.6.30-1.el6.remi.x86_64
--->  Package php-devel.x86_64 0:5.6.30-1.el6.remi will be installed
-->  Processing Dependency: php-pecl-jsonc-devel(x86-64) for package: php-devel-5.6.30-1.el6.remi.x86_64
-->  Processing Dependency: automake for package: php-devel-5.6.30-1.el6.remi.x86_64
-->  Processing Dependency: autoconf for package: php-devel-5.6.30-1.el6.remi.x86_64
.
.
.
  php-sebastian-global-state.noarch 0:1.1.1-1.el6.remi                 php-sebastian-object-enumerator.noarch 0:2.0.1-1.el6.remi          php-sebastian-recursion-context.noarch 0:2.0.0-1.el6.remi
  php-sebastian-resource-operations.noarch 0:1.0.0-2.el6.remi          php-soap.x86_64 0:5.6.30-1.el6.remi                                php-symfony-class-loader.noarch 0:2.8.19-2.el6.remi
  php-symfony-common.noarch 0:2.8.19-2.el6.remi                        php-symfony-yaml.noarch 0:2.8.19-2.el6.remi                        php-xml.x86_64 0:5.6.30-1.el6.remi
Complete!
Verify the PHP version by running the below command
[root@linuxhelp ~]# php -v
PHP 5.6.30 (cli) (built: Jan 19 2017 08:09:42)
Copyright (c) 1997-2016 The PHP Group
Zend Engine v2.6.0, Copyright (c) 1998-2016 Zend Technologies
    with Zend OPcache v7.0.6-dev, Copyright (c) 1999-2016, by Zend Technologies
    with Xdebug v2.5.3, Copyright (c) 2002-2017, by Derick Rethans
Now start and enable php-fpm service by executing the following command.
[root@linuxhelp ~]# service php-fpm start
Starting php-fpm:                                          [  OK  ]
[root@linuxhelp ~]# chkconfig php-fpm on
Next modify php-fpm configuration to allow Nginx users to communicate with php-fpm
[root@linuxhelp ~]# vim /etc/php-fpm.d/www.conf
Allow these changes to the configuration file.
user = nginx
Group = nginx
Restart php-fpm service using the restart command and execute it.
[root@linuxhelp ~]# service php-fpm restart
Stopping php-fpm:                                          [  OK  ]
Starting php-fpm:                                          [  OK  ]
Now install MySQL packages using the yum command and press y to continue with the installation.
[root@linuxhelp ~]# yum install mysql-server mysql -y
Loaded plugins: fastestmirror, refresh-packagekit, security
Setting up Install Process
Loading mirror speeds from cached hostfile
 * base: mirror.fibergrid.in
 * epel: repo.ugm.ac.id
 * extras: mirror.fibergrid.in
 * remi: mirrors.thzhost.com
 * remi-php56: mirrors.thzhost.com
 * remi-safe: mirrors.thzhost.com
 * updates: mirror.fibergrid.in
Resolving Dependencies
-->  Running transaction check
--->  Package mysql.x86_64 0:5.5.55-1.el6.remi will be installed
-->  Processing Dependency: real-mysql-libs(x86-64) = 5.5.55-1.el6.remi for package: mysql-5.5.55-1.el6.remi.x86_64
--->  Package mysql-server.x86_64 0:5.5.55-1.el6.remi will be installed
-->  Processing Dependency: perl-DBI for package: mysql-server-5.5.55-1.el6.remi.x86_64
.
.
.
Dependency Installed:
  compat-mysql51.x86_64 0:5.1.73-1.el6.remi                                   perl-DBD-MySQL.x86_64 0:4.013-3.el6                                   perl-DBI.x86_64 0:1.609-4.el6
Dependency Updated:
  mysql-libs.x86_64 0:5.5.55-1.el6.remi                                                                         postfix.x86_64 2:2.6.6-8.el6
Complete!
Start and enable MySQL service by running the following command.
[root@linuxhelp ~]# service mysqld start
[root@linuxhelp ~]# chkconfig mysqld on
Now start the MySQL installation and press y to all the questions set during the installation. Also set the root password for MySQL database.
[root@linuxhelp ~]# mysql_secure_installation
NOTE: RUNNING ALL PARTS OF THIS SCRIPT IS RECOMMENDED FOR ALL MySQL
      SERVERS IN PRODUCTION USE!  PLEASE READ EACH STEP CAREFULLY!
In order to log into MySQL to secure it, we' ll need the current
password for the root user.  If you' ve just installed MySQL, and
you haven' t set the root password yet, the password will be blank,
so you should just press enter here.
Enter current password for root (enter for none):
OK, successfully used password, moving on...
Setting the root password ensures that nobody can log into the MySQL
root user without the proper authorisation.
Set root password? [Y/n] y
New password:
Re-enter new password:
Password updated successfully!
Reloading privilege tables..
 ... Success!
By default, a MySQL installation has an anonymous user, allowing anyone
to log into MySQL without having to have a user account created for
them.  This is intended only for testing, and to make the installation
go a bit smoother.  You should remove them before moving into a
production environment.
Remove anonymous users? [Y/n] y
 ... Success!
Normally, root should only be allowed to connect from ' localhost' .  This
ensures that someone cannot guess at the root password from the network.
Disallow root login remotely? [Y/n] y
 ... Success!
By default, MySQL comes with a database named ' test'  that anyone can
access.  This is also intended only for testing, and should be removed
before moving into a production environment.
Remove test database and access to it? [Y/n] y
 - Dropping test database...
 ... Success!
 - Removing privileges on test database...
 ... Success!
Reloading the privilege tables will ensure that all changes made so far
will take effect immediately.
Reload privilege tables now? [Y/n] y
 ... Success!
Cleaning up...
All done!  If you' ve completed all of the above steps, your MySQL
installation should now be secure.
Thanks for using MySQL!
To Setup Laravel
Download the composer using the below command
[root@linuxhelp ~]# curl -sS https://getcomposer.org/installer | php
All settings correct for using Composer
Downloading...
Composer (version 1.4.1) successfully installed to: /root/composer.phar
Use it: php composer.phar
Now move it to the following directory to install composer
[root@linuxhelp ~]# mv composer.phar /usr/local/bin/composer
Move to the document root of Nginx to create a project for laravel using the below command.
[root@linuxhelp ~]# cd /usr/share/nginx/
Use the below command to create new Laravel project with any name, in this case “ myproject” is the name for the new Laravel project.
[root@linuxhelp nginx]# composer create-project laravel/laravel myproject dev-master --prefer-dist
Do not run Composer as root/super user! See https://getcomposer.org/root for details
Installing laravel/laravel (dev-master 859479a033962c3fb986517778c4af6896e83155)
  - Installing laravel/laravel (dev-master master): Downloading (100%)
Created project in myproject
>  php -r " file_exists(' .env' ) || copy(' .env.example' , ' .env' ) "
Loading composer repositories with package information
Updating dependencies (including require-dev)
Package operations: 59 installs, 0 updates, 0 removals
  - Installing symfony/polyfill-mbstring (v1.3.0): Downloading (100%)
  - Installing symfony/var-dumper (v3.2.7): Downloading (100%)
  - Installing jakub-onderka/php-console-color (0.1): Downloading (100%)
.
.
.
Writing lock file
Generating autoload files
>  IlluminateFoundationComposerScripts::postUpdate
>  php artisan optimize
Generating optimized class loader
The compiled services file has been removed.
>  php artisan key:generate
Application key [base64:2QLuu051Thf7yG5bZhH7aD+DhfLlhdlAhy1W9iw6vO0=] set successfully.
Next change the group and user ownership for the project directory.
[root@linuxhelp nginx]# chown -R nginx:nginx myproject
Now move to project directory and set file permission for storage directory.
[root@linuxhelp nginx]# cd myproject/
[root@linuxhelp myproject]# chmod -R 0777 storage/
Disable the SElinux by executing the following command.
[root@linuxhelp ~]# vim /etc/sysconfig/selinux
Selinux=disabled
In order to immediately force the SELinux to be disabled run the following command.
[root@linuxhelp ~]# setenforce 0
Next move to /etc/nginx/conf.d/ directory and create backup for default.conf file and recreate the same file with empty file. Copy and paste the below mentioned configuration into new default.conf file.
[root@linuxhelp ~]# cd /etc/nginx/conf.d/
[root@linuxhelp conf.d]# cp default.conf default.conf.old
[root@linuxhelp conf.d]# rm -rf default.conf
[root@linuxhelp conf.d]# vim default.conf
The configuration file opens. Now paste the contents into the new default.conf file.
server {
    listen       80
    server_name  linuxhelp
    root   /usr/share/nginx/myproject/public
    index  index.php index.html index.htm
    error_page   500 502 503 504  /50x.html
    location = /50x.html {
        root   /usr/share/nginx/html
    }
    location / {
        try_files $uri $uri/ /index.php?$query_string
    }
    location ~ .php$ {
        try_files $uri /index.php =404
        fastcgi_split_path_info ^(.+.php)(/.+)$
        fastcgi_pass 127.0.0.1:9000
        fastcgi_index  index.php
        fastcgi_param  SCRIPT_FILENAME  $document_root$fastcgi_script_name
        fastcgi_max_temp_file_size 0
        fastcgi_buffer_size 4K
        fastcgi_buffers 64 4k
        include        fastcgi_params
    }
}
Restart the Nginx server by using the restart command as follows.
[root@linuxhelp ~]# service nginx restart
Stopping nginx:                                            [  OK  ]
Starting nginx:                                            [  OK  ]
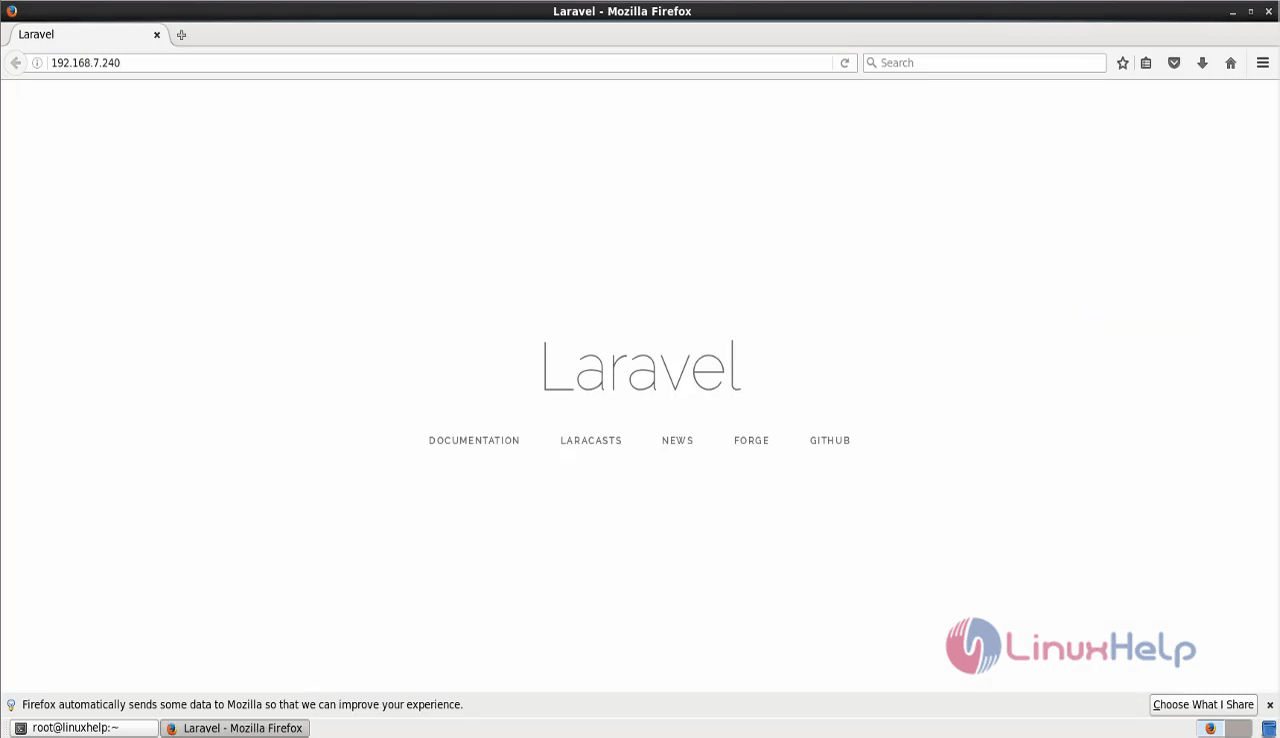
Now open the browser and call the IP address of Nginx web server where the Laravel has been installed and the default page for Laravel appears.
Wasn' t that an easy installation procedure? The Laravel Application logic is an integral part of developed applications, implemented either by using controllers or as part of the route declarations.
Comments ( 0 )
No comments available