How to install RabbitMQ in CentOS
To install RabbitMQ in CentOS
RabbitMQ is an open source message-oriented, middle ware that implements the Advanced Message Queuing Protocol (AMQP). It is programmed in Erlang programming language. It is built on the Open Telecom Platform framework for clustering and fail over. Installation of RabbitMQ in CentOS is explained in this manual.
To install RabbitMQ
Download the RabbitMQ package by applying the wget command.
[root@linuxhelp Desktop]# wget https://www.rabbitmq.com/releases/rabbitmq-server/v3.6.1/rabbitmq-server-3.6.1-1.noarch.rpm
--2016-10-14 16:20:09--  https://www.rabbitmq.com/releases/rabbitmq-server/v3.6.1/rabbitmq-server-3.6.1-1.noarch.rpm
Resolving www.rabbitmq.com (www.rabbitmq.com)... 192.240.153.117
Connecting to www.rabbitmq.com (www.rabbitmq.com)|192.240.153.117|:443... connected.
HTTP request sent, awaiting response... 200 OK
.
.
.
100%[==================================================> ] 5,088,884   72.3KB/s   in 43s

2016-10-14 16:20:53 (116 KB/s) - ‘ rabbitmq-server-3.6.1-1.noarch.rpm’  saved [5088884/5088884]
Once the download is done, import the RabbitMQ key.
[root@linuxhelp Desktop]# rpm --import https://www.rabbitmq.com/rabbitmq-signing-key-public.asc
Install the RabbitMQ package.
[root@linuxhelp Desktop]# yum install rabbitmq-server-3.6.1-1.noarch.rpm
Loaded plugins: fastestmirror, langpacks
Examining rabbitmq-server-3.6.1-1.noarch.rpm: rabbitmq-server-3.6.1-1.noarch
Marking rabbitmq-server-3.6.1-1.noarch.rpm to be installed
Resolving Dependencies
-->  Running transaction check
--->  Package rabbitmq-server.noarch 0:3.6.1-1 will be installed
.
.
.
  wxBase.x86_64 0:2.8.12-20.el7
  wxGTK.x86_64 0:2.8.12-20.el7
  wxGTK-gl.x86_64 0:2.8.12-20.el7
Complete!
Allow the following ports via SELinux, and Firewall to access RabbitMQ remote management console from the remote systems.
[root@linuxhelp Desktop]# firewall-cmd --permanent --add-port=4369/tcp
success
[root@linuxhelp Desktop]# firewall-cmd --permanent --add-port=25672/tcp
success
[root@linuxhelp Desktop]# firewall-cmd --permanent --add-port=5671-5672/tcp
success
[root@linuxhelp Desktop]# firewall-cmd --permanent --add-port=15672/tcp
success
[root@linuxhelp Desktop]# firewall-cmd --permanent --add-port=61613-61614/tcp
success
[root@linuxhelp Desktop]# firewall-cmd --permanent --add-port=8883/tcp
success
Reload the firewall services.
[root@linuxhelp Desktop]# firewall-cmd --reload
Success
Allow SELinux to enable RabbitMQ service by running the following command.
[root@linuxhelp Desktop]# setsebool -P nis_enabled 1
Start and enable the Rabbitmq services.
[root@linuxhelp Desktop]# systemctl start rabbitmq-server
[root@linuxhelp Desktop]# systemctl enable. rabbitmq-server
Verify the status of RabbitMQ.
[root@linuxhelp Desktop]# rabbitmqctl status
Status of node rabbit@linuxhelp ...
[{pid,44192},
 {running_applications,[{rabbit," RabbitMQ" ," 3.6.1" },
                        {mnesia," MNESIA  CXC 138 12" ," 4.11" },
                        {os_mon," CPO  CXC 138 46" ," 2.2.14" },
                        {rabbit_common,[]," 3.6.1" },
.
.
.
{processes,[{limit,1048576},{used,137}]},
 {run_queue,0},
 {uptime,182},
 {kernel,{net_ticktime,60}}]
Apply the following command to access RabbitMQ management console.
[root@linuxhelp Desktop]# rabbitmq-plugins enable rabbitmq_management
The following plugins have been enabled:
  mochiweb
  webmachine
  rabbitmq_web_dispatch
  amqp_client
  rabbitmq_management_agent
  rabbitmq_management
Applying plugin configuration to rabbit@linuxhelp... started 6 plugins.
Change the ownership for RabbitMQ directory.
[root@linuxhelp Desktop]# chown -R rabbitmq:rabbitmq /var/lib/rabbitmq/
Create the username and password for Mqadmin.
[root@linuxhelp Desktop]# rabbitmqctl add_user admin mqadmin
Creating user " admin"  ...
Enable the user to access RabbitMQ and set the permission for the user.
[root@linuxhelp Desktop]# rabbitmqctl set_user_tags admin administrator
Setting tags for user " admin"  to [administrator] ...
[root@linuxhelp Desktop]# rabbitmqctl set_permissions -p / admin " .*"  " .*"  " .*"
Setting permissions for user " admin"  in vhost " /"  ...
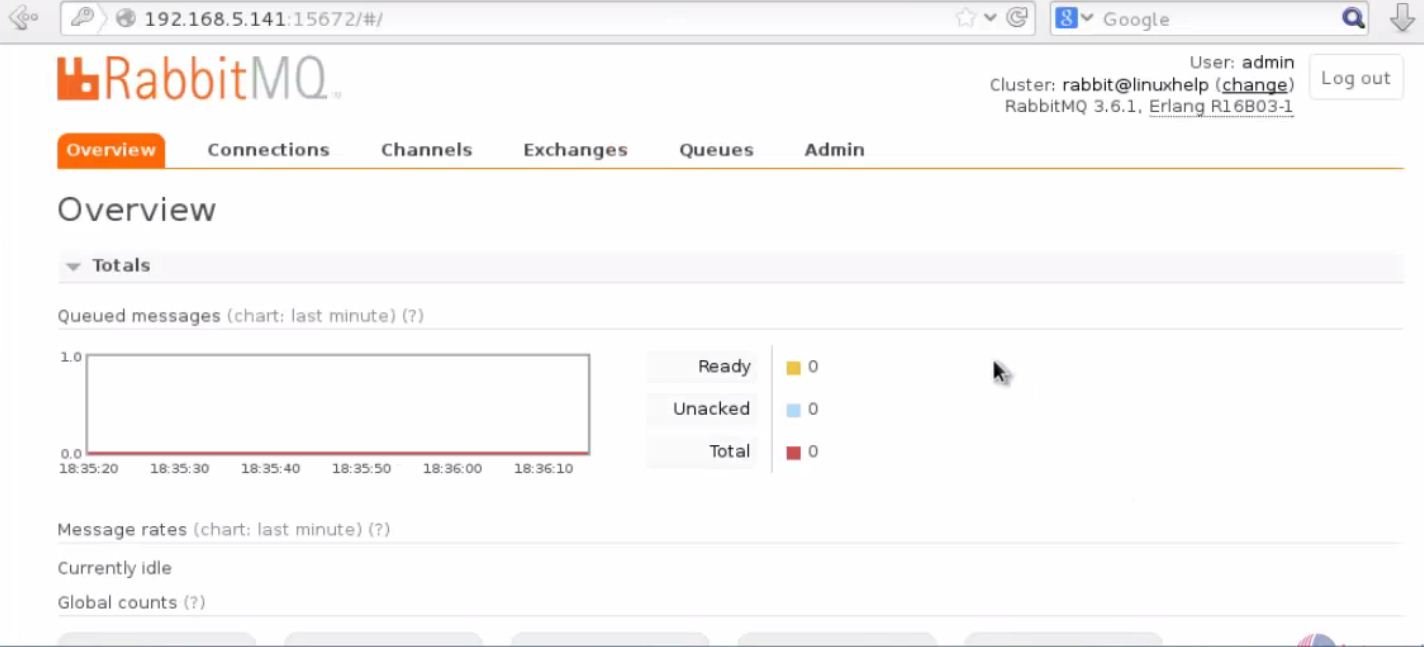
Open the browser and enter the http://< IP_address> :15672 and Login RabbitMQ

Dashboard of RabbitMQ appears.
Comments ( 5 )
Problem:
yum install rabbitmq-server-3.6.1-1.noarch.rpm
Loaded plugins: fastestmirror
Examining rabbitmq-server-3.6.1-1.noarch.rpm: rabbitmq-server-3.6.1-1.noarch
Marking rabbitmq-server-3.6.1-1.noarch.rpm to be installed
Resolving Dependencies
-> Running transaction check
---> Package rabbitmq-server.noarch 0: 3.6.1-1 will be installed
-> Processing Dependency: erlang> = R16B-03 for package: rabbitmq-server-3.6.1-1.noarch
Loading mirror speeds from cached hostfile
* base: centos.bhs.mirrors.ovh.net
* extras: centos.mirror.netelligent.ca
* updates: mirror.centos.serverforge.org
-> Finished Dependency Resolution
Error: Package: rabbitmq-server-3.6.1-1.noarch (/rabbitmq-server-3.6.1-1.noarch)
Requires: erlang> = R16B-03
You could try using --skip-broken to work around the problem
You could try running: rpm -Va --nofiles --nodigest
My version from centoS: CentOS Linux release 7.4.1708 (Core)
How do I install the compatible erlang?
Thanks!
can you detailly post you error log that appears with a snap