How to install Resource space on CentOS 7
How to install Resource space on CentOS 7
Resource Space is a free and open-source Digital Asset Management (DAM) software. It is written in PHP and stores its database in MySQL server. It provides a better way to organize, manage and share the digital assets such as images, design files, photos, videos, audio and more into an organization. It requires PHP, MySQL, and optionally utilities such as FFmpeg and ImageMagick that provide image processing capabilities. It works with most web server software such as Apache. This tutorial explains the installation of Resource space on CentOS 7.
Pre-Requisite
LAMP Setup
-Apache
-MariaDB
-Php 7 & above
Installation procedure
To start with the installation procedure, open the php.ini configuration file. Enter the changes in the file and save it.
[root@linuxhelp1 ~]# vim /etc/php.ini

memory_limit = 128M          //change it to any value greater than 512M
post_max_size 8M             //change it to 512M
upload_max_filesize 2M       //change it to 512M
Before installing the Resource space, install the required packages by running the yum command as follows.
[root@linuxhelp1 ~]# yum -y localinstall --nogpgcheck https://download1.rpmfusion.org/free/el/rpmfusion-free-release-7.noarch.rpm

Examining /var/tmp/yum-root-I2_zkt/rpmfusion-free-release-7.noarch.rpm: rpmfusion-free-release-7-1.noarch
Marking /var/tmp/yum-root-I2_zkt/rpmfusion-free-release-7.noarch.rpm to be installed
Resolving Dependencies
-->  Running transaction check
--->  Package rpmfusion-free-release.noarch 0:7-1 will be installed
-->  Processing Dependency: epel-release > = 7 for package: rpmfusion-free-release-7-1.noarch
.
.
.
Installed:
  rpmfusion-free-release.noarch 0:7-1

Dependency Installed:
  epel-release.noarch 0:7-9

Complete!


[root@linuxhelp1 ~]# yum -y localinstall https://forensics.cert.org/cert-forensics-tools-release-el7.rpm

Loaded plugins: fastestmirror, langpacks
cert-forensics-tools-release-el7.rpm                          |  11 kB  00:00:00
Examining /var/tmp/yum-root-I2_zkt/cert-forensics-tools-release-el7.rpm: cert-forensics-tools-release-7-11.noarch
Marking /var/tmp/yum-root-I2_zkt/cert-forensics-tools-release-el7.rpm to be installed
Resolving Dependencies
-->  Running transaction check
--->  Package cert-forensics-tools-release.noarch 0:7-11 will be installed
-->  Finished Dependency Resolution
epel/x86_64/metalink
.
.
.
Running transaction
  Installing : cert-forensics-tools-release-7-11.noarch                          1/1
  Verifying  : cert-forensics-tools-release-7-11.noarch                          1/1

Installed:
  cert-forensics-tools-release.noarch 0:7-11

Complete!
The depedency packages are installed successfully in the target system. Now install the required packages such as such as antiword, ffmpeg, perl-Image-ExifTool, mageMagick and xpdf packages.
[root@linuxhelp1 ~]# yum -y install antiword ffmpeg perl-Image-ExifTool ImageMagick xpdf
Loaded plugins: fastestmirror, langpacks
forensics                                                     | 2.9 kB  00:00:00
forensics-splunk                                              | 2.9 kB  00:00:00
(1/2): forensics-splunk/7/x86_64/primary_db                   |  11 kB  00:00:01
(2/2): forensics/7/x86_64/primary_db                          | 522 kB  00:00:07
Loading mirror speeds from cached hostfile
* base: centos.myfahim.com
.
.
.
 x265-libs.x86_64 0:1.9-4.el7
  xorg-x11-fonts-ISO8859-1-100dpi.noarch 0:7.5-9.el7
  xorg-x11-fonts-ISO8859-1-75dpi.noarch 0:7.5-9.el7
  xorg-x11-xbitmaps.noarch 0:1.1.1-6.el7
  xvidcore.x86_64 0:1.3.4-2.el7

Complete!
Go the Resource space' s official website and download the package using wget command followed by the download link.
[root@linuxhelp1 ~]# wget https://www.resourcespace.com/downloads/ResourceSpace_8_1_10036.zip
--2017-08-02 11:02:01--  https://www.resourcespace.com/downloads/ResourceSpace_8_1_10036.zip
Resolving www.resourcespace.com (www.resourcespace.com)... 93.93.130.35
Connecting to www.resourcespace.com (www.resourcespace.com)|93.93.130.35|:443... connected.
HTTP request sent, awaiting response... 200 OK
Length: 27350568 (26M) [application/zip]
Saving to: ‘ ResourceSpace_8_1_10036.zip’
100%[======================================> ] 2,73,50,568  883KB/s   in 67s

2017-08-02 11:03:10 (398 KB/s) - ‘ ResourceSpace_8_1_10036.zip’  saved [27350568/27350568]
Now create a new directory by running the following command in the directed destination path.
[root@linuxhelp1 ~]# mkdir -p /var/www/html/resourcespace/
Extract the downloaded packages by executing the unzip command.
[root@linuxhelp1 ~]# unzip ResourceSpace_8_1_10036.zip -d /var/www/html/resourcespace
 inflating: limesurvey/framework/cli/views/webapp/protected/yiic.php
   creating: limesurvey/framework/cli/views/webapp/themes/
   creating: limesurvey/framework/cli/views/webapp/themes/classic/
   creating: limesurvey/framework/cli/views/webapp/themes/classic/views/
 extracting: limesurvey/framework/cli/views/webapp/themes/classic/views/.htaccess
   creating: limesurvey/framework/cli/views/webapp/themes/classic/views/layouts/
 extracting: limesurvey/framework/cli/views/webapp/themes/classic/views/layouts/git-gitkeep
.
.
.
 inflating: /var/www/html/resourcespace/upgrade/readme.txt
   creating: /var/www/html/resourcespace/upgrade/scripts/
  inflating: /var/www/html/resourcespace/upgrade/scripts/001_migrate_to_nodes.php
  inflating: /var/www/html/resourcespace/upgrade/scripts/002_check_resource_node_table.php
Now go to the virtual host configuration using the vim editor and enter the following content in the file. Save and exit from the file.
[root@linuxhelp1 ~]# vim /etc/httpd/conf.d/rs.conf

< VirtualHost *:80>
    ServerName 192.168.7.218
    DocumentRoot /var/www/html/resourcespace
    < Directory /var/www/html/resourcespace>
        Options Indexes FollowSymLinks MultiViews
        AllowOverride All
        Order allow,deny
        allow from all
    < /Directory>
< /VirtualHost>
Change the owner and write permission to the directory and execute the following set of commands.
[root@linuxhelp1 ~]# chown -R apache:apache /var/www/html/resourecspace
[root@linuxhelp1 ~]# chmod -R 776 /var/www/html/resourcespace
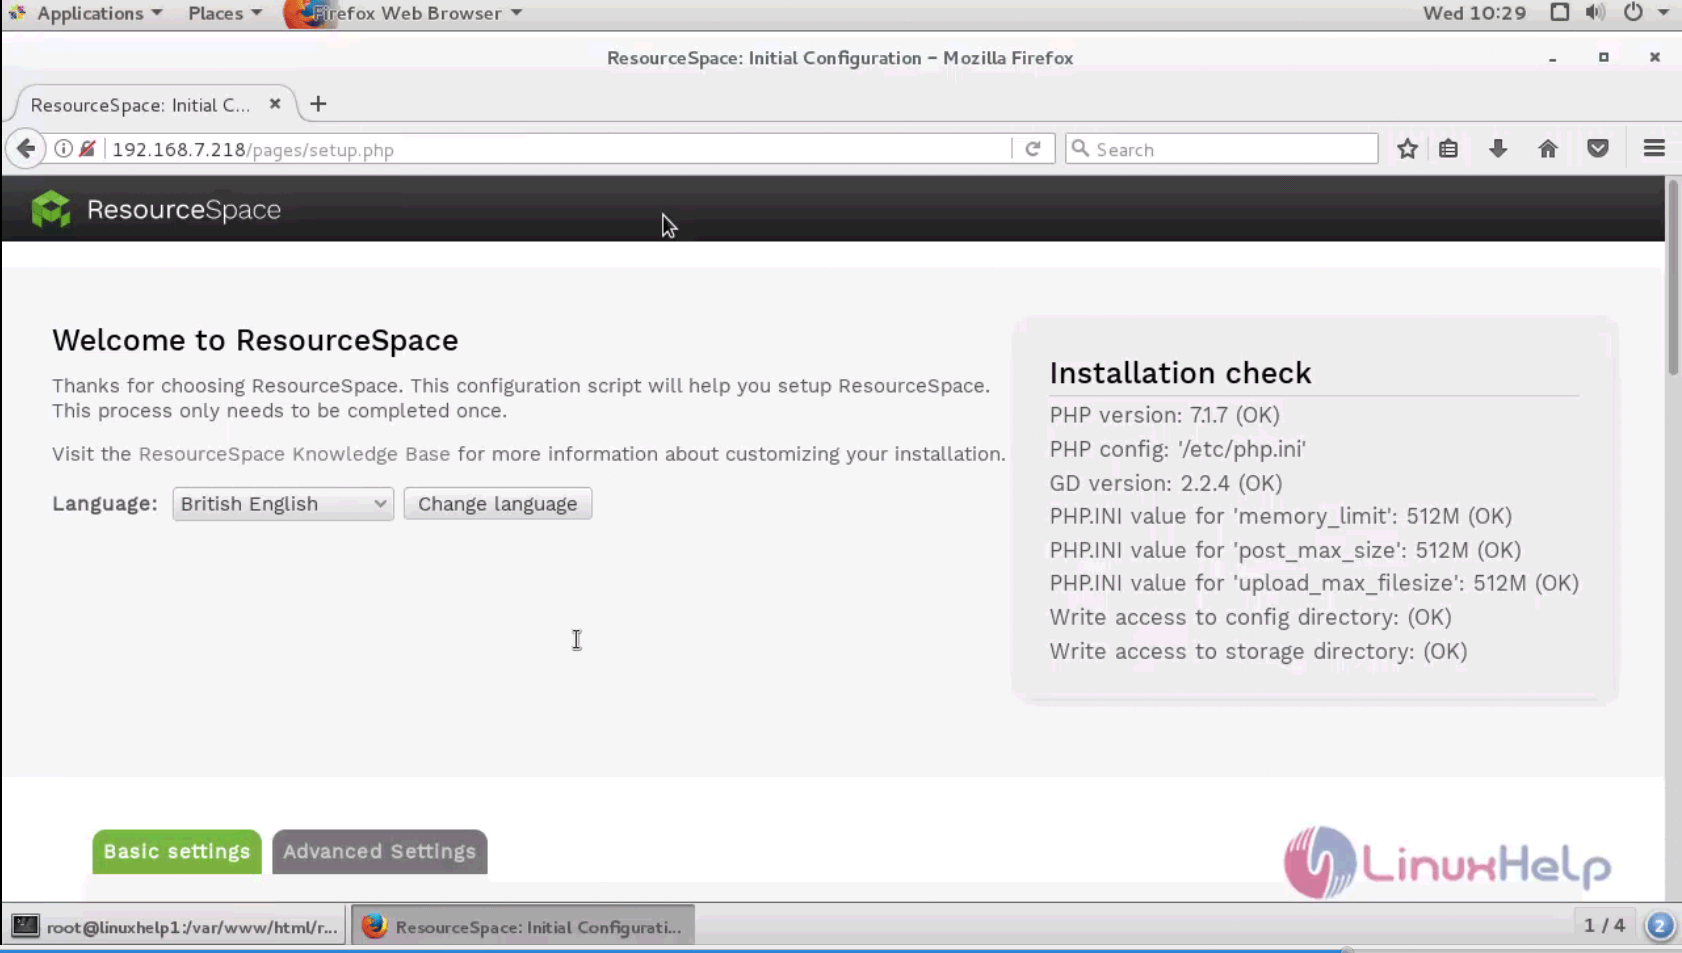
Switch to your web browser and enter your machine’ s IP address http://192.168.7218 and run it.
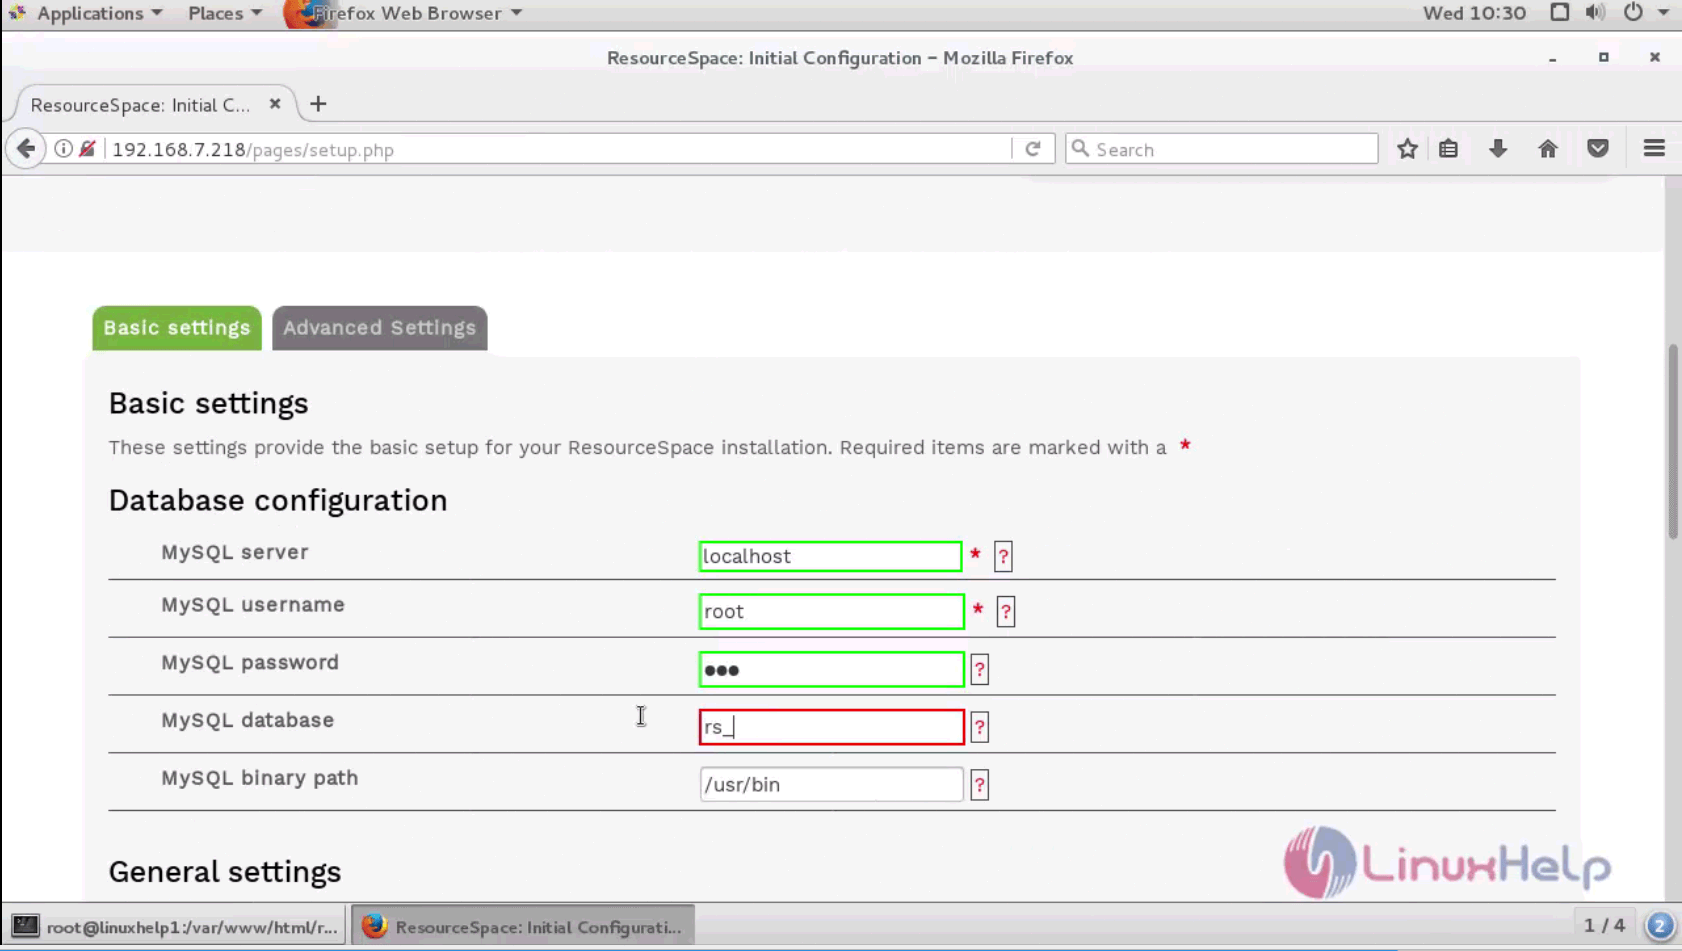
The Basic settings contains the database configuration such as MySQL server, username, password, etc.
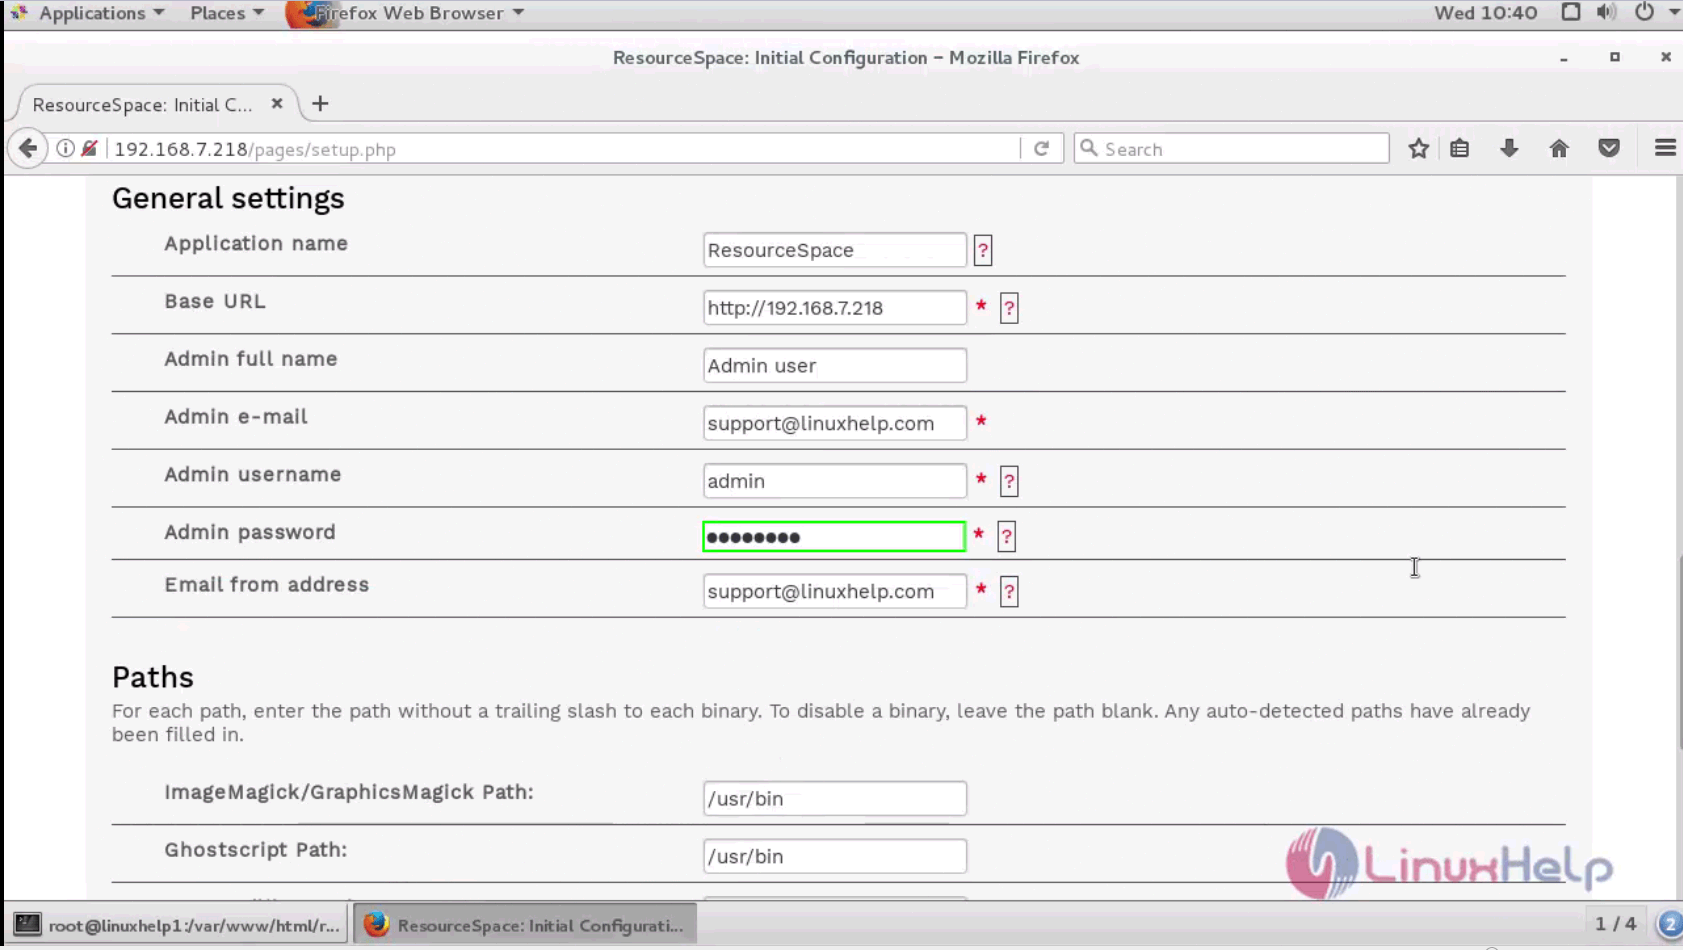
The General Settings contains the application name, URL and admin credentials to be filled in this page.
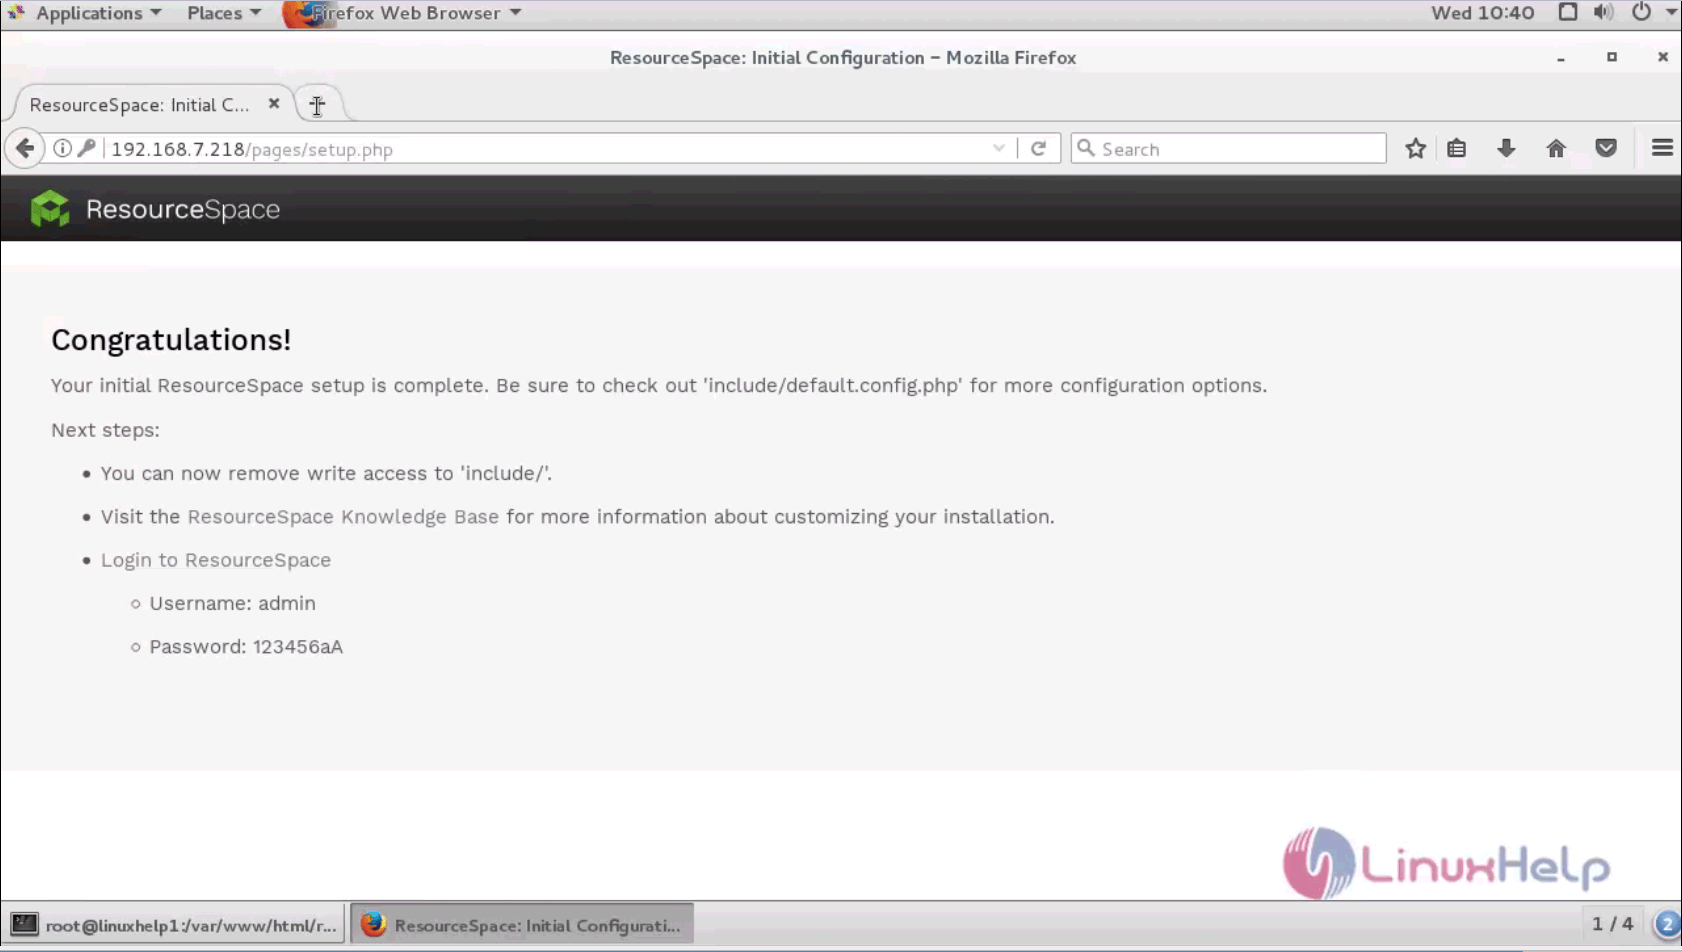
The configuration of the user is complete. The username and password for the admin is shown in this page.
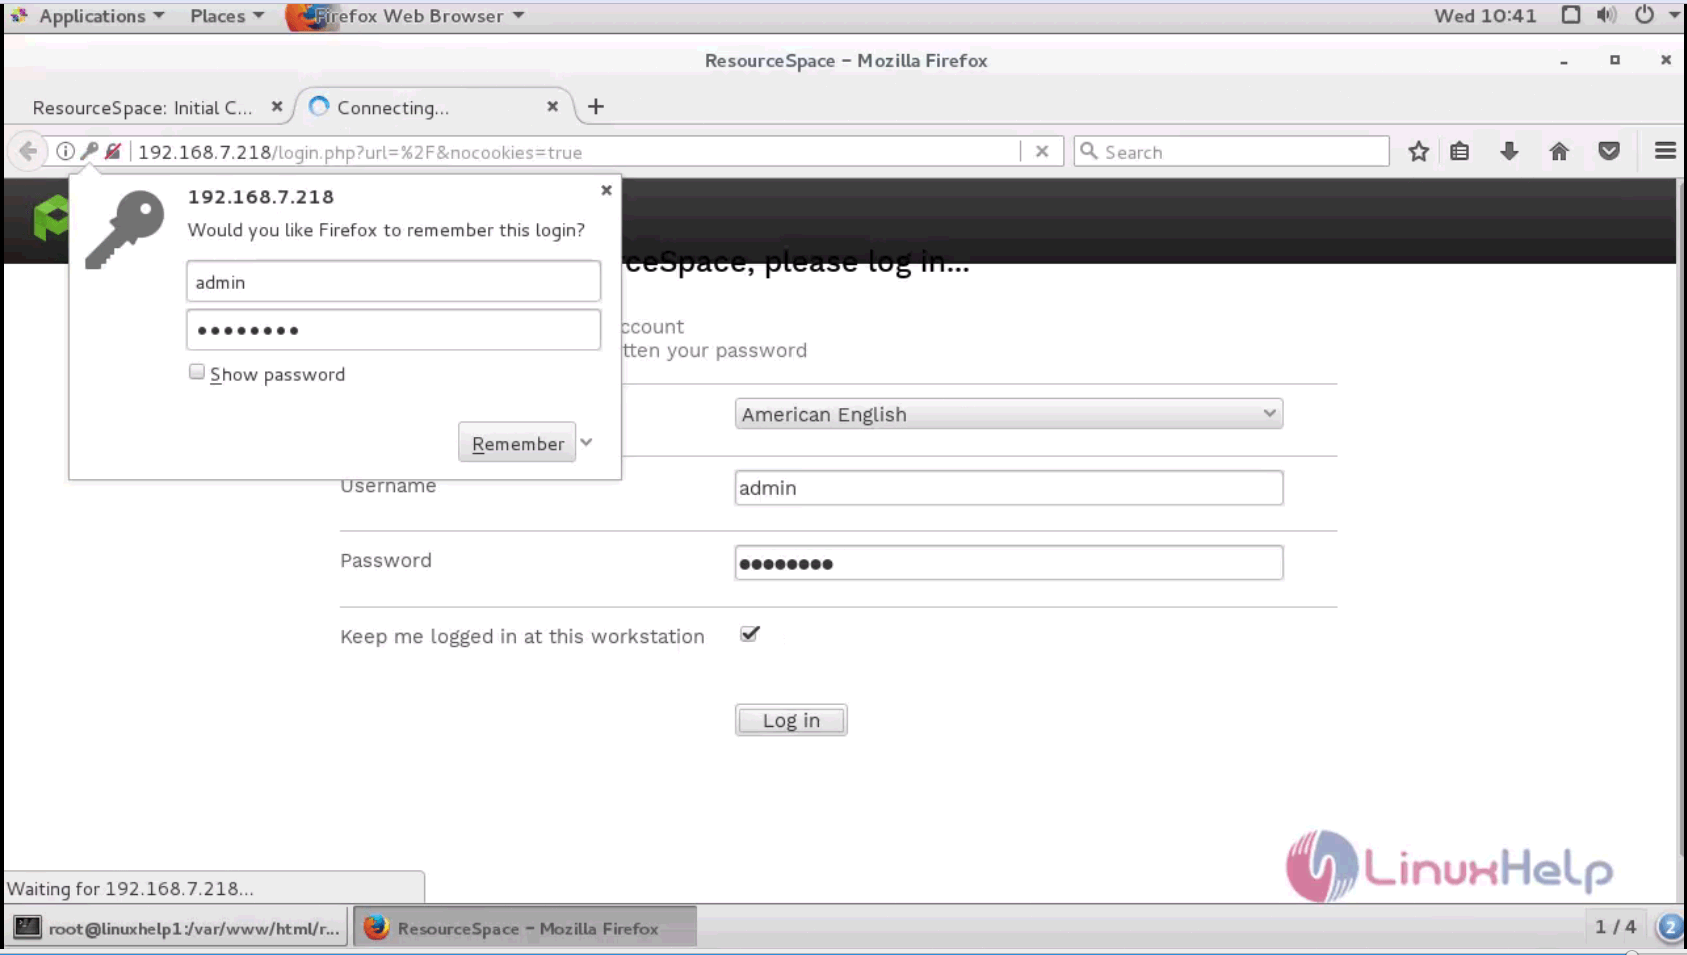
The user can login to the Resource Space by logging it in with username and password.
The Resouce Space' s home page is shown below.
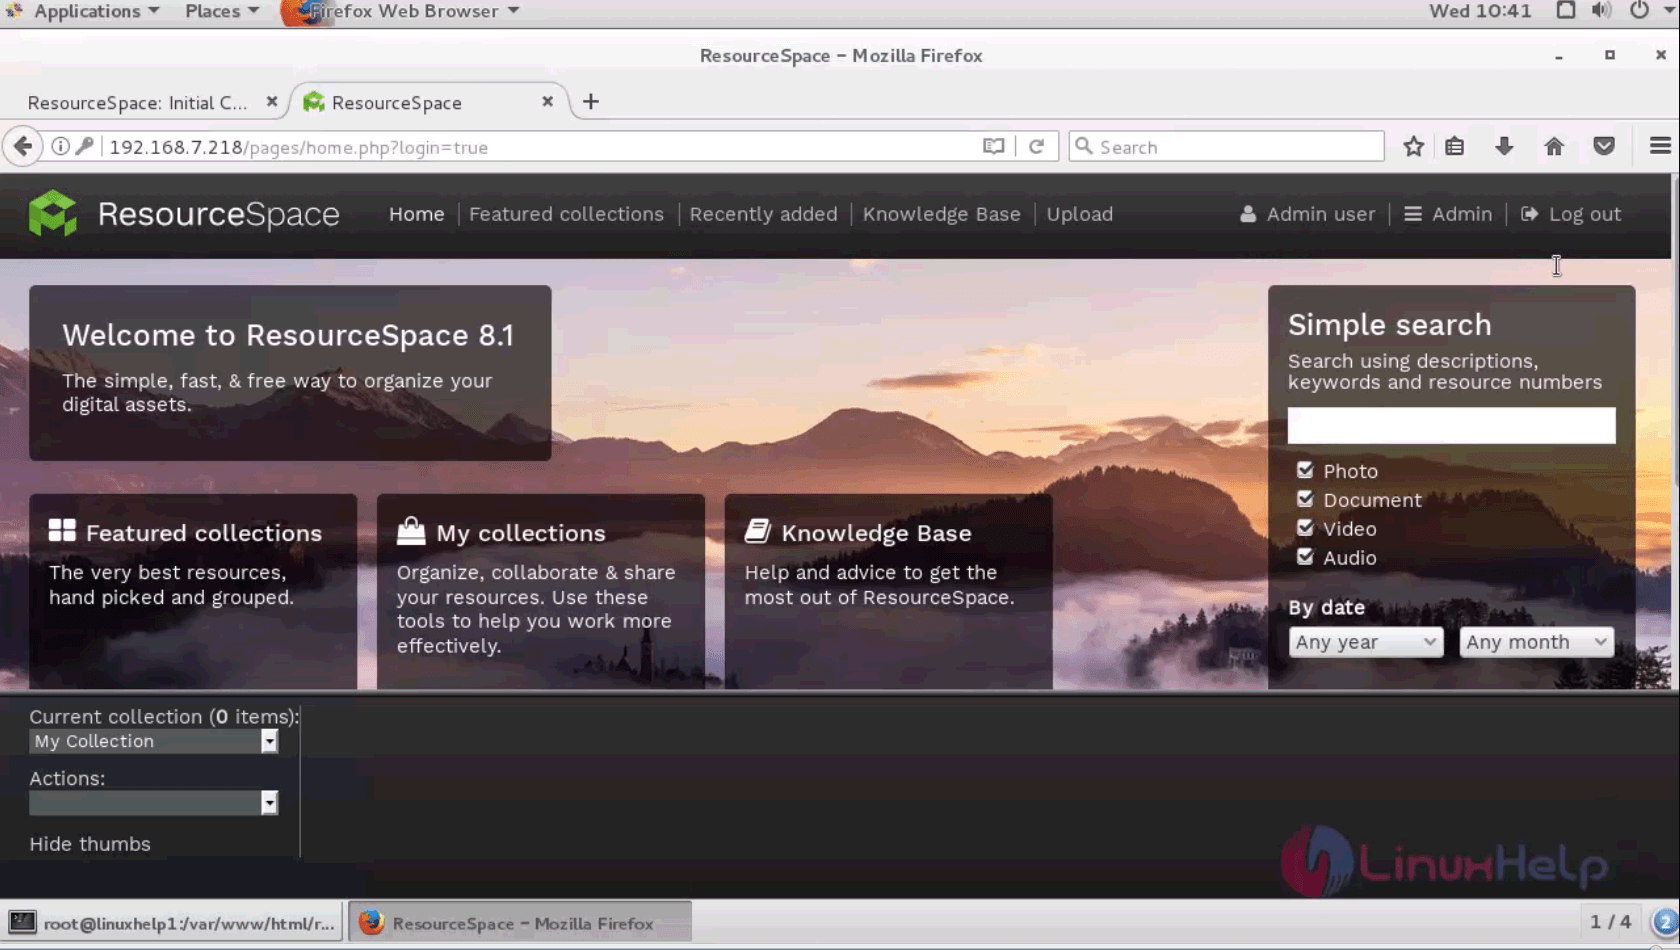
The installation of the Resource Space is done above.
Comments ( 0 )
No comments available