How to install Tomcat in Ubuntu
To install Tomcat in Ubuntu
In this article we will learn how to install Tomcat in Ubuntu. It is an open-source web server application that offers a Java HTTP server.
Installation of Tomcat
Run the following command to update your system software repository.
root@linuxhelp:~# apt-get update
Hit:1 http://in.archive.ubuntu.com/ubuntu xenial InRelease
Hit:2 http://security.ubuntu.com/ubuntu xenial-security InRelease
Hit:3 http://in.archive.ubuntu.com/ubuntu xenial-updates InRelease
Hit:4 http://in.archive.ubuntu.com/ubuntu xenial-backports InRelease
Reading package lists... Done
Then install JAVA packages on your system by using the following command.
root@linuxhelp:~# apt-get install openjdk-8* -y
Reading package lists... Done
Building dependency tree
Reading state information... Done
Note, selecting ' openjdk-8-jdk'  for glob ' openjdk-8*'
Note, selecting ' openjdk-8-jre'  for glob ' openjdk-8*'
Note, selecting ' openjdk-8-demo'  for glob ' openjdk-8*'
Note, selecting ' openjdk-8-jre-dcevm'  for glob ' openjdk-8*'
Note, selecting ' openjdk-8-jdk-headless'  for glob ' openjdk-8*'
Note, selecting ' openjdk-8-jre-zero'  for glob ' openjdk-8*'
.
.
.
Adding debian:Swisscom_Root_EV_CA_2.pem
Adding debian:Starfield_Root_Certificate_Authority_-_G2.pem
done.
Processing triggers for libc-bin (2.23-0ubuntu3) ...
Processing triggers for ca-certificates (20160104ubuntu1) ...
Updating certificates in /etc/ssl/certs...
0 added, 0 removed  done.
Running hooks in /etc/ca-certificates/update.d...
done.
done.
Run the following command to check the java version.
root@linuxhelp:~# java -version
openjdk version " 1.8.0_91"
OpenJDK Runtime Environment (build 1.8.0_91-8u91-b14-3ubuntu1~16.04.1-b14)
OpenJDK 64-Bit Server VM (build 25.91-b14, mixed mode)
Download the Tomcat package from it’ s official website by running the following command.
root@linuxhelp:~# wget http://mirror.fibergrid.in/apache/tomcat/tomcat-9/v9.0.0.M10/bin/apache-tomcat-9.0.0.M10.tar.gz
--2016-09-26 19:20:18--  http://mirror.fibergrid.in/apache/tomcat/tomcat-9/v9.0.0.M10/bin/apache-tomcat-9.0.0.M10.tar.gz
Resolving mirror.fibergrid.in (mirror.fibergrid.in)... 103.194.116.38
Connecting to mirror.fibergrid.in (mirror.fibergrid.in)|103.194.116.38|:80... connected.
HTTP request sent, awaiting response... 200 OK
Length: 9335218 (8.9M) [application/x-gzip]
Saving to: ‘ apache-tomcat-9.0.0.M10.tar.gz’

apache-tomcat-9.0.0.M10.tar.gz             100%[========================================================================================> ]   8.90M   361KB/s    in 28s

2016-09-26 19:20:52 (327 KB/s) - ‘ apache-tomcat-9.0.0.M10.tar.gz’  saved [9335218/9335218]
Move the Tomcat package into the /opt directory as shown below.
root@linuxhelp:~# ls
apache-tomcat-9.0.0.M10.tar.gz  Desktop  Documents  Downloads  examples.desktop  Music  Pictures  Public  Templates  Videos
root@linuxhelp:~# mv apache-tomcat-9.0.0.M10.tar.gz /opt
After moving the directory, extract the downloaded package by running the following command.
root@linuxhelp:~# cd /opt
root@linuxhelp:/opt# ls
apache-tomcat-9.0.0.M10.tar.gz
root@linuxhelp:/opt# tar -xzvf apache-tomcat-9.0.0.M10.tar.gz
apache-tomcat-9.0.0.M10/conf/
apache-tomcat-9.0.0.M10/conf/catalina.policy
apache-tomcat-9.0.0.M10/conf/catalina.properties
apache-tomcat-9.0.0.M10/conf/context.xml
apache-tomcat-9.0.0.M10/conf/jaspic-providers.xml
apache-tomcat-9.0.0.M10/conf/jaspic-providers.xsd
.
.
.
apache-tomcat-9.0.0.M10/bin/daemon.sh
apache-tomcat-9.0.0.M10/bin/digest.sh
apache-tomcat-9.0.0.M10/bin/setclasspath.sh
apache-tomcat-9.0.0.M10/bin/shutdown.sh
apache-tomcat-9.0.0.M10/bin/startup.sh
apache-tomcat-9.0.0.M10/bin/tool-wrapper.sh
apache-tomcat-9.0.0.M10/bin/version.sh
Remove the tar file and rename the newly created directory as shown below.
root@linuxhelp:/opt# rm -rf apache-tomcat-9.0.0.M10.tar.gz
root@linuxhelp:/opt# mv apache-tomcat-9.0.0.M10 tomcat
root@linuxhelp:/opt# ls
tomcat
Then export the CATALINA HOME directory path by running the following command.
root@linuxhelp:/opt# echo " export CATALINA_HOME=' /opt/tomcat/' "  > >  ~/.bashrc
root@linuxhelp:/opt# source ~/.bashrc
Lets create users for Tomcat, by opening the tomcat users file.
root@linuxhelp:/opt# vim /opt/tomcat/conf/tomcat-users.xml
Add the following entry into it.
< !-- User linuxtechi who can access only manager section -->

< role rolename=" manager-gui"  />

< user username=" linuhelp"  password=" 123"  roles=" manager-gui"  />

< !-- User Admin Who can access manager and admin section both -->

< role rolename=" admin-gui"  />

< user username=" admin"  password=" admin"  roles=" admin-gui"  />
To start Tomcat services use the script file as shown below.
root@linuxhelp:/opt/tomcat# cd bin
root@linuxhelp:/opt/tomcat/bin# ls
bootstrap.jar  catalina-tasks.xml            configtest.bat  digest.bat        setclasspath.sh  startup.bat      tomcat-native.tar.gz  version.bat
catalina.bat   commons-daemon.jar            configtest.sh   digest.sh         shutdown.bat     startup.sh       tool-wrapper.bat      version.sh
catalina.sh    commons-daemon-native.tar.gz  daemon.sh       setclasspath.bat  shutdown.sh      tomcat-juli.jar  tool-wrapper.sh
root@linuxhelp:/opt/tomcat/bin# sh startup.sh
Using CATALINA_BASE:   /opt/tomcat/
Using CATALINA_HOME:   /opt/tomcat/
Using CATALINA_TMPDIR: /opt/tomcat//temp
Using JRE_HOME:        /usr
Using CLASSPATH:       /opt/tomcat//bin/bootstrap.jar:/opt/tomcat//bin/tomcat-juli.jar
Tomcat started.
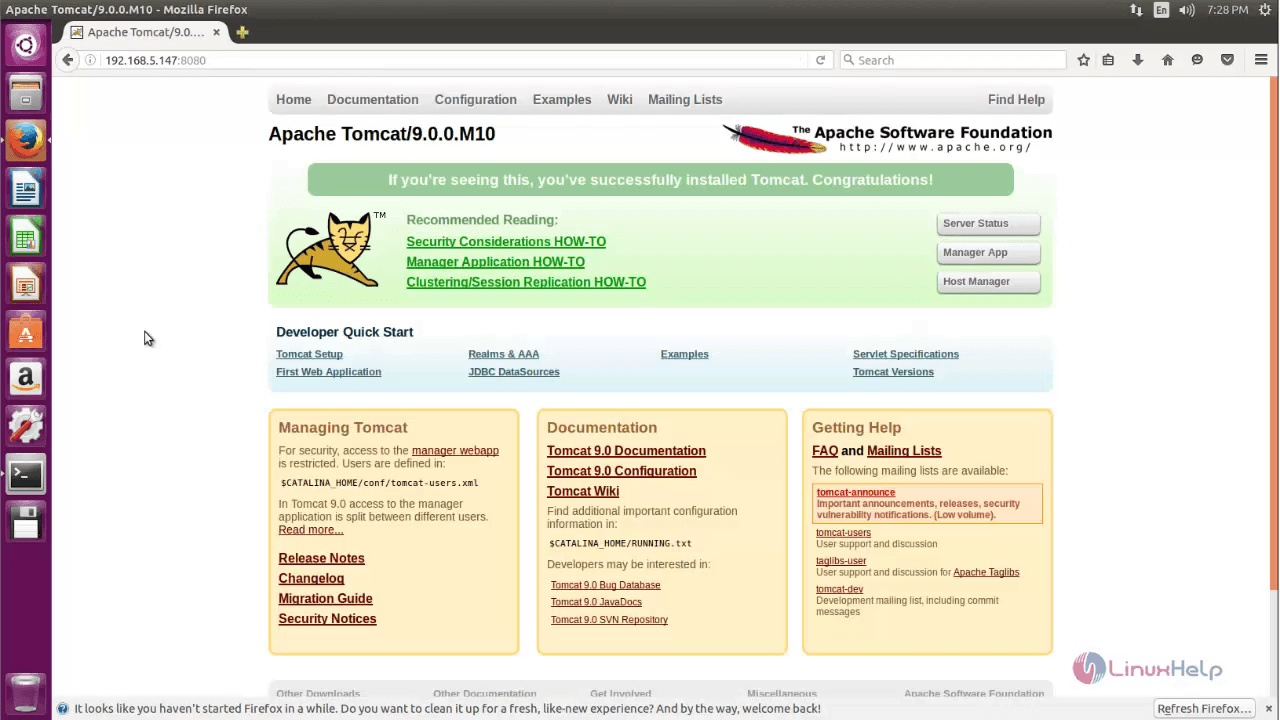
Open the browser and dive into http://< IP_address> :8080
Comments ( 0 )
No comments available