How to install X2CRM in Ubuntu
To install X2CRM in Ubuntu
X2CRM is a free source Customer Relationship Management (CRM) application. It allows the user to create Websites like marketing, sales and customer service for CRM application. Installation of X2CRM is explained in this manual.
To install LAMP server
X2CRM requires LAMP server for its installation as a pre-requisites. Run the following command to install the required packages to setup the LAMP Server.
root@linuxhelp:~# apt-get install lamp-server^ -y
Reading package lists... Done
Building dependency tree
Reading state information... Done
Note, selecting ' libhttp-message-perl'  for task ' lamp-server'
Note, selecting ' libencode-locale-perl'  for task ' lamp-server'
Note, selecting ' php7.0-cli'  for task ' lamp-server'
Note, selecting ' mysql-client-5.7'  for task ' lamp-server'
Note, selecting ' libapache2-mod-php'  for task ' lamp-server'
Note, selecting ' rename'  for task ' lamp-server'
Note, selecting ' mysql-server-5.7'  for task ' lamp-server'
Note, selecting ' php-common'  for task ' lamp-server'
Note, selecting ' libaprutil1'  for task ' lamp-server'
Note, selecting ' mysql-server'  for task ' lamp-server'
Note, selecting ' php7.0-opcache'  for task ' lamp-server'
Note, selecting ' libcgi-fast-perl'  for task ' lamp-server'
.
.
.
Creating config file /etc/php/7.0/mods-available/pdo_mysql.ini with new version
Setting up php-mysql (1:7.0+35ubuntu6) ...
Processing triggers for libc-bin (2.23-0ubuntu3) ...
Processing triggers for systemd (229-4ubuntu6) ...
Processing triggers for ureadahead (0.100.0-19) ...
Processing triggers for ufw (0.35-0ubuntu2) ...
Processing triggers for libapache2-mod-php7.0 (7.0.8-0ubuntu0.16.04.2) ...
Utilize the following command to install the php extensions.
root@linuxhelp:~# apt-get install php7.0 libapache2-mod-php7.0 php7.0-mbstring php7.0-curl php7.0-zip php7.0-gd php7.0-mysql php7.0-mcrypt -y
Reading package lists... Done
Building dependency tree
Reading state information... Done
libapache2-mod-php7.0 is already the newest version (7.0.8-0ubuntu0.16.04.2).
php7.0-mysql is already the newest version (7.0.8-0ubuntu0.16.04.2).
The following packages were automatically installed and are no longer required:
  libpango1.0-0 libpangox-1.0-0
Use ' sudo apt autoremove'  to remove them.
.
.
.
Creating config file /etc/php/7.0/mods-available/mbstring.ini with new version
Setting up php7.0-mcrypt (7.0.8-0ubuntu0.16.04.2) ...

Creating config file /etc/php/7.0/mods-available/mcrypt.ini with new version
Setting up php7.0-zip (7.0.8-0ubuntu0.16.04.2) ...

Creating config file /etc/php/7.0/mods-available/zip.ini with new version
Processing triggers for libc-bin (2.23-0ubuntu3) ...
Processing triggers for libapache2-mod-php7.0 (7.0.8-0ubuntu0.16.04.2) ...
Now start and enable the Apache and MySql services as shown below.
root@linuxhelp:~# systemctl start apache2
root@linuxhelp:~# systemctl enable apache2
apache2.service is not a native service, redirecting to systemd-sysv-install
Executing /lib/systemd/systemd-sysv-install enable apache2
root@linuxhelp:~# systemctl start mysql
root@linuxhelp:~# systemctl enable mysql
Synchronizing state of mysql.service with SysV init with /lib/systemd/systemd-sysv-install...
Executing /lib/systemd/systemd-sysv-install enable mysql
Utilize the following command to create the database and user for X2CRM.
root@linuxhelp:~# mysql -u root -p
Enter password:
Welcome to the MySQL monitor.  Commands end with   or g.
Your MySQL connection id is 4
Server version: 5.7.13-0ubuntu0.16.04.2 (Ubuntu)

Copyright (c) 2000, 2016, Oracle and/or its affiliates. All rights reserved.

Oracle is a registered trademark of Oracle Corporation and/or its
affiliates. Other names may be trademarks of their respective
owners.

Type ' help '  or ' h'  for help. Type ' c'  to clear the current input statement.

mysql>  CREATE DATABASE x2crmdb
Query OK, 1 row affected (0.08 sec)

mysql>  GRANT ALL PRIVILEGES ON x2crmdb.* TO ' x2crmuser' @' localhost'  IDENTIFIED BY ' 123'
Query OK, 0 rows affected, 1 warning (0.37 sec)

mysql>  FLUSH PRIVILEGES
Query OK, 0 rows affected (0.43 sec)

mysql>  exit
Bye
Run the following command to enable the apache rewrite module.
root@linuxhelp:~# a2enmod rewrite
Enabling module rewrite.
To activate the new configuration, you need to run:
   service apache2 restart
Restart the apache services, once the LAMP installation is completed.
root@linuxhelp:~# service apache2 restart
To install X2CRM
Now run the following command to download the X2CRM package.
root@linuxhelp:~# wget https://github.com/X2Engine/X2Engine/archive/master.zip
--2016-09-10 17:38:50--  https://github.com/X2Engine/X2Engine/archive/master.zip
Resolving github.com (github.com)... 192.30.253.112
Connecting to github.com (github.com)|192.30.253.112|:443... connected.
HTTP request sent, awaiting response... 200 OK
Length: unspecified [application/zip]
Saving to: ‘ master.zip’

master.zip                                     [          < =>                                                                             ]  28.89M   338KB/s    in 82s

2016-09-10 17:40:15 (362 KB/s) - ‘ master.zip’  saved [30294151]
After downloading the package, move the package to /var/www/ location.
root@linuxhelp:~# ls
Desktop  Documents  Downloads  examples.desktop  master.zip  Music  Pictures  Public  Templates  Videos
root@linuxhelp:~# mv master.zip /var/www/html
root@linuxhelp:~# cd /var/www/html
root@linuxhelp:/var/www/html# ls
index.html  master.zip
Remove the default index.html file from the document root.
root@linuxhelp:/var/www/html# rm -rf index.html
Run the following command to extract the package.
root@linuxhelp:/var/www/html# unzip master.zip
Archive:  master.zip
a061b24f9c4b4a6fbcf0e00d036c97c845d020f5
   creating: X2CRM-master/
  inflating: X2CRM-master/.gitignore
  inflating: X2CRM-master/.travis.yml
  inflating: X2CRM-master/CHANGELOG.md
  inflating: X2CRM-master/CONTRIBUTING.md
  inflating: X2CRM-master/README.md
.
.
.
   creating: X2CRM-master/x2engine/uploads/protected/media/chames/
  inflating: X2CRM-master/x2engine/uploads/protected/media/chames/Bills_Billing_Hierarchy.odg
   creating: X2CRM-master/x2engine/uploads/protected/media/ssmith/
  inflating: X2CRM-master/x2engine/uploads/protected/media/ssmith/heatmap_2012-10-11.jpeg
  inflating: X2CRM-master/x2engine/uploads/protected/pigeon_point.jpg
  inflating: X2CRM-master/x2engine/uploads/protected/santacruznight_blur.jpg
  inflating: X2CRM-master/x2engine/webConfig.php
  inflating: X2CRM-master/x2engine/webListener.php
  inflating: X2CRM-master/x2engine/webTracker.php
Rename the X2CRM-master directory to x2crm.
root@linuxhelp:/var/www/html# ls
master.zip  X2CRM-master
root@linuxhelp:/var/www/html# mv X2CRM-master x2crm
Change the ownership for the x2crm directory with the help of the following command.
root@linuxhelp:/var/www/html# chown -R www-data:www-data /var/www/html/x2crm/
Create the new apache virtual host configuration file for x2crm in the “ sites-available” directory and create a soft link to “ sites-enabled” directory.
root@linuxhelp:/var/www/html# touch /etc/apache2/sites-available/x2crm.conf
root@linuxhelp:/var/www/html# ln -s /etc/apache2/sites-available/x2crm.conf /etc/apache2/sites-enabled/x2crm.conf
root@linuxhelp:/var/www/html# vim /etc/apache2/sites-available/x2crm.conf
Append the following lines to the configuration file.
< VirtualHost *:80>
ServerAdmin [email protected]
DocumentRoot /var/www/html/x2crm/
ServerName linuxhelp.com
ServerAlias www.linuxhelp.com
< Directory/var/www/html/x2crm/>
Options FollowSymLinks
AllowOverride All
Order allow,deny
allow from all
< /Directory>
ErrorLog /var/log/apache2/linuxhelp.com-error_log
CustomLog /var/log/apache2/linuxhelp.com-access_log common
< /VirtualHost>
Then restart the apache service.
root@linuxhelp:/var/www/html# systemctl restart apache2
Open the browser and navigate to http://< IP_address> /x2crm/x2engine/install.php
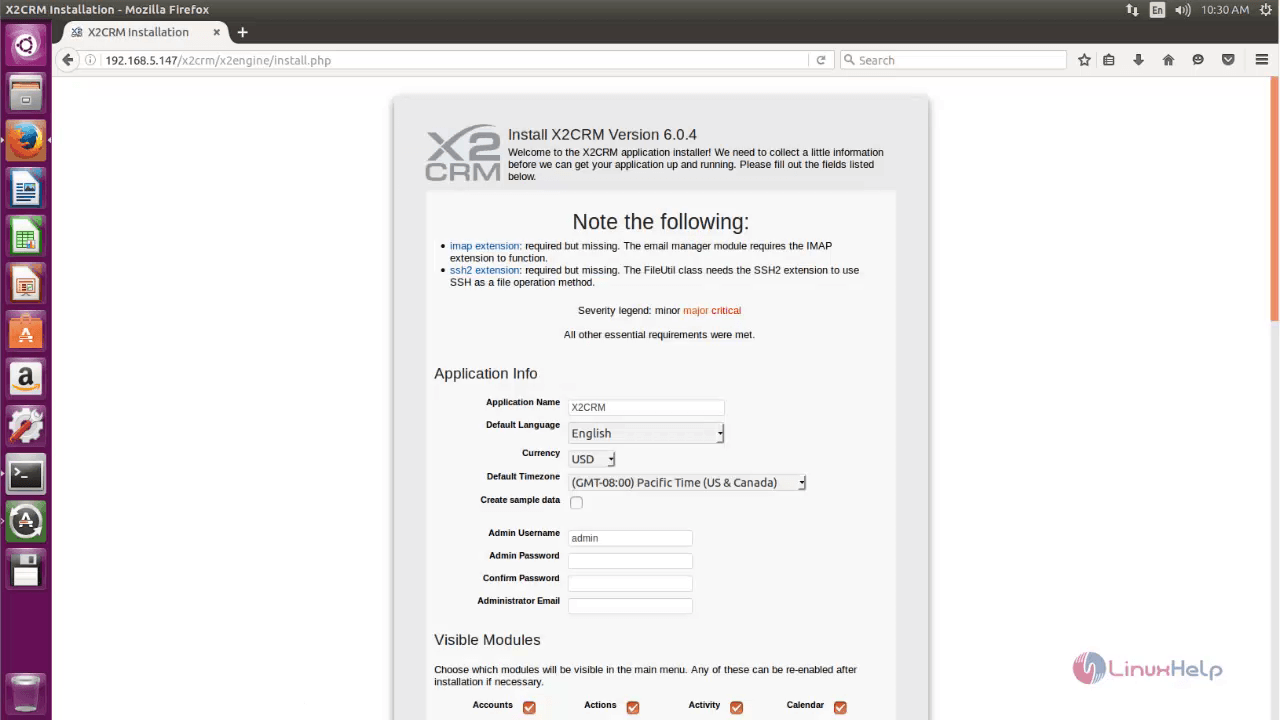
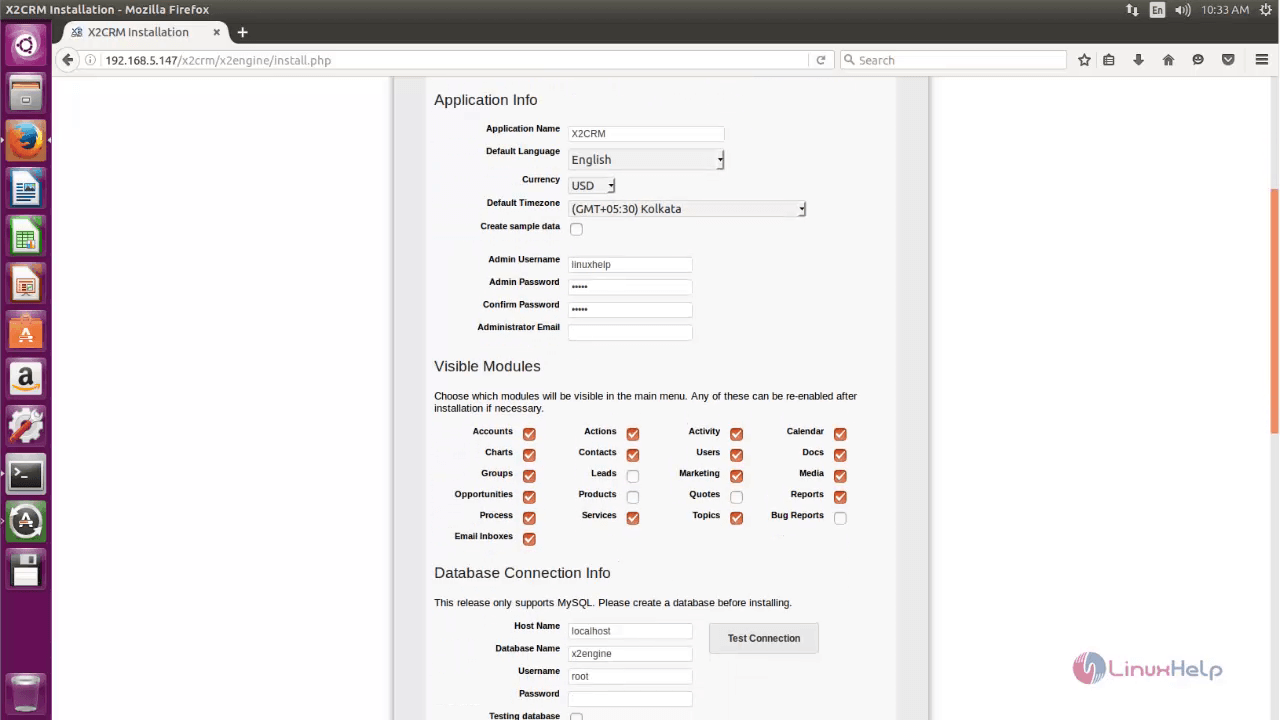
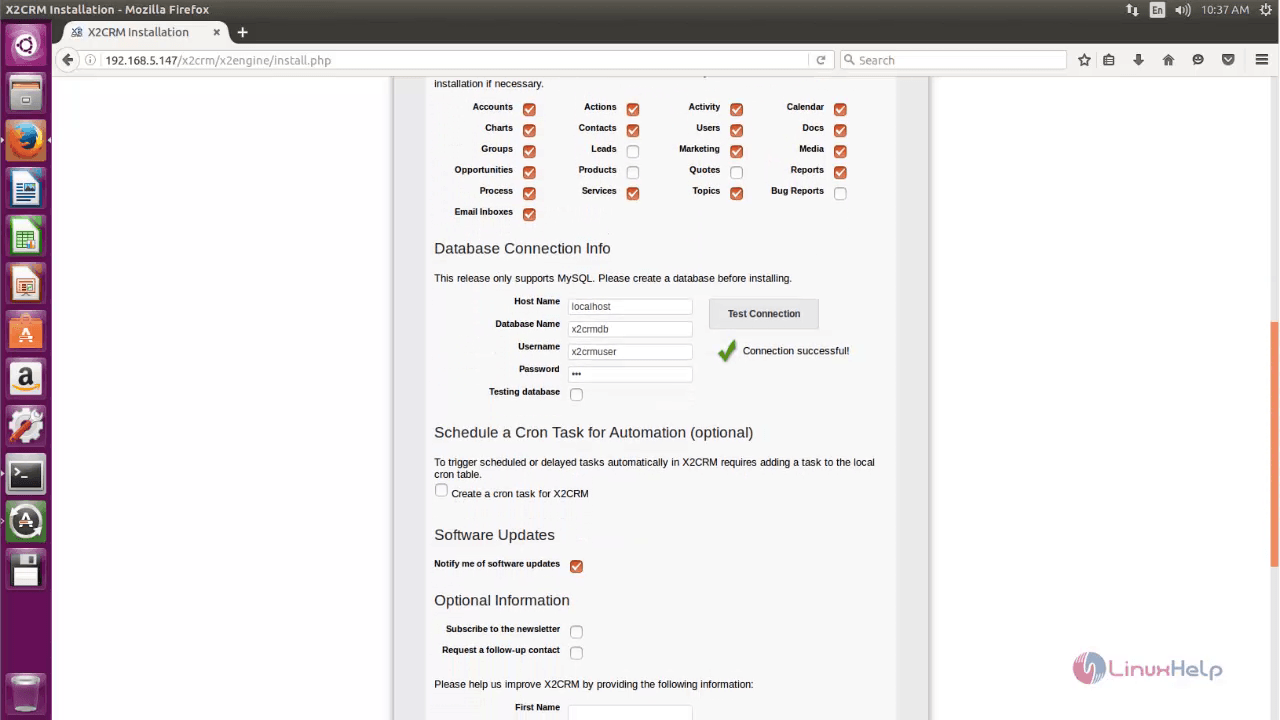
Fill the required information such as Admin username, password, database information etc., and click “ Install”
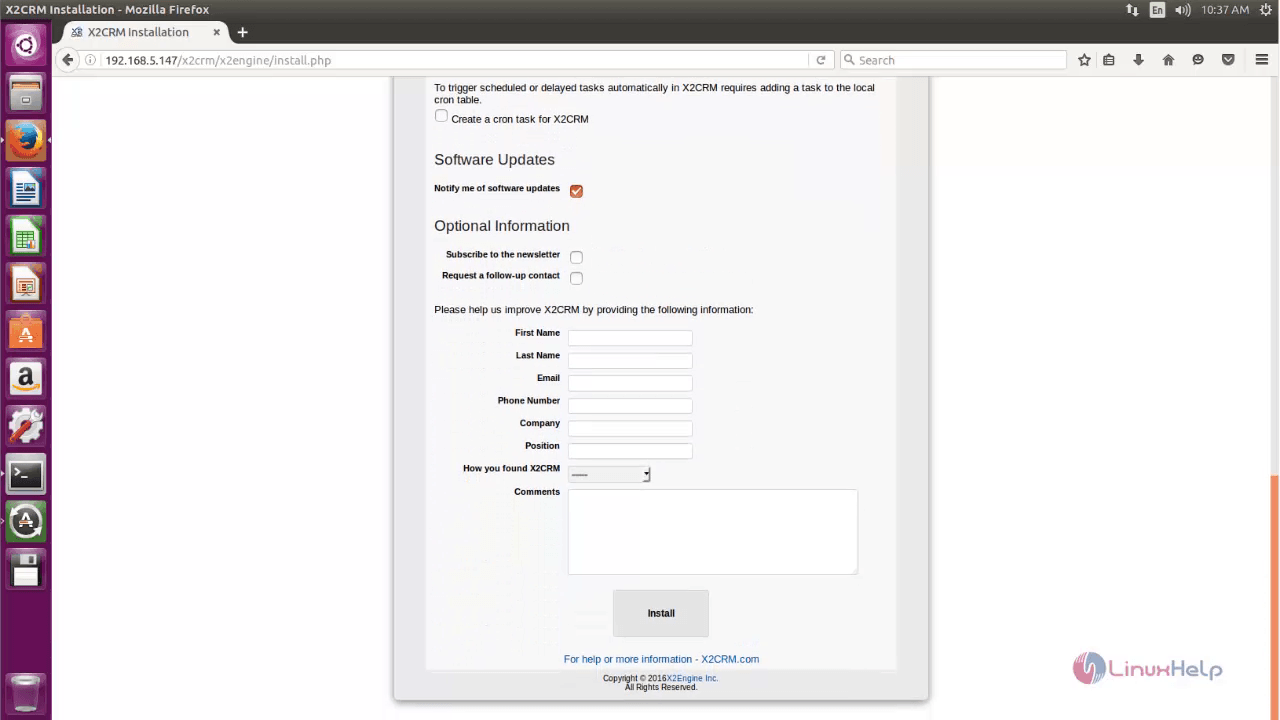
Now the installation is completed successfully.
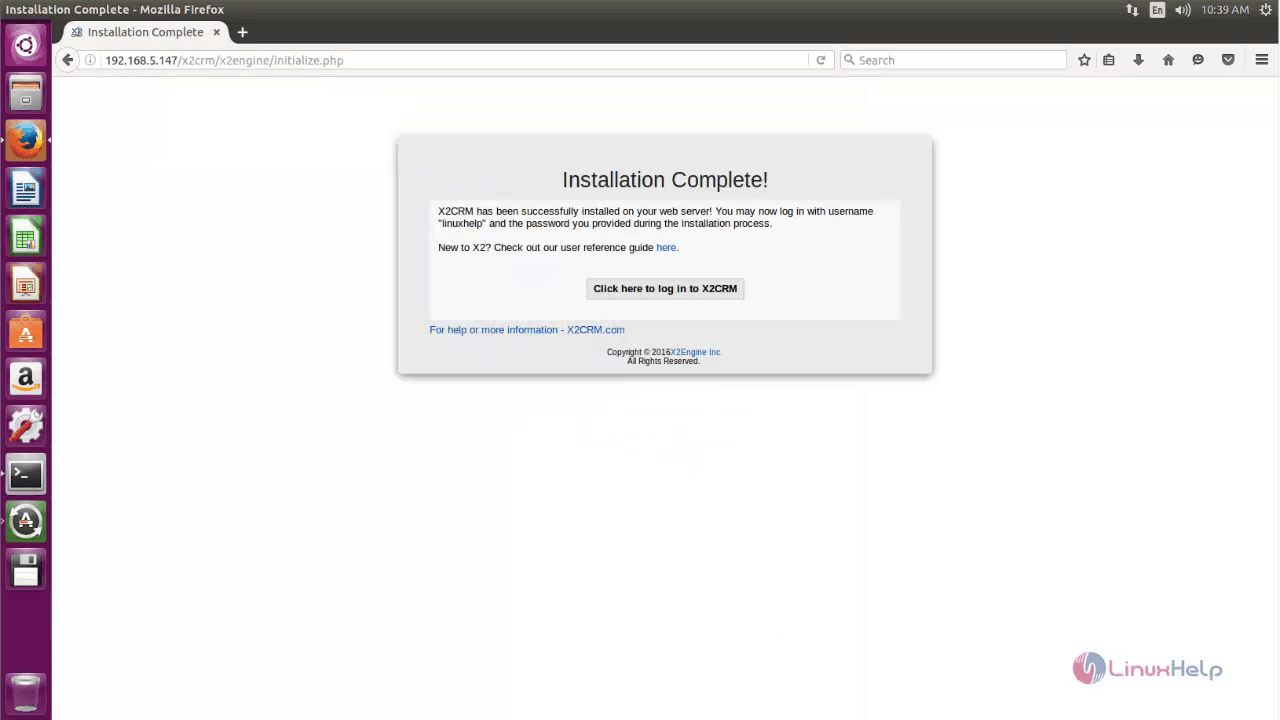
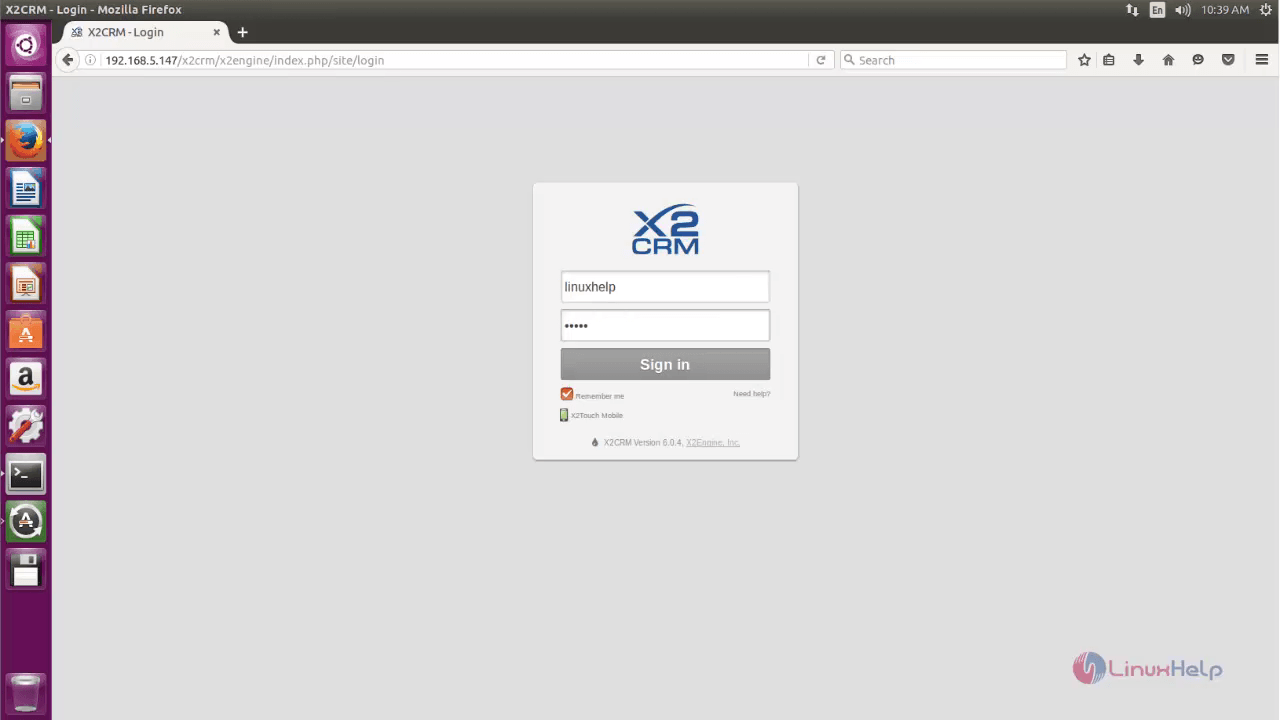
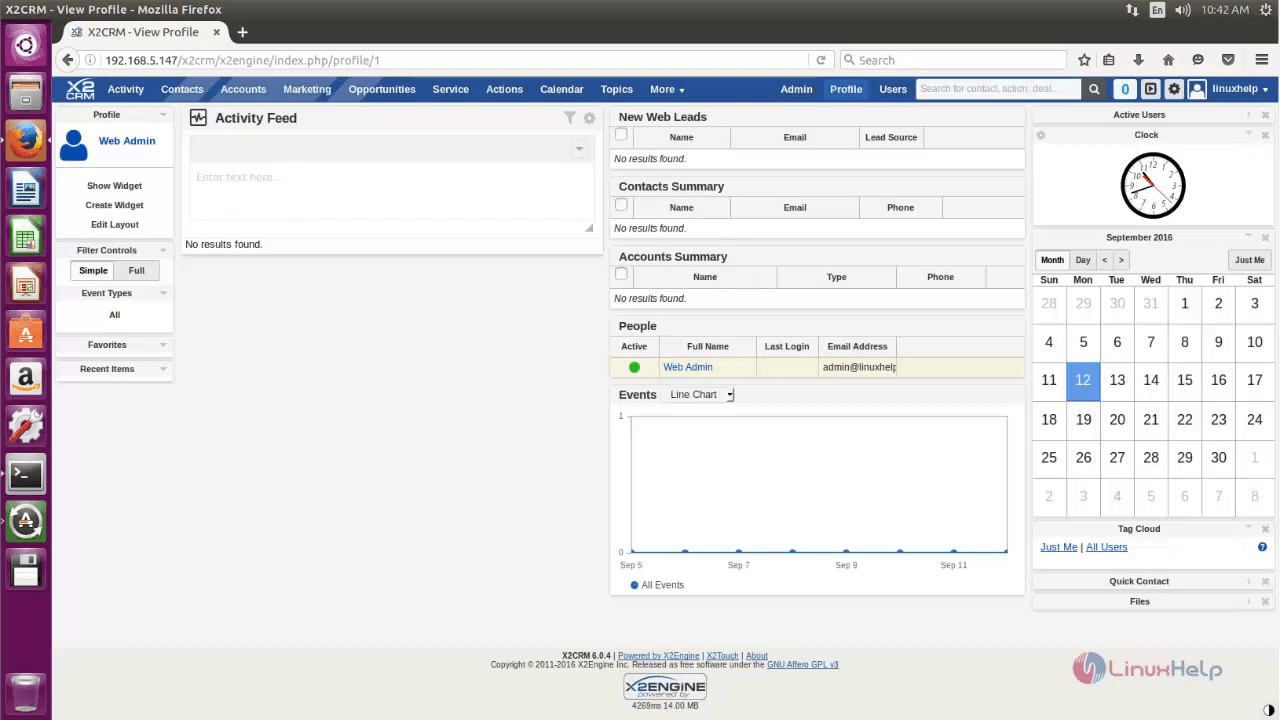
Login to the X2CRM using the user credentials.
Comments ( 0 )
No comments available