How to install Zenario on OpenSUSE leap 42.3
How to install Zenario on OpenSUSE leap 42.3
Zenario is a Content Management System, which enables you to build websites and powerful online applications. It is designed especially for the users who want to grow with their site. It is so simple to install Zenario on OpenSUSE Leap 42.3, and this tutorial covers the ground on the same process.
Requirements
LAMP Stack
- -Apache
- -MariaDB
- -PHP 7 (zypper install php php-mysql php-pecl-zip php-xml php-mbstring php-gd)
Installing Zenario
First, you need to download the latest and stable version of Zenario by making use of wget command along with its download link.
linuxhelp:~ #wget https://zenar.io/public/downloads/zfofV/zenario-probusiness-8.0.44236.zip
--2018-01-08 19:19:09--  https://zenar.io/public/downloads/zfofV/zenario-probusiness-8.0.44236.zip
Resolving zenar.io (zenar.io)... 154.59.130.222
Connecting to zenar.io (zenar.io)|154.59.130.222|:443... connected.
HTTP request sent, awaiting response... 200 OK
Length: 16103227 (15M) [application/zip]
Saving to: ‘ zenario-probusiness-8.0.44236.zip’
100%[======================================> ] 16,103,227   451KB/s   in 48s
2018-01-08 19:20:01 (325 KB/s) - ‘ zenario-probusiness-8.0.44236.zip’  saved [16103227/16103227]
Once it is done, you need to extract the package by, making use of the unzip command.
linuxhelp:~ #unzip zenario-probusiness-8.0.44236.zip
Archive:  zenario-probusiness-8.0.44236.zip
   creating: zenario-probusiness-8.0/
  inflating: zenario-probusiness-8.0/htaccess_for_tildes_in_home_dir.txt
   creating: zenario-probusiness-8.0/zenario/
  inflating: zenario-probusiness-8.0/zenario/visitorheader.inc.php
  inflating: zenario-probusiness-8.0/zenario/editions.inc.php
  inflating: zenario-probusiness-8.0/zenario/.DS_Store
  inflating: zenario-probusiness-8.0/zenario/index.php
  inflating: zenario-probusiness-8.0/zenario/has_database_changed_and_is_cache_out_of_date.php
.
.
.
creating: zenario-probusiness-8.0/zenario_custom/frameworks/
   creating: zenario-probusiness-8.0/zenario_custom/modules/
  inflating: zenario-probusiness-8.0/robots.txt
  inflating: zenario-probusiness-8.0/license.txt
  inflating: zenario-probusiness-8.0/composer.json
  inflating: zenario-probusiness-8.0/README_INSTALL.md
  inflating: zenario-probusiness-8.0/.htaccess
Later, you need to provide appropriate owner and file execution permissions and for that, you need to run the following command.
linuxhelp1:/srv/www/htdocs/zenario-probusiness-8.0 # chown -R wwwrun:www /srv/www/htdocs/
linuxhelp1:/srv/www/htdocs/zenario-probusiness-8.0 # chmod -R 775 /srv/www/htdocs/
You should now configure your Apache VirtualHost for Zenario CMS. So, create a .conf file for Zenario by running the following command.
linuxhelp:/srv/www/htdocs # vim /etc/apache2/conf.d/zenario.conf
In that file, you need to add the following lines.
< VirtualHost *:80>
DocumentRoot " /srv/www/htdocs"
ServerName www.linuxhelp1.com
< Directory " /srv/www/htdocs/" >
DirectoryIndex index.php
Options FollowSymLinks
AllowOverride All
Require all granted
< /Directory>
< /VirtualHost>
After the installation, you need to restart your Apache service by making use of the following command.
linuxhelp:/srv/www/htdocs # systemctl restart apache
And then, you need to configure your Firewall settings by running the following command.
linuxhelp:/srv/www/htdocs # vim /etc/sysconfig/SuSEfirewall2
FW_CONFIGURATIONS_EXT=" apache"
linuxhelp:/srv/www/htdocs # systemctl restart SuSEfirewall2
Once it is done, you shall rename this as per your convenience.
linuxhelp:/srv/www/htdocs # mv zenario-probusiness-8.0 zenario
Now, open the web browser and navigate to http://< IP_address> , the Zenario Installation wizard appears on your screen. Select Begin Installation.

Read and accept the license agreement and click Fresh install.

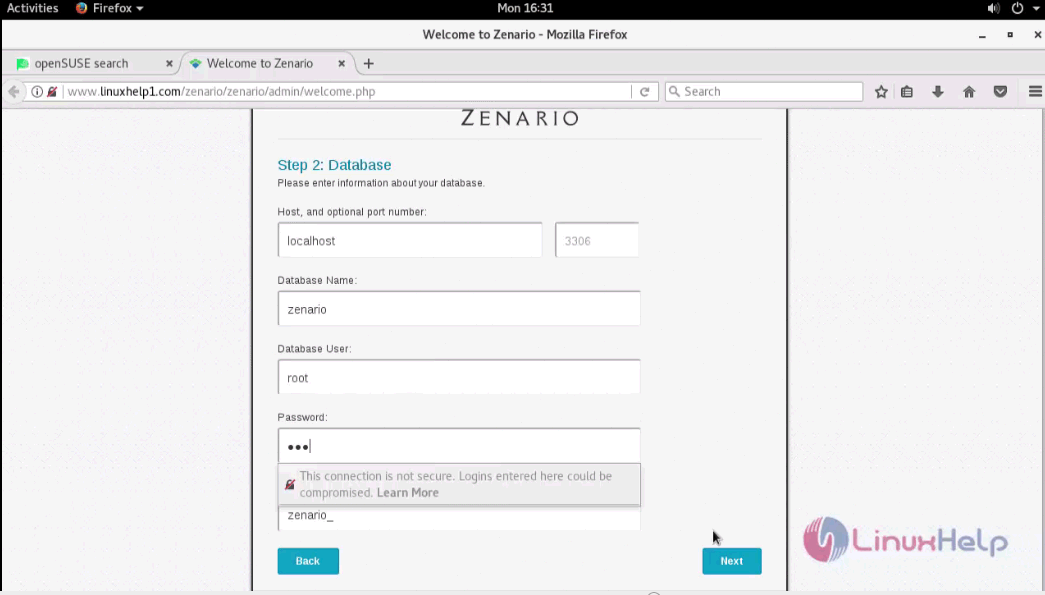
After that, make sure you all the necessary Database Information. Click Next to proceed further.
Select your site content and click Next.

Then add your admin account detail and click Next.

In the next stage, you need to copy the site configuration file. Copy the file and add it in the /srv/www/htdocs/zenario # vim zenario_siteconfig.php location.

So, go back to your terminal and enter into that location.
linuxhelp:/srv/www/htdocs # cd zenario/

linuxhelp:/srv/www/htdocs/zenario # vim zenario_siteconfig.php
And copy this in that file.
< ?php
// This file should be called zenario_siteconfig.php and located in your CMS directory.

  /////////////////////////////
 // MySQL database settings //
/////////////////////////////

//Database host (often localhost):
define(' DBHOST' , ' localhost' )
//Database name:
define(' DBNAME' , ' zenario' )  //Provide your db name
//MySQL database username:
define(' DBUSER' , ' root' )
//Database password:
define(' DBPASS' , ' 123' )
//Database port number:
define(' DBPORT' , ' ' )
//Prefix for all table names (to keep them distinct from other apps):
define(' DB_NAME_PREFIX' , ' zenario_' )
//Use MySQL in " strict"  mode:
define(' DEBUG_USE_STRICT_MODE' , true)

  //////////////////////////////////////////////////////////
 // MySQL database settings for multi-site adminstrators //
//////////////////////////////////////////////////////////

// These optional parameters allow you to specify a different installation
// of Zenario and log in to this installation with those administrator accounts:
//define(' DBHOST_GLOBAL' , ' [[DBHOST_GLOBAL]]' )
//define(' DBNAME_GLOBAL' , ' [[DBNAME_GLOBAL]]' )
//define(' DBUSER_GLOBAL' , ' [[DBUSER_GLOBAL]]' )
//define(' DBPASS_GLOBAL' , ' [[DBPASS_GLOBAL]]' )
//define(' DBPORT_GLOBAL' , ' [[DBPORT_GLOBAL]]' )
//define(' DB_NAME_PREFIX_GLOBAL' , ' [[DB_NAME_PREFIX_GLOBAL]]' )

  ///////////////////////////
 // Support email address //
///////////////////////////

// Send system errors to the following email address:
define(' EMAIL_ADDRESS_GLOBAL_SUPPORT' , ' admin@gmail.com' )

// Send an email to the address above if there is a database error:
define(' DEBUG_SEND_EMAIL' , true)

// Note that other email-related settings can be found under
// " Configuration ->  Site settings ->  Email"  in Organizer

  /////////////////////////////
 // Directory and file name //
/////////////////////////////

// If you are running Zenario in a subdirectory please enter this here.
// If specifed, it MUST start with a / and must end in a /
// If you are not running in a subdirectory please just enter a /
define(' SUBDIRECTORY' , ' /zenario/' )

// The filename of the index file in the root directory.
// In most cases you don' t need to change this.
define(' DIRECTORY_INDEX_FILENAME' , ' index.php' )

  //////////////////////////
 // Cookies and Sessions //
//////////////////////////

// If you are using multiple sub-domains for your site, and this value is defined,
// then cookies set in the browser, an administrator' s login, and an extranet user' s
// login will persist across the domain and any sub-domains.
//
// For example, a setting of ' example.com'  will persist cookies across all sites at
// *.example.com where ' *'  means any sub-domain, as well as example.com itself.
//
// You should use this if you use a sub-domains to denote languages, such as
// example.com, en.example.com, de.example.com and fr.example.com.
// In that case, enter ' example.com'  below.
//
// Leave this blank if you' re not using sub-domains.
define(' COOKIE_DOMAIN' , ' ' )

// The length of time (in seconds) that the cookie consent, " remember me"  and
// " Log me in automatically"  options last.
// The default value if not set is 100 days.
define(' COOKIE_TIMEOUT' , 8640000)

// The length of time (in seconds) to persist the login of administrators and extranet users.
//
// I.e. if they do not visit the site for the set time they will be logged out.
// This will be overridden by the session.cookie_lifetime and/or session.gc_maxlifetime
// settings in the php.ini file if they are shorter.
//
// If non-zero, the user will be logged out after that number of seconds, but they will not
// be logged out simply by quitting their browser or restarting their PC.
//
// If set to 0 then they will be logged out when quitting/restarting, but will otherwise
// remain logged in until session.cookie_lifetime and/or session.gc_maxlifetime.
//
// Set this to 0 for maximum security.
define(' SESSION_TIMEOUT' , 0)

  /////////////////////
 // Error reporting //
/////////////////////

//define(' ERROR_REPORTING_LEVEL' , (E_ALL | E_NOTICE | E_STRICT))
// This shows every type of error.
// We recommend using this level of reporting on development or staging sites that are not live.

define(' ERROR_REPORTING_LEVEL' , (E_ALL &  ~E_NOTICE &  ~E_STRICT))
// This shows all errors except notices and strict errors.
// We recommend using this level of reporting on live/production sites.

  ////////////////////////////
 // Forwarded IP addresses //
////////////////////////////

// Normally, a visitor' s IP Address is read from the $_SERVER[' REMOTE_ADDR' ] variable.
// If you are using a load balancer and/or a proxy, you must set this to true so that
// Zenario will read from the $_SERVER[' HTTP_X_FORWARDED_FOR' ] variable instead.
define(' USE_FORWARDED_IP' , false)
After adding, go back to the installation setup and click on I’ ve done it myself.
You will get the success message which means, you have completed your installation process.


Start your journey with Zenario by Creating a new user account.

With this, the installation of Zenario on OpenSUSE Leap 42.3 comes to an end.
Comments ( 0 )
No comments available