How to Create private website using Moodle in Linux
Steps to Create Own Online Learning Management System Using Moodle in Linux
Moodle is software learning management system used for e-learning projects in education system and work places. It is also used to create private websites with courses using the community sourced plugins. Creation of Own Online Learning Management System with the help of Moodle is explained in this manual. It is free and easy to use.
Features of Moodle
- Convenient file management
- Integration of Multimedia
- Additional functionality Plugins
- User roles
- Regular security updates
- Multilingual capability
- Personalized dashboard
- Secure authentication and mass enrollment
- Creation of Bulk course
- Multiple supported languages
- Customizable layout/site design
- Progress tracking
- Notifications
- Simple text editor & Simple plugin management
- Easy management of file
- All-in-one calendar
- Collaborative tools and activities
- Modern and easy to use interface
Requirements for installing Moodle
Since moodle is used to create and host a private website for online learning management, it should need for a Web server and the Database to store the datas.
- Web Server &ndash Apache, Nginx or any other.
- Database &ndash MySQL, MariaDB or any other.
- PHP and its Extensions - to support moodle to run with error free.
You should have full access to your system by executing the commands with sudo privileges or root user.
Step 1: To Setup a LAMP or LEMP Environment for Moodle
We need to set LAMP or LEMP environment for moodle.
To Setup a LAMP Environment for Moodle
LAMP means it’ s a combination of Linux Apache, MariaDB and PHP packages. Run the following command to setup a LAMP environment.
On Fedora 22+ versions
# dnf install httpd php mariadb-server

On Debian/Ubuntu based systems
# apt-get install apache2 php5 mariadb-server
On RedHat/CentOS based systems
[root@linuxhelp ~]# yum install httpd php mariadb-server -y
Loaded plugins: fastestmirror, langpacks
Loading mirror speeds from cached hostfile
 * base: centos.excellmedia.net
 * extras: centos.excellmedia.net
 * updates: centos.excellmedia.net
Resolving Dependencies
-->  Running transaction check
--->  Package httpd.x86_64 0:2.4.6-40.el7.centos will be installed
-->  Processing Dependency: httpd-tools = 2.4.6-40.el7.centos for package: httpd-2.4.6-40.el7.centos.x86_64
-->  Processing Dependency: /etc/mime.types for package: httpd-2.4.6-40.el7.centos.x86_64
-->  Processing Dependency: libaprutil-1.so.0()(64bit) for package: httpd-2.4.6-40.el7.centos.x86_64
-->  Processing Dependency: libapr-1.so.0()(64bit) for package: httpd-2.4.6-40.el7.centos.x86_64
.
.
.
Installed:
  httpd.x86_64 0:2.4.6-40.el7.centos             mariadb-server.x86_64 1:5.5.47-1.el7_2             php.x86_64 0:5.4.16-36.el7_1
Dependency Installed:
  apr.x86_64 0:1.4.8-3.el7                        apr-util.x86_64 0:1.5.2-6.el7                  httpd-tools.x86_64 0:2.4.6-40.el7.centos
  libzip.x86_64 0:0.10.1-8.el7                    mailcap.noarch 0:2.1.41-2.el7                  mariadb.x86_64
.
.
.
  php-common.x86_64 0:5.4.16-36.el7_1
Dependency Updated:
  mariadb-libs.x86_64 1:5.5.47-1.el7_2

Complete!
To Setup a LEMP Environment for Moodle
LEMP is a combination of Linux Nginx, MariaDB and PHP packages. Run the following command to setup a LEMP environment.
On RedHat/CentOS based systems
# yum install nginx php php-fpm mariadb-server

On Fedora 22+ versions
# dnf install nginx php php-fpm mariadb-server

On Debian/Ubuntu based systems
# apt-get install nginx php5 php5-fpm mariadb-server
Step 2: To Install PHP Extensions and Libraries
Install the below PHP extensions and libraries to execute error free Moodle.
--------------------- On On Fedora 22+ versions ---------------------
# dnf install php-iconv php-mbstring php-curl php-opcache php-xmlrpc php-mysql php-openssl php-tokenizer php-soap php-ctype php-zip php-gd php-simplexml php-spl php-pcre php-dom php-xml php-intl php-json php-ldap wget unzip
--------------------- On Debian/Ubuntu based systems ---------------------
# apt-get install graphviz aspell php5-pspell php5-curl php5-gd php5-intl php5-mysql php5-xmlrpc php5-ldap
--------------------- On RedHat/CentOS based systems ---------------------
[root@linuxhelp ~]# yum install php-iconv php-mbstring php-curl php-opcache php-xmlrpc php-mysql php-openssl php-tokenizer php-soap php-ctype php-zip php-gd php-simplexml php-spl php-pcre php-dom php-xml php-intl php-json php-ldap wget unzip -y
Loaded plugins: fastestmirror, langpacks
Loading mirror speeds from cached hostfile
 * base: centos.excellmedia.net
 * extras: centos.excellmedia.net
 * updates: centos.excellmedia.net
Package php-common-5.4.16-36.el7_1.x86_64 already installed and latest version
Package php-common-5.4.16-36.el7_1.x86_64 already installed and latest version
.
.
.
Installed:
  php-gd.x86_64 0:5.4.16-36.el7_1                 php-intl.x86_64 0:5.4.16-36.el7_1             php-ldap.x86_64 0:5.4.16-36.el7_1
  php-mbstring.x86_64 0:5.4.16-36.el7_1           php-mysql.x86_64 0:5.4.16-36.el7_1            php-soap.x86_64 0:5.4.16-36.el7_1
  php-xml.x86_64 0:5.4.16-36.el7_1                php-xmlrpc.x86_64 0:5.4.16-36.el7_1

Dependency Installed:
  php-pdo.x86_64 0:5.4.16-36.el7_1                                        t1lib.x86_64 0:5.1.2-14.el7

Updated:
  unzip.x86_64 0:6.0-15.el7                                          wget.x86_64 0:1.14-10.el7_0.1

Complete!
Step 3: To Configure PHP Settings
Open and change PHP settings in your php.ini or .htaccess
[root@linuxhelp ~]# vim /etc/php.ini
Add the entry as follows to php.ini file.
register_globals = Off
safe_mode = Off
memory_limit = 128M
session.save_handler = files
magic_quotes_gpc = Off
magic_quotes_runtime = Off
file_uploads = On
session.auto_start = 0
session.bug_compat_warn = Off
post_max_size = 50M
upload_max_filesize = 50M
Enable the below variable in php.ini file on Nginx web server.
cgi.fix_pathinfo=1
After performing the above changes, restart and enable the web server.
For Apache Web Server
--------------------- On Systemd based systems ---------------------
On RedHat/CentOS based systems
# systemctl restart httpd.service

On Debian/Ubuntu based systems
# systemctl restart apache2.service
# Systemctl enable httpd.service
# systemctl enable apache2.service
For Nginx Web Server
--------------------- On Systemd based systems ---------------------
# systemctl restart nginx.service
# systemctl enable nginz.service
# systemctl restart php-fpm.service
# systemctl enable php-fpm.service
[root@linuxhelp ~]# systemctl restart httpd
[root@linuxhelp ~]# systemctl enable httpd
ln -s ' /usr/lib/systemd/system/httpd.service'  ' /etc/systemd/system/multi-user.target.wants/httpd.service'
[root@linuxhelp ~]# systemctl status httpd
httpd.service - The Apache HTTP Server
   Loaded: loaded (/usr/lib/systemd/system/httpd.service  enabled)
   Active: active (running) since Mon 2016-05-02 15:42:05 IST  10s ago
     Docs: man:httpd(8)
           man:apachectl(8)
 Main PID: 12313 (httpd)
   Status: " Total requests: 0  Current requests/sec: 0  Current traffic:   0 B/sec"
   CGroup: /system.slice/httpd.service
           ??12313 /usr/sbin/httpd -DFOREGROUND
           ??12315 /usr/sbin/httpd -DFOREGROUND
           ??12316 /usr/sbin/httpd -DFOREGROUND
           ??12317 /usr/sbin/httpd -DFOREGROUND
           ??12319 /usr/sbin/httpd -DFOREGROUND
           ??12321 /usr/sbin/httpd -DFOREGROUND

May 02 15:42:04 linuxhelp systemd[1]: Starting The Apache HTTP Server...
May 02 15:42:05 linuxhelp httpd[12313]: AH00557: httpd: apr_sockaddr_info_get() failed for linuxhelp
May 02 15:42:05 linuxhelp httpd[12313]: AH00558: httpd: Could not reliably determine the server' s fully qualified domain name, usi...message
May 02 15:42:05 linuxhelp systemd[1]: Started The Apache HTTP Server.
Step 4: Installation of Moodle Learning Management System
Navigate to the document root directory of your Nginx or Apache server by running the following command.
For Apache
# cd /var/www/html

For Nginx
# cd /usr/share/nginx/html
You will be directed to the Moodle download page. In that, grab the recent Moodle archive or with the help of wget command download the Moodle.
[root@linuxhelp ~]# cd /var/www/html/
[root@linuxhelp html]# wget https://download.moodle.org/download.php/direct/stable30/moodle-3.0.zip
--2016-05-02 15:48:52--  https://download.moodle.org/download.php/direct/stable30/moodle-3.0.zip
Resolving download.moodle.org (download.moodle.org)... 141.101.112.179, 141.101.113.179, 2400:cb00:2048:1::8d65:70b3, ...
Connecting to download.moodle.org (download.moodle.org)|141.101.112.179|:443... connected.
HTTP request sent, awaiting response... 200 OK
Length: 50358652 (48M) [application/zip]
Saving to: ‘ moodle-3.0.zip’
100%[==================================================================================================> ] 50,358,652   458KB/s   in 6m 40s

2016-05-02 15:55:34 (123 KB/s) - ‘ moodle-3.0.zip’  saved [50358652/50358652]
[root@linuxhelp html]# ls -l
total 49180
-rw-r--r--. 1 root root 50358652 Nov 15 23:14 moodle-3.0.zip
Unzip the downloaded archive, which will create a new directory known as “ moodle” . Move all of the contents of moodle to the document root directory of web server.
[root@linuxhelp html]# unzip moodle-3.0.zip
inflating: moodle/auth/db/lang/en/auth_db.php
  inflating: moodle/auth/db/version.php
  inflating: moodle/auth/db/auth.php
   creating: moodle/auth/db/tests/
  inflating: moodle/auth/db/tests/db_test.php
   creating: moodle/auth/db/db/
  inflating: moodle/auth/db/db/install.php
   creating: moodle/auth/nologin/
   creating: moodle/auth/nologin/lang/
   creating: moodle/auth/nologin/lang/en/
  inflating: moodle/auth/nologin/lang/en/auth_nologin.php
  inflating: moodle/auth/nologin/version.php
  inflating: moodle/auth/nologin/auth.php
[root@linuxhelp html]# ls -l
total 49184
drwxr-xr-x. 45 root root     4096 Nov 16 03:40 moodle
-rw-r--r--.  1 root root 50358652 Nov 15 23:14 moodle-3.0.zip
[root@linuxhelp html]# cd moodle/
[root@linuxhelp moodle]# cp -r * /var/www/html/
Next change the files ownership into webserver user, based on your distribution. Apache might be executing with user “ Apache” and Nginx running as a user nginx.
On RedHat/CentOS based systems

# chown -R apache: /var/www/html

On Debian/Ubuntu based systems
# chown -R www-data: /var/www/html
OR
# chown -R nginx: /usr/share/nginx/html/
[root@linuxhelp html]# ls -lZd /var/www/html/
drwxr-xr-x. root root system_u:object_r:httpd_sys_content_t:s0 /var/www/html/
[root@linuxhelp html]# chown -R apache: /var/www/html
[root@linuxhelp html]# ls -lZd /var/www/html/
drwxr-xr-x. apache apache system_u:object_r:httpd_sys_content_t:s0 /var/www/html/
Create that directory outside of the document root directory, for security purposes which can be done as follows. And set the context for /var/www directory to make as writable, while the installation of moodle.
For Apache

# mkdir /var/www/moodledata

For Nginx
# mkdir /usr/share/moodledata
[root@linuxhelp html]# mkdir /var/www/moodledata
[root@linuxhelp html]# ls -lZd /var/www/
drwxr-xr-x. root root system_u:object_r:httpd_sys_content_t:s0 /var/www/
[root@linuxhelp html]# chcon -Rt httpd_sys_rw_content_t /var/www
[root@linuxhelp html]# ls -lZd /var/www/
drwxr-xr-x. root root system_u:object_r:httpd_sys_rw_content_t:s0 /var/www/
Fix the folder ownership as
On RedHat/CentOS based systems

# chown -R apache: /var/www/moodledata

On Debian/Ubuntu based systems
# chown -R nginx: /usr/share/moodledata
[root@linuxhelp html]# ls -lZd /var/www/moodledata/
drwxr-xr-x. root root unconfined_u:object_r:httpd_sys_rw_content_t:s0 /var/www/moodledata/
[root@linuxhelp html]# chown -R apache: /var/www/moodledata
[root@linuxhelp html]# ls -lZd /var/www/moodledata/
drwxr-xr-x. apache apache unconfined_u:object_r:httpd_sys_rw_content_t:s0 /var/www/moodledata/
Step 5: To Create Moodle Database
Now restart and enable the service for MariaDB and run the following command to prepare a database for our installation.
[root@linuxhelp ~]# systemctl restart mariadb
[root@linuxhelp ~]# systemctl enable mariadb
ln -s ' /usr/lib/systemd/system/mariadb.service'  ' /etc/systemd/system/multi-user.target.wants/mariadb.service'
[root@linuxhelp ~]# systemctl status mariadb
mariadb.service - MariaDB database server
   Loaded: loaded (/usr/lib/systemd/system/mariadb.service  enabled)
   Active: active (running) since Mon 2016-05-02 16:15:34 IST  16s ago
 Main PID: 12935 (mysqld_safe)
   CGroup: /system.slice/mariadb.service
           ??12935 /bin/sh /usr/bin/mysqld_safe --basedir=/usr
           ??13092 /usr/libexec/mysqld --basedir=/usr --datadir=/var/lib/mysql --plugin-dir=/usr/lib64/mysql/plugin --log-error=/var/log/...

May 02 16:15:30 linuxhelp mariadb-prepare-db-dir[12853]: The latest information about MariaDB is available at http://mariadb.org/.
May 02 16:15:30 linuxhelp mariadb-prepare-db-dir[12853]: You can find additional information about the MySQL part at:
May 02 16:15:30 linuxhelp mariadb-prepare-db-dir[12853]: http://dev.mysql.com
May 02 16:15:30 linuxhelp mariadb-prepare-db-dir[12853]: Support MariaDB development by buying support/new features from MariaDB
May 02 16:15:30 linuxhelp mariadb-prepare-db-dir[12853]: Corporation Ab. You can contact us about this at [email protected].
May 02 16:15:30 linuxhelp mariadb-prepare-db-dir[12853]: Alternatively consider joining our community based development effort:
May 02 16:15:30 linuxhelp mariadb-prepare-db-dir[12853]: http://mariadb.com/kb/en/contributing-to-the-mariadb-project/
May 02 16:15:31 linuxhelp mysqld_safe[12935]: 160502 16:15:31 mysqld_safe Logging to ' /var/log/mariadb/mariadb.log' .
May 02 16:15:31 linuxhelp mysqld_safe[12935]: 160502 16:15:31 mysqld_safe Starting mysqld daemon with databases from /var/lib/mysql
May 02 16:15:34 linuxhelp systemd[1]: Started MariaDB database server.

[root@linuxhelp ~]# mysql -u root -p
Enter password:
Type your password if you any, and continue. Create a new database known as “ moodle” :

MariaDB [(none)]>  create database moodle
Query OK, 1 row affected (0.01 sec)
Now grant a user “ moodle” on database moodle with all privileges:
MariaDB [(none)]>  grant all on moodle.* to moodle@' localhost'  identified by ' 123'
Query OK, 0 rows affected (0.00 sec)
Step 6: To Start the Installation of Moodle
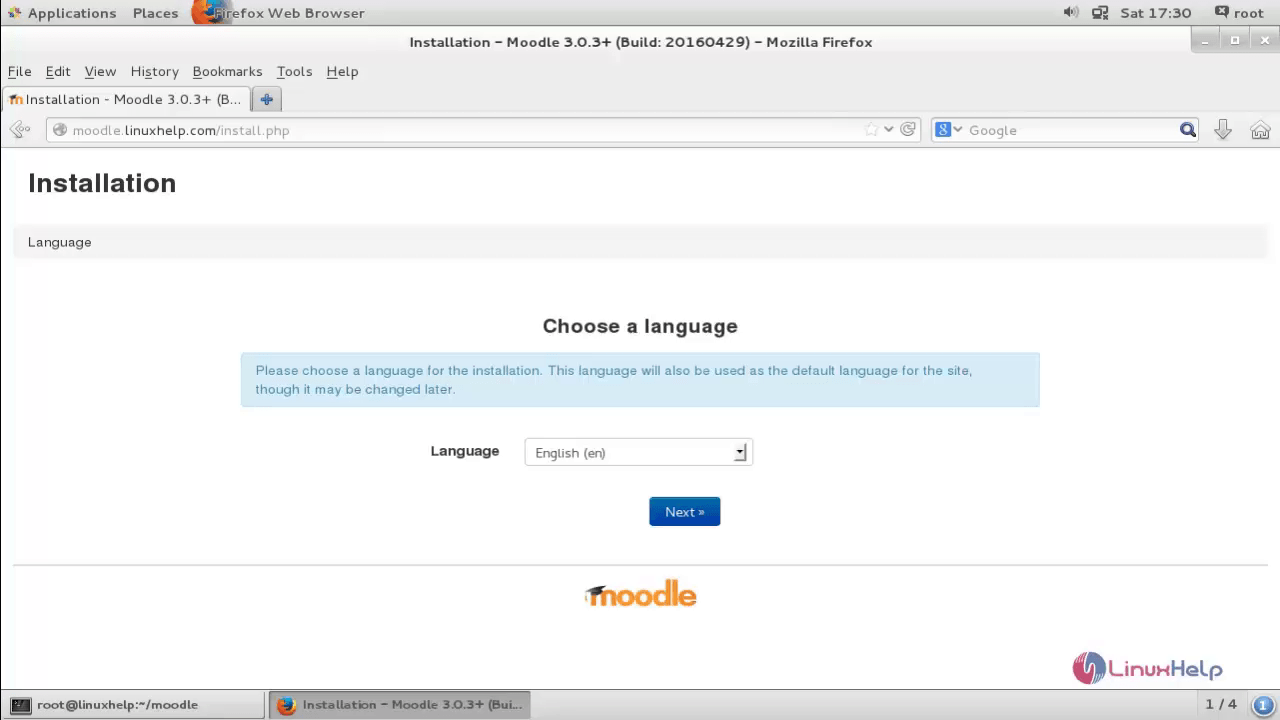
Enter your hostname or IP address in a browser. You can view the Moodle installer and choose the language for your installation:
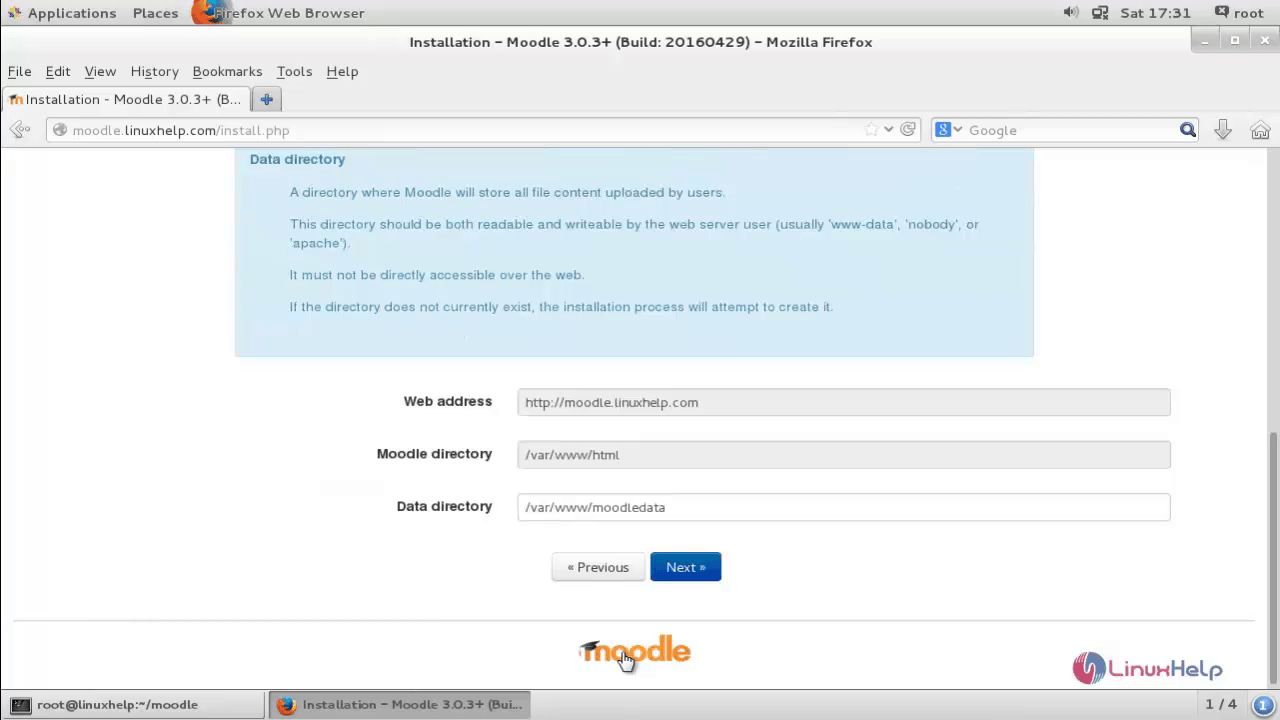
Select the path for your Moodle data directory.
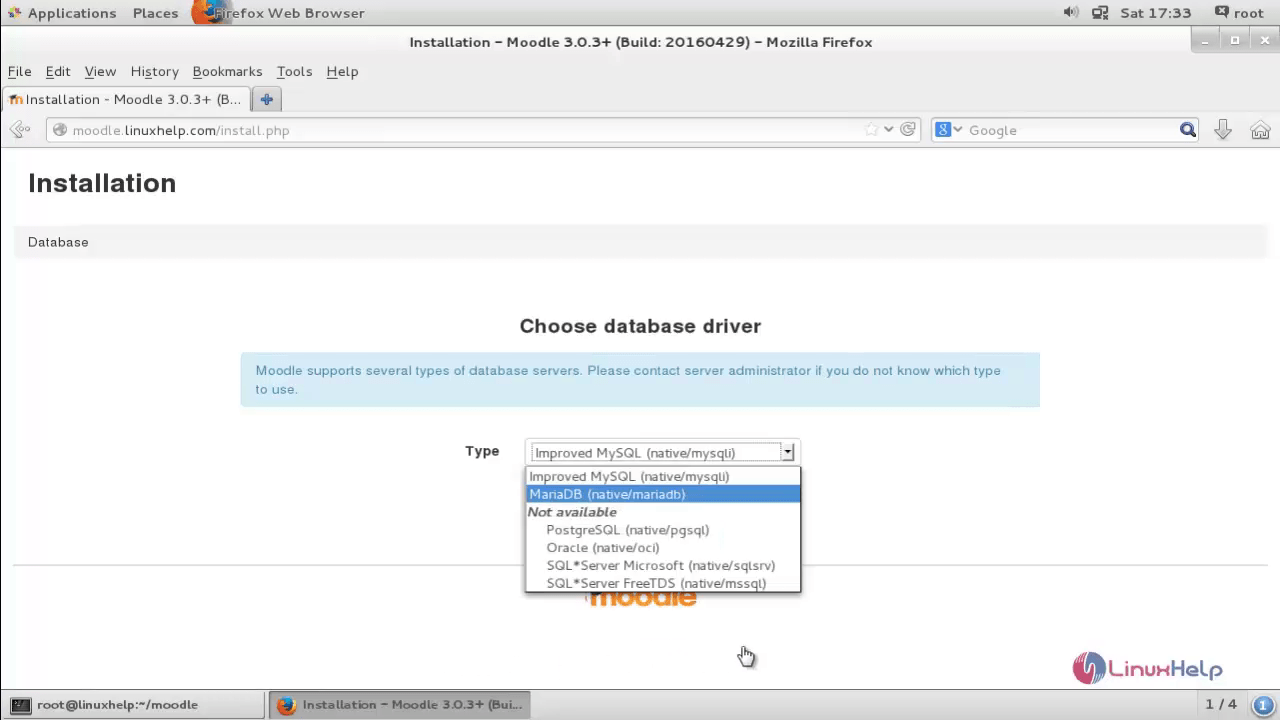
Choose the database driver.
On MySQL : Select Improved MySQL driver.
On MariaDB : Select MariaDB/native driver.
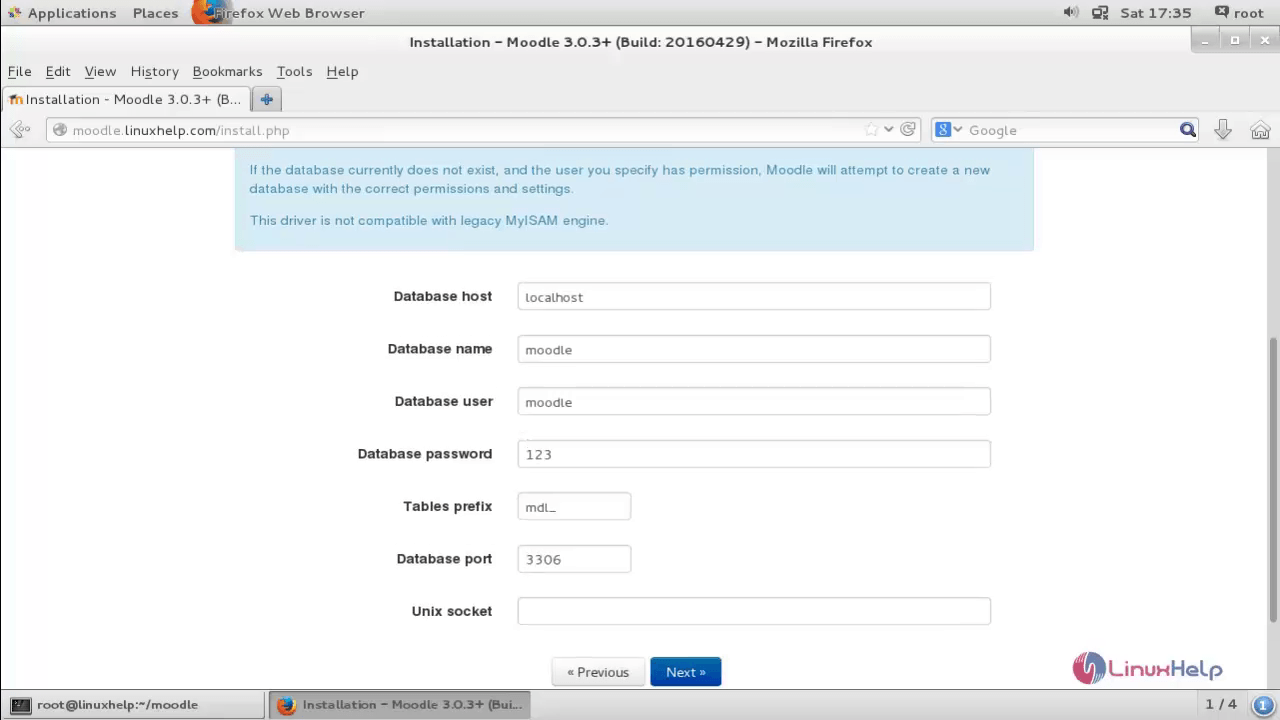
MySQL credentials screen appears Fill the required field and click next.
| Database Name | moodle |
| Database User | moodle |
| Password | 123 |
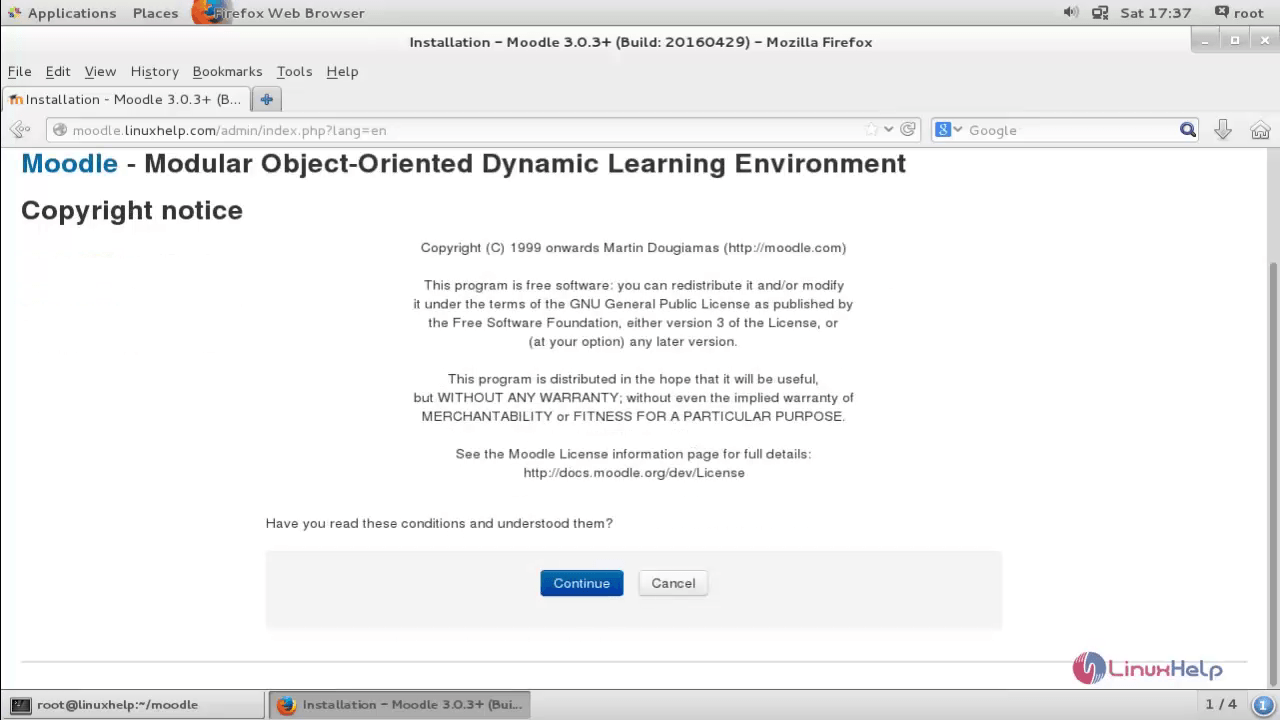
You will be directed to the copyrights page, review it and click continue.
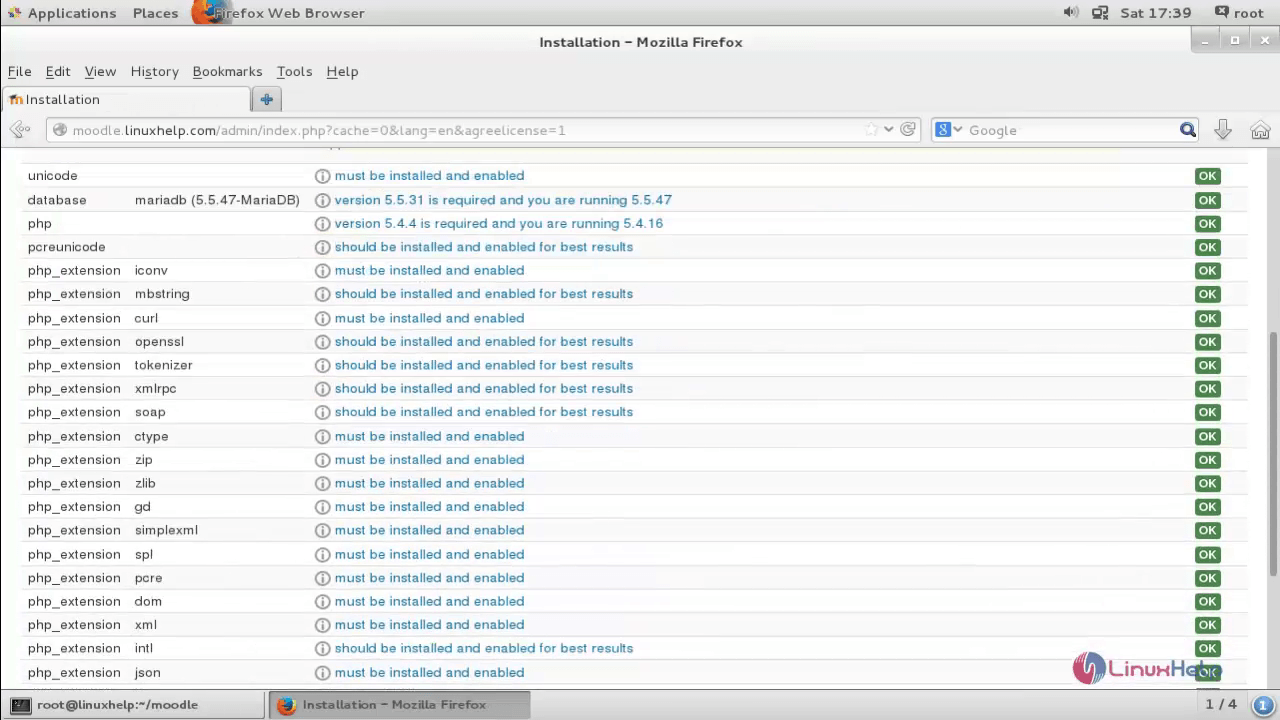
On the next page, Moodle will perform system checks for server environment and informs if there are missing extensions/modules on your computer. Click on the link next to each extension and you will be provided with instructions how to install it and click continue.
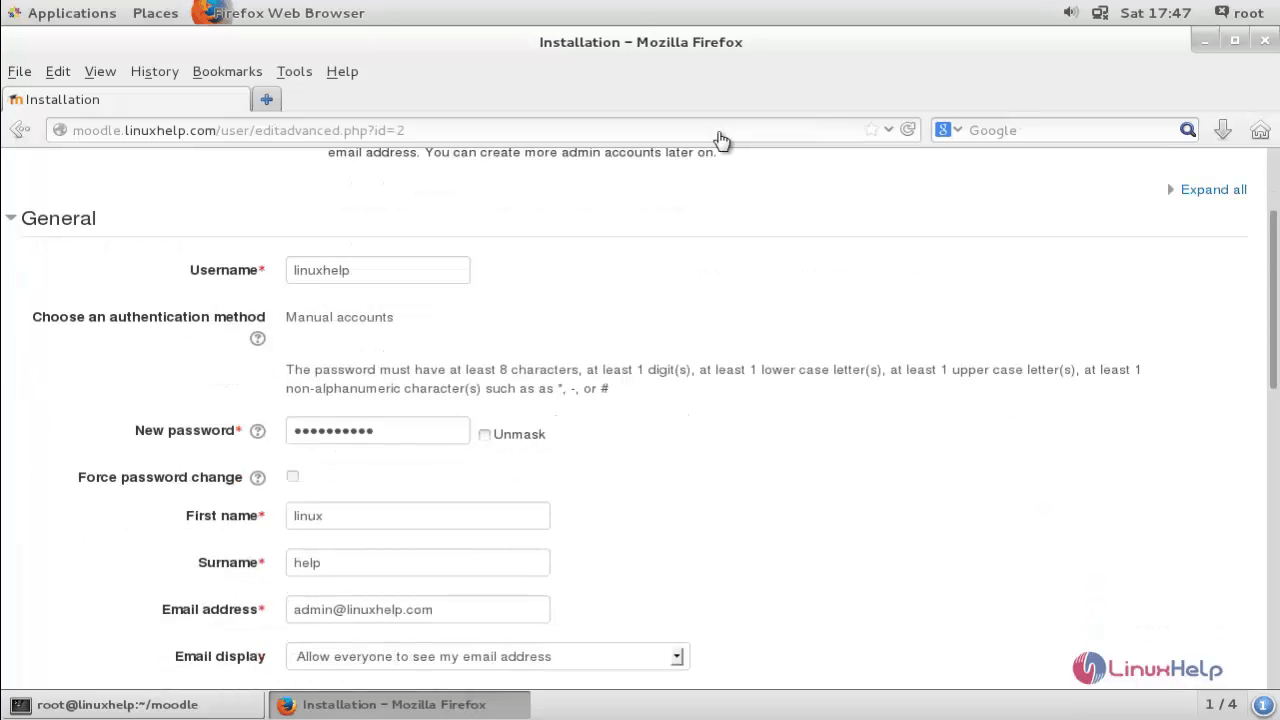
Next is to configure the administrative user and fill in the following details:
Username is the username with which the user will login
Password is password for the above user
Surname
Firstname
Email address for the administrative user
City/town
Timezone
Country
Description is the information about yourself
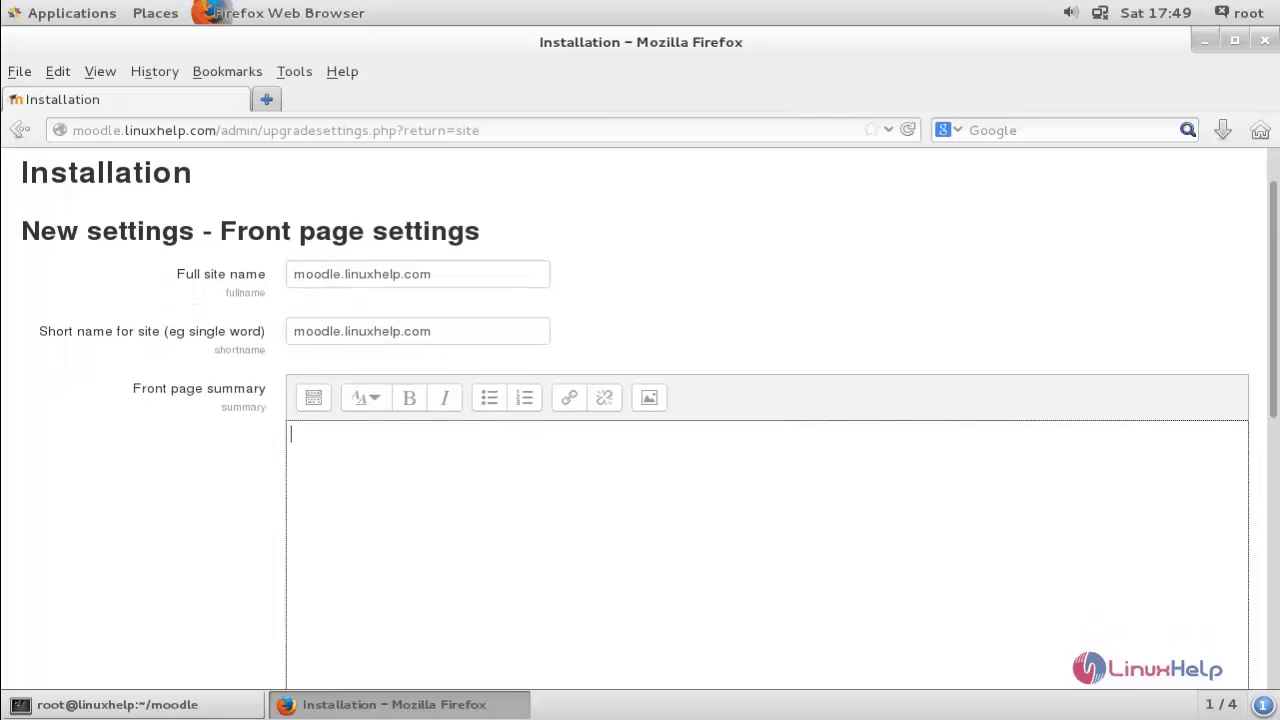
Now Fill in the following information to provide detail about the site.
Location Settings
Complete site name
Short name for the site
Front page summary is the information that will be displayed on the site front page
Site registration is to choose the registration type be self-registration or via email.
The installation is completed and you will be directed to the administrator profile.
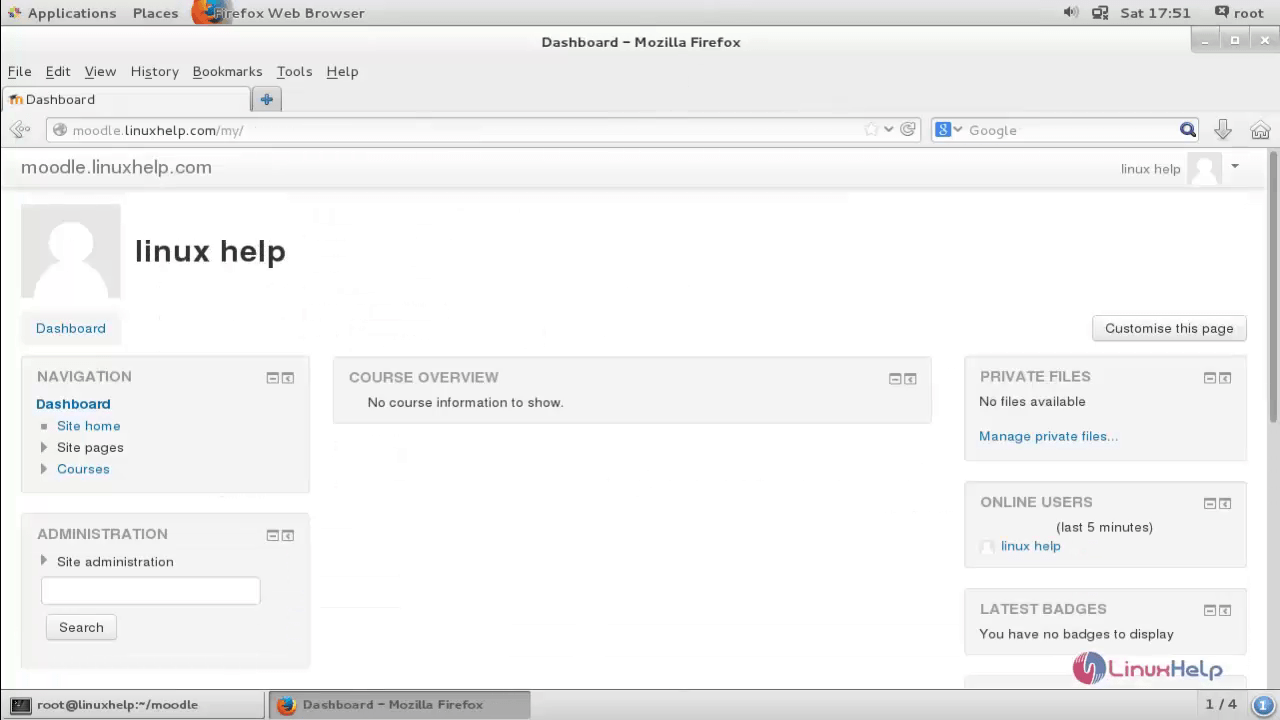
Open the following link to access the Moodle administrative dashboard.
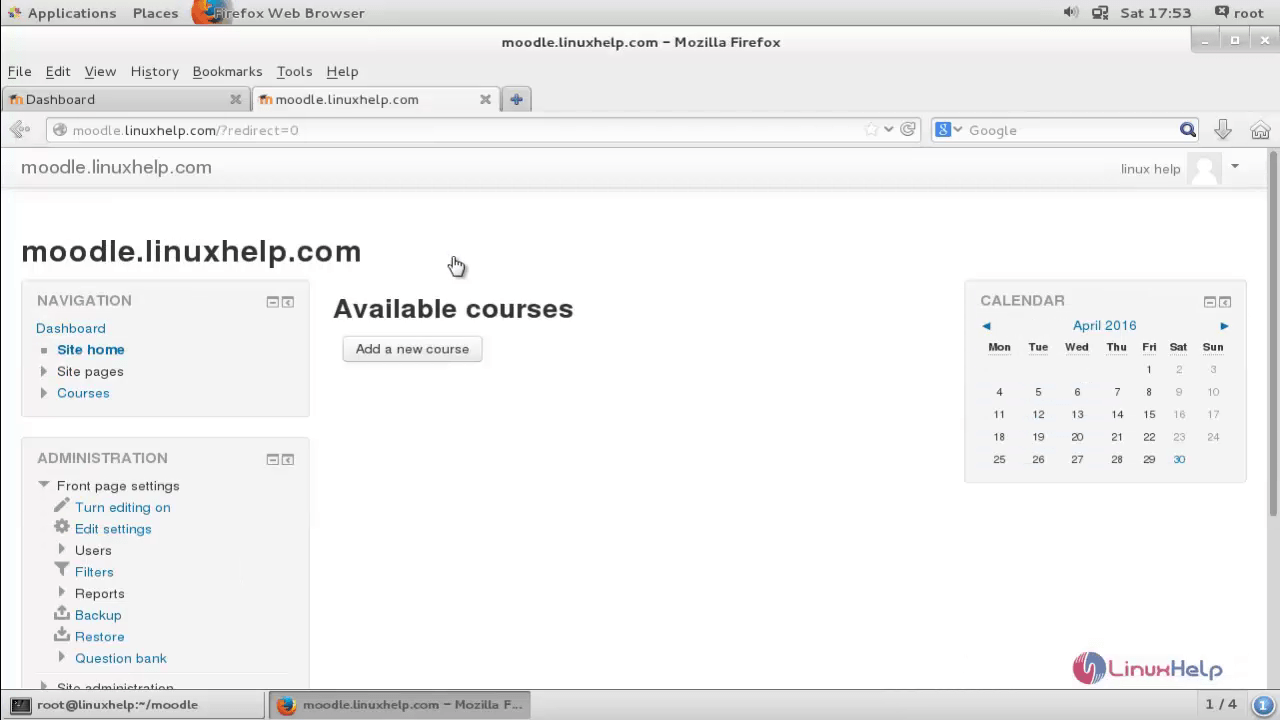
Manage your website and create your first courses, users or customize the settings of your site.
Comments ( 0 )
No comments available