How to Install and Configure ELK Stack on Ubuntu 21.04
- 00:31 lsb_release -a
- 00:44 apt install default-jdk default-jre -y
- 01:15 javac -version
- 01:32 curl -fsSL https://artifacts.elastic.co/GPG-KEY-elasticsearch | apt-key add -
- 01:45 echo "deb https://artifacts.elastic.co/packages/7.x/apt stable main" > /etc/apt/sources.list.d/elastic-7.x.list
- 01:54 apt update
- 02:06 apt install elasticsearch -y
- 02:32 vim /etc/elasticsearch/elasticsearch.yml
- 03:29 vim /etc/elasticsearch/jvm.options
- 04:12 systemctl restart elasticsearch
- 04:36 systemctl enable elasticsearch
- 04:53 curl -X GET "localhost:9200"
- 05:19 apt install logstash -y
- 05:44 systemctl start logstash
- 06:02 systemctl enable logstash
- 06:22 systemctl status logstash
- 06:35 apt install kibana -y
- 07:06 vim /etc/kibana/kibana.yml
- 07:42 systemctl start kibana
- 07:52 systemctl enable kibana
- 08:07 systemctl status kibana
To Install and Configure ELK Stack on Ubuntu 21.04
Introduction:
Elasticsearch is an open-source full-text search and analytics platform. This search engine has rapidly become the most popular, being used for log analytics, full-text search, security intelligence, business intelligence, and operational intelligence.
Installation Procedure:
Step 1: Check the OS version by using the below command
root@linuxhelp:~# lsb_release -a
No LSB modules are available.
Distributor ID:	Ubuntu
Description:	Ubuntu 21.04
Release:	21.04
Codename:	hirsute
Step 2: Install the dependency Java environment packages by using the below command
root@linuxhelp:~# apt install default-jdk default-jre -y
Reading package lists... Done
Building dependency tree... Done
Reading state information... Done
The following package was automatically installed and is no longer required:
  libllvm11
Use 'apt autoremove' to remove it.
The following additional packages will be installed:
  ca-certificates-java default-jdk-headless default-jre-headless fonts-dejavu-extra java-common libatk-wrapper-java
  libatk-wrapper-java-jni libice-dev libpthread-stubs0-dev libsm-dev libx11-dev libxau-dev libxcb1-dev libxdmcp-dev
  libxt-dev openjdk-11-jdk openjdk-11-jdk-headless openjdk-11-jre openjdk-11-jre-headless x11proto-dev

  xorg-sgml-doctools xtrans-dev
Suggested packages:
  libice-doc libsm-doc libx11-doc libxcb-doc libxt-doc openjdk-11-demo openjdk-11-source visualvm
  fonts-ipafont-gothic fonts-ipafont-mincho fonts-wqy-microhei | fonts-wqy-zenhei
The following NEW packages will be installed:
  ca-certificates-java default-jdk default-jdk-headless default-jre default-jre-headless fonts-dejavu-extra
  java-common libatk-wrapper-java libatk-wrapper-java-jni libice-dev libpthread-stubs0-dev libsm-dev libx11-dev
  libxau-dev libxcb1-dev libxdmcp-dev libxt-dev openjdk-11-jdk openjdk-11-jdk-headless openjdk-11-jre
  openjdk-11-jre-headless x11proto-dev xorg-sgml-doctools xtrans-dev
0 upgraded, 24 newly installed, 0 to remove and 0 not upgraded.
Need to get 260 MB of archives.
After this operation, 416 MB of additional disk space will be used


Get:12 http://in.archive.ubuntu.com/ubuntu hirsute/main amd64 libatk-wrapper-java all 0.38.0-2ubuntu2 [53.5 kB]
Setting up default-jdk-headless (2:1.11-72) ...
Setting up openjdk-11-jdk:amd64 (11.0.13+8-0ubuntu1~21.04) ...
update-alternatives: using /usr/lib/jvm/java-11-openjdk-amd64/bin/jconsole to provide /usr/bin/jconsole (jconsole) in a
Step 3: Check the Installed Java Version by using the below command
root@linuxhelp:~# javac -version
javac 11.0.13
Step 4: Add the elasticsearch APT repository key by using the below command
root@linuxhelp:~# curl -fsSL https://artifacts.elastic.co/GPG-KEY-elasticsearch | apt-key add -
Warning: apt-key is deprecated. Manage keyring files in trusted.gpg.d instead (see apt-key(8)).
OK
Step 5: Add the Elastic Search to the APT source List by using the below command
root@linuxhelp:~# echo "deb https://artifacts.elastic.co/packages/7.x/apt stable main" > /etc/apt/sources.list.d/elastic-7.x.list
Step 6: Update the APT source list by using the below command
root@linuxhelp:~# apt update
Get:1 https://artifacts.elastic.co/packages/7.x/apt stable InRelease [13.7 kB]
Hit:2 http://in.archive.ubuntu.com/ubuntu hirsute InRelease
Hit:3 http://in.archive.ubuntu.com/ubuntu hirsute-updates InRelease
Hit:4 http://in.archive.ubuntu.com/ubuntu hirsute-backports InRelease

Get:5 https://artifacts.elastic.co/packages/7.x/apt stable/main amd64 Packages [93.4 kB]
Get:6 https://artifacts.elastic.co/packages/7.x/apt stable/main i386 Packages [70.5 kB]
Hit:7 http://security.ubuntu.com/ubuntu hirsute-security InRelease
Fetched 177 kB in 1s (160 kB/s)
Reading package lists... Done
Building dependency tree... Done
Reading state information... Done
All packages are up to date.
Step 7: Install the Elastic Search by using the below command
root@linuxhelp:~# apt install elasticsearch -y
Reading package lists... Done
Building dependency tree... Done
Reading state information... Done
The following package was automatically installed and is no longer required:
  libllvm11
Use 'apt autoremove' to remove it.
The following NEW packages will be installed:
  elasticsearch
0 upgraded, 1 newly installed, 0 to remove and 0 not upgraded.
Need to get 311 MB of archives.
After this operation, 517 MB of additional disk space will be used.
Get:1 https://artifacts.elastic.co/packages/7.x/apt stable/main amd64 elasticsearch amd64 7.17.0 [311 MB]
Fetched 311 MB in 28s (11.1 MB/s)
Step 8: Configure the elastic search by using the below command
root@linuxhelp:~# vim /etc/elasticsearch/elasticsearch.yml
network.host: localhost
http.port: 9200
Step 9: Configure the JVM heap memory by using the below command
root@linuxhelp:~# vim /etc/elasticsearch/jvm.options
-Xms512m
-Xmx512m
Step 10: Restart the Elastic Search by using the below command
root@linuxhelp:~# systemctl restart elasticsearch
Step 11: Enable the Elastic Search to start on boot by using the below command
root@linuxhelp:~# systemctl enable elasticsearch
Synchronizing state of elasticsearch.service with SysV service script with /lib/systemd/systemd-sysv-install.
Executing: /lib/systemd/systemd-sysv-install enable elasticsearch
Created symlink /etc/systemd/system/multi-user.target.wants/elasticsearch.service → /lib/systemd/system/elasticsearch.service.
Step 12: Ping the Elastic Search to verify installation by using the below command
root@linuxhelp:~# curl -X GET "localhost:9200"
{
  "name" : "linuxhelp",
  "cluster_name" : "elasticsearch",
  "cluster_uuid" : "k7WWxFi_Qui_1zccM37qyA",
  "version" : {
    "number" : "7.17.0",
    "build_flavor" : "default",
    "build_type" : "deb",
    "build_hash" : "bee86328705acaa9a6daede7140defd4d9ec56bd",
    "build_date" : "2022-01-28T08:36:04.875279988Z",
    "build_snapshot" : false,
    "lucene_version" : "8.11.1",
    "minimum_wire_compatibility_version" : "6.8.0",
    "minimum_index_compatibility_version" : "6.0.0-beta1"
  },
  "tagline" : "You Know, for Search"
}
Step 13: Install the Logstash by using the below command
root@linuxhelp:~# apt install logstash -y
Reading package lists... Done
Building dependency tree... Done
Reading state information... Done
The following package was automatically installed and is no longer required:
  libllvm11
Use 'apt autoremove' to remove it.
The following NEW packages will be installed:
  logstash

0 upgraded, 1 newly installed, 0 to remove and 0 not upgraded.
Need to get 367 MB of archives.
After this operation, 631 MB of additional disk space will be used.
Get:1 https://artifacts.elastic.co/packages/7.x/apt stable/main amd64 logstash amd64 1:7.17.0-1 [367 MB]
Fetched 367 MB in 32s (11.3 MB/s)
Selecting previously unselected package logstash.
Successfully created system startup script for Logstash
Step 14: Start the Logstash Service by using the below command
root@linuxhelp:~# systemctl start logstash
Step 15: Enable the Logstash Service to start on boot by using the below command
root@linuxhelp:~# systemctl enable logstash
Created symlink /etc/systemd/system/multi-user.target.wants/logstash.service → /etc/systemd/system/logstash.service.
Step 16: Check the status of the Logstash Service by using the below command
root@linuxhelp:~# systemctl status logstash
● logstash.service - logstash
     Loaded: loaded (/etc/systemd/system/logstash.service; enabled; vendor preset: enabled)
     Active: active (running) since Sun 2022-02-13 22:37:51 IST; 32s ago
   Main PID: 7491 (java)
      Tasks: 15 (limit: 4592)
     Memory: 368.1M
     CGroup: /system.slice/logstash.service
             └─7491 /usr/share/logstash/jdk/bin/java -Xms1g -Xmx1g -XX:+UseConcMarkSweepGC -XX:CMSInitiatingOccupancyF>

Feb 13 22:37:51 linuxhelp systemd[1]: Started logstash.
Feb 13 22:37:51 linuxhelp logstash[7491]: Using bundled JDK: /usr/share/logstash/jdk
Feb 13 22:37:52 linuxhelp logstash[7491]: OpenJDK 64-Bit Server VM warning: Option UseConcMarkSweepGC was deprecated i>
Step 17: Install the Kibana by using the below command
root@linuxhelp:~# apt install kibana -y
Reading package lists... Done
Building dependency tree... Done
Reading state information... Done
The following package was automatically installed and is no longer required:
  libllvm11
Use 'apt autoremove' to remove it.
The following NEW packages will be installed:
  kibana
0 upgraded, 1 newly installed, 0 to remove and 0 not upgraded.
Need to get 286 MB of archives.
After this operation, 769 MB of additional disk space will be used.
Step 18: Configure kibana in the following file by using the below command
root@linuxhelp:~# vim /etc/kibana/kibana.yml
server.port: 5601
server.host: "localhost"
elasticsearch.hosts: ["http://localhost:9200"]
Step 19: Start the kibana Service by using the below command
root@linuxhelp:~# systemctl start kibana
Step 20: Enable the kibana Service by using the below command
root@linuxhelp:~# systemctl enable kibana
Synchronizing state of kibana.service with SysV service script with /lib/systemd/systemd-sysv-install.
Executing: /lib/systemd/systemd-sysv-install enable kibana
Created symlink /etc/systemd/system/multi-user.target.wants/kibana.service → /etc/systemd/system/kibana.service.
Step 21: Check the status of the kibana service by using the below command
root@linuxhelp:~# systemctl status kibana
● kibana.service - Kibana
     Loaded: loaded (/etc/systemd/system/kibana.service; enabled; vendor preset: enabled)
     Active: active (running) since Sun 2022-02-13 22:41:08 IST; 27s ago
       Docs: https://www.elastic.co
   Main PID: 7972 (node)
      Tasks: 11 (limit: 4592)
     Memory: 205.3M
     CGroup: /system.slice/kibana.service
             └─7972 /usr/share/kibana/bin/../node/bin/node /usr/share/kibana/bin/../src/cli/dist --logging.dest=/var/l>

Feb 13 22:41:08 linuxhelp systemd[1]: Started Kibana.
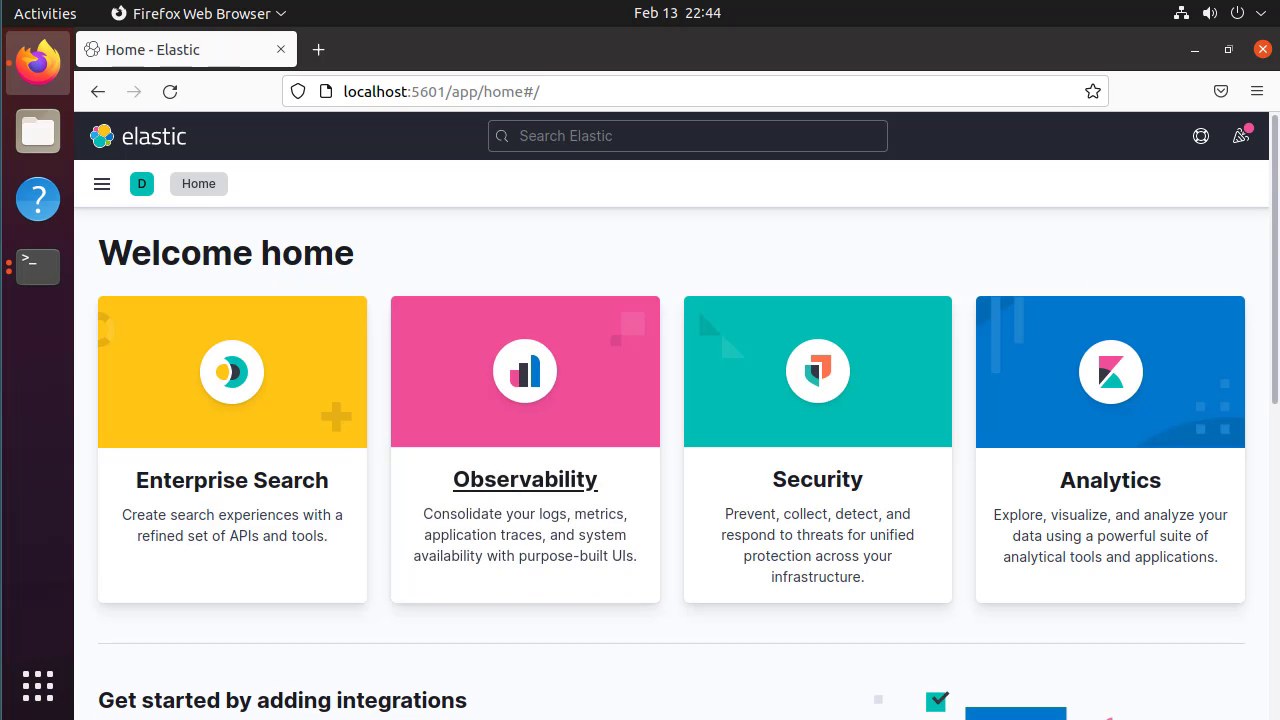
Step 22: Ping the http://localhost:9200 in browser to view the Dashboard of the kibana as show in the below image
By this, to Install and Configure ELK Stack on Ubuntu 21.04 have been completed.
Comments ( 0 )
No comments available