How to install Ansible on Oracle Linux 8.8
- 00:31 cat /etc/os-release
- 00:45 sudo dnf makecache
- 01:15 sudo dnf install epel-release
- 01:48 sudo dnf makecache
- 02:07 sudo dnf install ansible
- 03:20 ansible --version
- 03:47 vim /etc/hosts
- 04:33 ssh-keygen
- 04:55 ssh root@linuxhelp.com
- 05:50 echo "$(whoami) ALL=(ALL) NOPASSWD:ALL" | sudo tee /etc/sudoers.d/$(whoami)
- 06:35 exit
- 06:50 mkdir ~/ansible
- 07:00 cd ~/ansible/
- 07:13 vim hosts
- 08:15 ansible -i hosts --list-hosts all
- 09:14 ansible -i hosts -b --become-method=sudo -m shell -a 'yum install -y httpd' webserver
To Install Ansible On Oracle Linux 8.8
Introduction:
The Ansible platform is an open-source IT automation and configuration management platform developed by Red Hat that uses human-readable YAML templates to automate repetitive tasks.
Installation Procedure:
Step 1: Check the Oracle Linux Version by using the below command
[root@linuxhelp ~]# cat /etc/os-release
NAME="Oracle Linux Server"
VERSION="8.8"
ID="ol"
ID_LIKE="fedora"
VARIANT="Server"
VARIANT_ID="server"
VERSION_ID="8.8"
PLATFORM_ID="platform:el8"
PRETTY_NAME="Oracle Linux Server 8.8"
ANSI_COLOR="0;31"
CPE_NAME="cpe:/o:oracle:linux:8:8:server"
HOME_URL="https://linux.oracle.com/"
BUG_REPORT_URL="https://github.com/oracle/oracle-linux"
ORACLE_BUGZILLA_PRODUCT="Oracle Linux 8"
ORACLE_BUGZILLA_PRODUCT_VERSION=8.8
ORACLE_SUPPORT_PRODUCT="Oracle Linux"
ORACLE_SUPPORT_PRODUCT_VERSION=8.8
Step 2: Update the DNF Package Repository cache with the below command
[root@linuxhelp ~]# sudo dnf makecache
Oracle Linux 8 BaseOS Latest (x86_64)            15 kB/s | 3.6 kB     00:00
Oracle Linux 8 BaseOS Latest (x86_64)           9.8 MB/s |  59 MB     00:06
Oracle Linux 8 Application Stream (x86_64)       20 kB/s | 3.9 kB     00:00
Oracle Linux 8 Application Stream (x86_64)       10 MB/s |  47 MB     00:04
Latest Unbreakable Enterprise Kernel Release 6   32 kB/s | 3.0 kB     00:00
Latest Unbreakable Enterprise Kernel Release 6   10 MB/s |  72 MB     00:07
Last metadata expiration check: 0:00:20 ago on Monday 10 July 2023 01:01:20 AM IST.
Metadata cache created.
Step 3: Enable EPEL Repository, Install the epel-release package with the below command
[root@linuxhelp ~]# sudo dnf install epel-release
Last metadata expiration check: 0:01:24 ago on Monday 10 July 2023 01:01:20 AM IST.
Dependencies resolved.
================================================================================
 Package                  Arch    Version              Repository          Size
================================================================================
Installing:
 oracle-epel-release-el8  x86_64  1.0-5.el8            ol8_baseos_latest   15 k
Installing dependencies:
 yum-utils                noarch  4.0.21-19.0.1.el8_8  ol8_baseos_latest   75 k
Transaction Summary
================================================================================
Install  2 Packages
Total download size: 90 k
Installed size: 41 k
Is this ok [y/N]: y
Downloading Packages:
(1/2): oracle-epel-release-el8-1.0-5.el8.x86_64  71 kB/s |  15 kB     00:00
(2/2): yum-utils-4.0.21-19.0.1.el8_8.noarch.rpm 296 kB/s |  75 kB     00:00
--------------------------------------------------------------------------------
Total                                           341 kB/s |  90 kB     00:00
Running transaction check
Transaction check succeeded.
Running transaction test
Transaction test succeeded.
Running transaction
  Preparing        :                                                        1/1
  Installing       : yum-utils-4.0.21-19.0.1.el8_8.noarch                   1/2
  Installing       : oracle-epel-release-el8-1.0-5.el8.x86_64               2/2
  Running scriptlet: oracle-epel-release-el8-1.0-5.el8.x86_64               2/2
  Verifying        : oracle-epel-release-el8-1.0-5.el8.x86_64               1/2
  Verifying        : yum-utils-4.0.21-19.0.1.el8_8.noarch                   2/2
Installed:
  oracle-epel-release-el8-1.0-5.el8.x86_64 yum-utils-4.0.21-19.0.1.el8_8.noarch
Complete!
Step 4: Update the DNF package repository cache again with the below command
[root@linuxhelp ~]# sudo dnf makecache
Oracle Linux 8 EPEL Packages for Development (x  10 MB/s |  49 MB     00:04
Oracle Linux 8 EPEL Modular Packages for Develo 1.2 MB/s | 322 kB     00:00
Oracle Linux 8 BaseOS Latest (x86_64)            40 kB/s | 3.6 kB     00:00
Oracle Linux 8 Application Stream (x86_64)       35 kB/s | 3.9 kB     00:00
Latest Unbreakable Enterprise Kernel Release 6   28 kB/s | 3.0 kB     00:00
Metadata cache created.
Step 5: Install Ansible by using the below command
[root@linuxhelp ~]# sudo dnf install ansible
Last metadata expiration check: 0:00:31 ago on Monday 10 July 2023 01:03:41 AM IST.
Dependencies resolved.
================================================================================
 Package               Arch      Version            Repository             Size
================================================================================
Installing:
 ansible               noarch    2.9.27-1.el8       ol8_developer_EPEL     17 M
Installing dependencies:
 python3-babel         noarch    2.5.1-7.el8        ol8_appstream         4.8 M
 python3-jinja2        noarch    2.10.1-3.el8       ol8_appstream         538 k
 python3-jmespath      noarch    0.9.0-11.el8       ol8_appstream          45 k
 python3-markupsafe    x86_64    0.23-19.el8        ol8_appstream          39 k
 sshpass               x86_64    1.09-4.el8         ol8_appstream          30 k
Transaction Summary
================================================================================
Install  6 Packages
Total download size: 22 M
Installed size: 119 M
Is this ok [y/N]: y
Downloading Packages:
(1/6): python3-jinja2-2.10.1-3.el8.noarch.rpm   1.9 MB/s | 538 kB     00:00
(2/6): python3-jmespath-0.9.0-11.el8.noarch.rpm 913 kB/s |  45 kB     00:00
(3/6): python3-markupsafe-0.23-19.el8.x86_64.rp 1.1 MB/s |  39 kB     00:00
(4/6): sshpass-1.09-4.el8.x86_64.rpm            1.2 MB/s |  30 kB     00:00
(5/6): python3-babel-2.5.1-7.el8.noarch.rpm     5.8 MB/s | 4.8 MB     00:00
(6/6): ansible-2.9.27-1.el8.noarch.rpm          6.8 MB/s |  17 MB     00:02
--------------------------------------------------------------------------------
Total                                           8.9 MB/s |  22 MB     00:02
Running transaction check
Transaction check succeeded.
Running transaction test
Transaction test succeeded.
Running transaction
  Preparing        :                                                        1/1
  Installing       : python3-jmespath-0.9.0-11.el8.noarch                   1/6
  Installing       : sshpass-1.09-4.el8.x86_64                              2/6
  Installing       : python3-markupsafe-0.23-19.el8.x86_64                  3/6
  Installing       : python3-babel-2.5.1-7.el8.noarch                       4/6
  Installing       : python3-jinja2-2.10.1-3.el8.noarch                     5/6
  Installing       : ansible-2.9.27-1.el8.noarch                            6/6
  Running scriptlet: ansible-2.9.27-1.el8.noarch                            6/6
  Verifying        : ansible-2.9.27-1.el8.noarch                            1/6
  Verifying        : python3-babel-2.5.1-7.el8.noarch                       2/6
  Verifying        : python3-jinja2-2.10.1-3.el8.noarch                     3/6
  Verifying        : python3-jmespath-0.9.0-11.el8.noarch                   4/6
  Verifying        : python3-markupsafe-0.23-19.el8.x86_64                  5/6
  Verifying        : sshpass-1.09-4.el8.x86_64                              6/6
Installed:
  ansible-2.9.27-1.el8.noarch             python3-babel-2.5.1-7.el8.noarch
  python3-jinja2-2.10.1-3.el8.noarch      python3-jmespath-0.9.0-11.el8.noarch
  python3-markupsafe-0.23-19.el8.x86_64   sshpass-1.09-4.el8.x86_64
Complete!
Step 6: Check the Ansible version by using the below command
[root@linuxhelp ~]# ansible --version
ansible 2.9.27
  config file = /etc/ansible/ansible.cfg
  configured module search path = ['/root/.ansible/plugins/modules', '/usr/share/ansible/plugins/modules']
  ansible python module location = /usr/lib/python3.6/site-packages/ansible
  executable location = /usr/bin/ansible
  python version = 3.6.8 (default, Jun 14 2023, 10:42:30) [GCC 8.5.0 20210514 (Red Hat 8.5.0-18.0.2)]
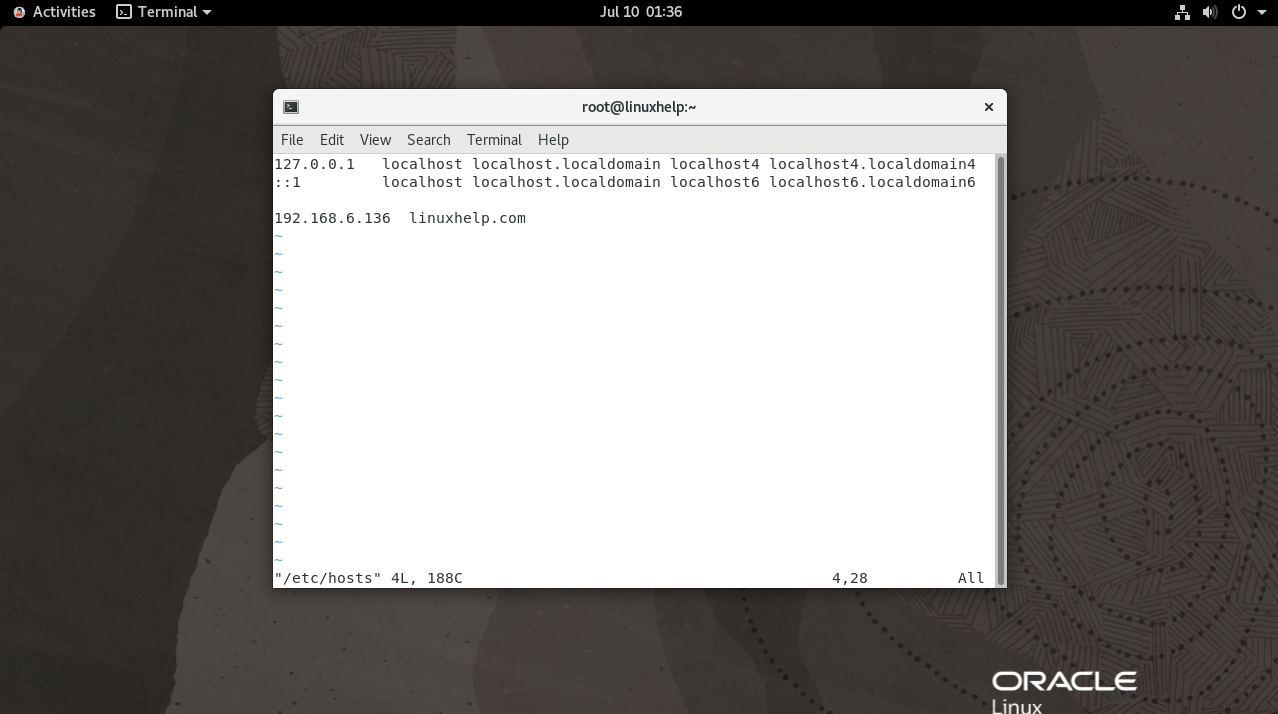
Step 7: Open your /etc/hosts file and add the following using the below command
[root@linuxhelp ~]# vim /etc/hosts
Step 8: Now generate SSH Key.copy, this created ssh key for another remote server by using the below command
[root@linuxhelp ~]# ssh-keygen
Generating public/private rsa key pair.
Enter file in which to save the key (/root/.ssh/id_rsa):
Created directory '/root/.ssh'.
Enter passphrase (empty for no passphrase):
Enter same passphrase again:
Your identification has been saved in /root/.ssh/id_rsa.
Your public key has been saved in /root/.ssh/id_rsa.pub.
The key fingerprint is:
SHA256:yK5xYr/KpfLJE2b2aIcrlGY+KAA2xUULhkrAiI/M5j0 root@linuxhelp
The key's randomart image is:
+---[RSA 3072]----+
|* oooo           |
|o+.o. .          |
|=o.  .           |
|+*.  . .         |
|= o.  o S        |

|..=E=.           |
|.* +==+          |
|o =+=Xo          |
|.  *X=o.         |
+----[SHA256]-----+
[root@linuxhelp ~]# ssh-copy-id root@linuxhelp.com
The authenticity of host 'linuxhelp.com (192.168.6.136)' can't be established.
ECDSA key fingerprint is SHA256:38frx9vyZqBXVdtlTHa6oDK17712pJ5V0UAiUDXGWYc.
Are you sure you want to continue connecting (yes/no/[fingerprint])? yes
/usr/bin/ssh-copy-id: INFO: attempting to log in with the new key(s), to filter out any that are already installed
/usr/bin/ssh-copy-id: INFO: 1 key(s) remain to be installed -- if you are prompted now it is to install the new keys
root@linuxhelp.com's password:
Number of key(s) added: 1
Now try logging into the machine, with:   "ssh 'root@linuxhelp.com'"
and check to make sure that only the key(s) you wanted were added.
Step 9: After added the SSH key without any SSH password you can able to access for remote server by using the below command
[root@linuxhelp ~]# ssh root@linuxhelp.com
Activate the web console with: systemctl enable --now cockpit.socket
Last login: Fri Jun 16 23:15:57 2023
[root@linuxhelp ~]# ip a
1: lo: <LOOPBACK,UP,LOWER_UP> mtu 65536 qdisc noqueue state UNKNOWN group default qlen 1000
    link/loopback 00:00:00:00:00:00 brd 00:00:00:00:00:00
    inet 127.0.0.1/8 scope host lo
       valid_lft forever preferred_lft forever
    inet6 ::1/128 scope host
       valid_lft forever preferred_lft forever
2: ens160: <BROADCAST,MULTICAST,UP,LOWER_UP> mtu 1500 qdisc mq state UP group default qlen 1000
    link/ether 00:0c:29:9c:8b:d4 brd ff:ff:ff:ff:ff:ff
    inet 192.168.6.136/23 brd 192.168.7.255 scope global noprefixroute ens160
       valid_lft forever preferred_lft forever
    inet6 fe80::20c:29ff:fe9c:8bd4/64 scope link noprefixroute
       valid_lft forever preferred_lft forever
3: virbr0: <BROADCAST,MULTICAST> mtu 1500 qdisc noqueue state DOWN group default qlen 1000
    link/ether 52:54:00:21:7f:e8 brd ff:ff:ff:ff:ff:ff
Step 10: Next run the below commands without password for login user by using the below command.
[root@linuxhelp ~]# echo "$(whoami) ALL=(ALL) NOPASSWD:ALL" | sudo tee /etc/sudoers.d/$(whoami)
root ALL=(ALL) NOPASSWD:ALL
Step 11: Exit from Remote Server by using the below command
[root@linuxhelp ~]# exit
logout
Connection to linuxhelp.com closed.
Step 12: Create new ansible project directory and Navigate to Ansible directory by using the below command
[root@linuxhelp ~]# mkdir ~/ansible
 [root@linuxhelp ~]# cd ~/ansible/
Step 13: Next you can add the Group servers by using the below command
[root@linuxhelp ansible]# vim hosts
linuxhelp.com ansible_user=root
Step 14: List and ping the host single group as well by using the below commands
[root@linuxhelp ansible]# ansible -i hosts --list-hosts all
  hosts (1):
    linuxhelp.com
 [root@linuxhelp ansible]# ansible -i hosts -m ping webserver
[WARNING]: Platform linux on host linuxhelp.com is using the discovered Python
interpreter at /usr/bin/python3.6, but future installation of another Python
interpreter could change this. See https://docs.ansible.com/ansible/2.9/referen
ce_appendices/interpreter_discovery.html for more information.
linuxhelp.com | SUCCESS => {
    "ansible_facts": {
        "discovered_interpreter_python": "/usr/bin/python3.6"
    },
    "changed": false,
    "ping": "pong"
}
Step 15: Next install Apache webserver on the webserver group by using the below command
[root@linuxhelp ansible]# ansible -i hosts -b --become-method=sudo -m shell -a 'yum install -y httpd' webserver
[WARNING]: Consider using the yum module rather than running 'yum'.  If you
need to use command because yum is insufficient you can add 'warn: false' to
this command task or set 'command_warnings=False' in ansible.cfg to get rid of
this message.
[WARNING]: Platform linux on host linuxhelp.com is using the discovered Python
interpreter at /usr/bin/python3.6, but future installation of another Python
interpreter could change this. See https://docs.ansible.com/ansible/2.9/referen
ce_appendices/interpreter_discovery.html for more information.
linuxhelp.com | CHANGED | rc=0 >>
Last metadata expiration check: 0:07:34 ago on Monday 10 July 2023 01:03:41 AM IST.
Dependencies resolved.
====================================================================================================
 Package              Arch    Version                                       Repository          Size
====================================================================================================
Installing:
 httpd                x86_64  2.4.37-56.0.1.module+el8.8.0+21057+13668aee.6 ol8_appstream      1.4 M
Installing dependencies:
 apr                  x86_64  1.6.3-12.el8                                  ol8_appstream      129 k
 apr-util             x86_64  1.6.1-6.el8_8.1                               ol8_appstream      105 k
 httpd-filesystem     noarch  2.4.37-56.0.1.module+el8.8.0+21057+13668aee.6 ol8_appstream       43 k
 httpd-tools          x86_64  2.4.37-56.0.1.module+el8.8.0+21057+13668aee.6 ol8_appstream      110 k
 mod_http2            x86_64  1.15.7-8.module+el8.8.0+21057+13668aee.3      ol8_appstream      155 k
 oracle-logos-httpd   noarch  84.5-1.0.1.el8                                ol8_baseos_latest   29 k
Installing weak dependencies:
 apr-util-bdb         x86_64  1.6.1-6.el8_8.1                               ol8_appstream       25 k
 apr-util-openssl     x86_64  1.6.1-6.el8_8.1                               ol8_appstream       27 k
Enabling module streams:
 httpd                        2.4
Transaction Summary
====================================================================================================
Install  9 Packages
Total download size: 2.0 M
Installed size: 5.4 M
Downloading Packages:
(1/9): oracle-logos-httpd-84.5-1.0.1.el8.noarch 235 kB/s |  29 kB     00:00
(2/9): apr-util-1.6.1-6.el8_8.1.x86_64.rpm      772 kB/s | 105 kB     00:00
(3/9): apr-1.6.3-12.el8.x86_64.rpm              888 kB/s | 129 kB     00:00
(4/9): apr-util-bdb-1.6.1-6.el8_8.1.x86_64.rpm  999 kB/s |  25 kB     00:00
(5/9): apr-util-openssl-1.6.1-6.el8_8.1.x86_64. 899 kB/s |  27 kB     00:00
(6/9): httpd-filesystem-2.4.37-56.0.1.module+el 1.5 MB/s |  43 kB     00:00
(7/9): httpd-tools-2.4.37-56.0.1.module+el8.8.0 1.3 MB/s | 110 kB     00:00
(8/9): mod_http2-1.15.7-8.module+el8.8.0+21057+ 1.3 MB/s | 155 kB     00:00
(9/9): httpd-2.4.37-56.0.1.module+el8.8.0+21057 7.9 MB/s | 1.4 MB     00:00
--------------------------------------------------------------------------------
Total                                           5.8 MB/s | 2.0 MB     00:00
Running transaction check
Transaction check succeeded.
Running transaction test
Transaction test succeeded.
Running transaction
  Preparing        :                                                        1/1
  Installing       : apr-1.6.3-12.el8.x86_64                                1/9
  Running scriptlet: apr-1.6.3-12.el8.x86_64                                1/9
  Installing       : apr-util-bdb-1.6.1-6.el8_8.1.x86_64                    2/9
  Installing       : apr-util-openssl-1.6.1-6.el8_8.1.x86_64                3/9
  Installing       : apr-util-1.6.1-6.el8_8.1.x86_64                        4/9
  Running scriptlet: apr-util-1.6.1-6.el8_8.1.x86_64                        4/9
  Installing       : httpd-tools-2.4.37-56.0.1.module+el8.8.0+21057+13668   5/9
  Running scriptlet: httpd-filesystem-2.4.37-56.0.1.module+el8.8.0+21057+   6/9
  Installing       : httpd-filesystem-2.4.37-56.0.1.module+el8.8.0+21057+   6/9
  Installing       : oracle-logos-httpd-84.5-1.0.1.el8.noarch               7/9
  Installing       : mod_http2-1.15.7-8.module+el8.8.0+21057+13668aee.3.x   8/9
  Installing       : httpd-2.4.37-56.0.1.module+el8.8.0+21057+13668aee.6.   9/9
  Running scriptlet: httpd-2.4.37-56.0.1.module+el8.8.0+21057+13668aee.6.   9/9
  Verifying        : oracle-logos-httpd-84.5-1.0.1.el8.noarch               1/9
  Verifying        : apr-1.6.3-12.el8.x86_64                                2/9
  Verifying        : apr-util-1.6.1-6.el8_8.1.x86_64                        3/9
  Verifying        : apr-util-bdb-1.6.1-6.el8_8.1.x86_64                    4/9
  Verifying        : apr-util-openssl-1.6.1-6.el8_8.1.x86_64                5/9
  Verifying        : httpd-2.4.37-56.0.1.module+el8.8.0+21057+13668aee.6.   6/9
  Verifying        : httpd-filesystem-2.4.37-56.0.1.module+el8.8.0+21057+   7/9
  Verifying        : httpd-tools-2.4.37-56.0.1.module+el8.8.0+21057+13668   8/9
  Verifying        : mod_http2-1.15.7-8.module+el8.8.0+21057+13668aee.3.x   9/9
Installed:
  apr-1.6.3-12.el8.x86_64
  apr-util-1.6.1-6.el8_8.1.x86_64
  apr-util-bdb-1.6.1-6.el8_8.1.x86_64
  apr-util-openssl-1.6.1-6.el8_8.1.x86_64
  httpd-2.4.37-56.0.1.module+el8.8.0+21057+13668aee.6.x86_64
  httpd-filesystem-2.4.37-56.0.1.module+el8.8.0+21057+13668aee.6.noarch
  httpd-tools-2.4.37-56.0.1.module+el8.8.0+21057+13668aee.6.x86_64
  mod_http2-1.15.7-8.module+el8.8.0+21057+13668aee.3.x86_64
  oracle-logos-httpd-84.5-1.0.1.el8.noarch
Complete!
Conclusion:
We have reached the end of this article. In this guide, we have walked you through the steps required to install and configure Ansible on Oracle Linux 8.8. Your feedback is much welcome.
Comments ( 0 )
No comments available