How to install AWStats on CentOS 7
To install AWStats on CentOS 7
AWStats, expanded as Advanced Web Statistics, is a free and easy-to-use web analytics reporting tool which generates advanced web, streaming, FTP, or mail server statistics written using the Perl language. It is indeed one of the most widely used log analyzers. It displays the HTML reports in a nice graphical display which is easy-to-comprehend. It is really simple to install AWStats and this tutorial covers the method to install AWStats on CentOS 7.
Basic requirements
Apache web server installed.
Installing Awstats
Installing Awstats requires the prior installation of the the EPEL Repository in the following way.
[root@linuxhelp ~]# wget https://dl.fedoraproject.org/pub/epel/epel-release-latest-7.noarch.rpm
--2017-12-06 12:32:04--  https://dl.fedoraproject.org/pub/epel/epel-release-latest-7.noarch.rpm
Resolving dl.fedoraproject.org (dl.fedoraproject.org)... 209.132.181.24, 209.132.181.23, 209.132.181.25
Connecting to dl.fedoraproject.org (dl.fedoraproject.org)|209.132.181.24|:443... connected.
HTTP request sent, awaiting response... 200 OK
Length: 15080 (15K) [application/x-rpm]
Saving to: ‘ epel-release-latest-7.noarch.rpm’

100%[======================================> ] 15,080      59.7KB/s   in 0.2s

2017-12-06 12:32:10 (59.7 KB/s) - ‘ epel-release-latest-7.noarch.rpm’  saved [15080/15080]
[root@linuxhelp ~]# rpm -ivh epel-release-latest-7.noarch.rpm
Preparing...                          ################################# [100%]
    file /etc/yum.repos.d/epel-testing.repo from install of epel-release-7-11.noarch conflicts with file from package epel-release-7-9.noarch
    file /etc/yum.repos.d/epel.repo from install of epel-release-7-11.noarch conflicts with file from package epel-release-7-9.noarch
And once you are through with the installation of EPEL, you shall proceed with the installation of Awstats.
[root@linuxhelp ~]# yum install awstats
Loaded plugins: fastestmirror, langpacks
Repodata is over 2 weeks old. Install yum-cron? Or run: yum makecache fast
base                                                     | 3.6 kB     00:00
epel/x86_64/metalink                                     | 7.9 kB     00:00
epel                                                     | 4.7 kB     00:00
extras                                                   | 3.4 kB     00:00
remi-php71                                               | 2.9 kB     00:00
remi-safe                                                | 2.9 kB     00:00
updates                                                  | 3.4 kB     00:00
(1/7): epel/x86_64/group_gz                                | 266 kB   00:01
(2/7): epel/x86_64/updateinfo                              | 851 kB   00:04
(3/7): extras/7/x86_64/primary_db                          | 130 kB   00:01
(4/7): remi-php71/primary_db                               | 207 kB   00:02
(5/7): remi-safe/primary_db                                | 1.1 MB   00:09
(6/7): updates/7/x86_64/primary_db                         | 4.5 MB   00:25
.
.
.
.
perl-Net-SSLeay.x86_64 0:1.55-6.el7
  perl-Switch.noarch 0:2.16-7.el7
  perl-TimeDate.noarch 1:2.30-2.el7
  perl-URI.noarch 0:1.60-9.el7
  perl-WWW-RobotRules.noarch 0:6.02-5.el7
  perl-libwww-perl.noarch 0:6.05-2.el7

Complete!
Later, move to your host file and check if you have provided your IP address with your fully qualified domain name.
[root@www ~]# vim /etc/hosts
192.168.7.165    www.linuxhelp1.com  linuxhelp1
And then, open your awstats default configuration file, set the aliases and do the following modifications in it.
[root@www ~]# vim /etc/httpd/conf.d/awstats.conf
Alias /awstats/icon/ /usr/share/awstats/wwwroot/icon/

ScriptAlias /awstats/ /usr/share/awstats/wwwroot/cgi-bin/
< Directory /usr/share/awstats/wwwroot/cgi-bin/>
        DirectoryIndex awstats.pl
        Options ExecCGI
        order deny,allow
        allow from all
< /Directory>

Alias /awstatsclasses " /usr/share/awstats/wwwroot/classes/"
Alias /awstatscss " /usr/share/awstats/wwwroot/css/"
Alias /awstatsicons " /usr/share/awstats/wwwroot/icon/"
ScriptAlias /awstats/ " /usr/share/awstats/wwwroot/cgi-bin/"
Also, in that file, you need to permit URL access to scripts/files in AWStats directory. You shall do that by making the following modifications.
< Directory " /usr/share/awstats/wwwroot" >
    Options None
    AllowOverride None
    < IfModule mod_authz_core.c>
        # Apache 2.4
        Require local
    < /IfModule>
    < IfModule !mod_authz_core.c>
        # Apache 2.2
        Order allow,deny
        Allow from 127.0.0.1
        Allow from 192.168.7.165
    < /IfModule>
< /Directory>
You should also edit the AWStats FQDN file with your Domain Name and Host Aliases as follows.
[root@www ~]# vim /etc/awstats/awstats.www.linuxhelp1.com.conf
SiteDomain=" www.linuxhelp1.com"
HostAliases=" REGEX[^.*www.linuxhelp1.com$]"
And then, you need to update your AWStats Configuration File by running the following command.
[root@www ~]# /usr/share/awstats/wwwroot/cgi-bin/awstats.pl -config=www.linuxhelp1.com &ndash update
Create/Update database for config " /etc/awstats/awstats.www.linuxhelp1.com.conf"  by AWStats version 7.6 (build 20161204)
From data in log file " /var/log/httpd/access_log" ...
Phase 1 : First bypass old records, searching new record...
Searching new records from beginning of log file...
Jumped lines in file: 0
Parsed lines in file: 0
 Found 0 dropped records,
 Found 0 comments,
 Found 0 blank records,
 Found 0 corrupted records,
 Found 0 old records,
 Found 0 new qualified records.
Once it is done, you need to restart your Apache service by making use of the following command.
[root@www ~]# systemctl restart httpd
Now you need to open your web browser and visit AWstats page by navigating to the following link: http://YourIP/awstats/awstats.pl?config=yourdomain. You will be taken to the summary page of AWStat.
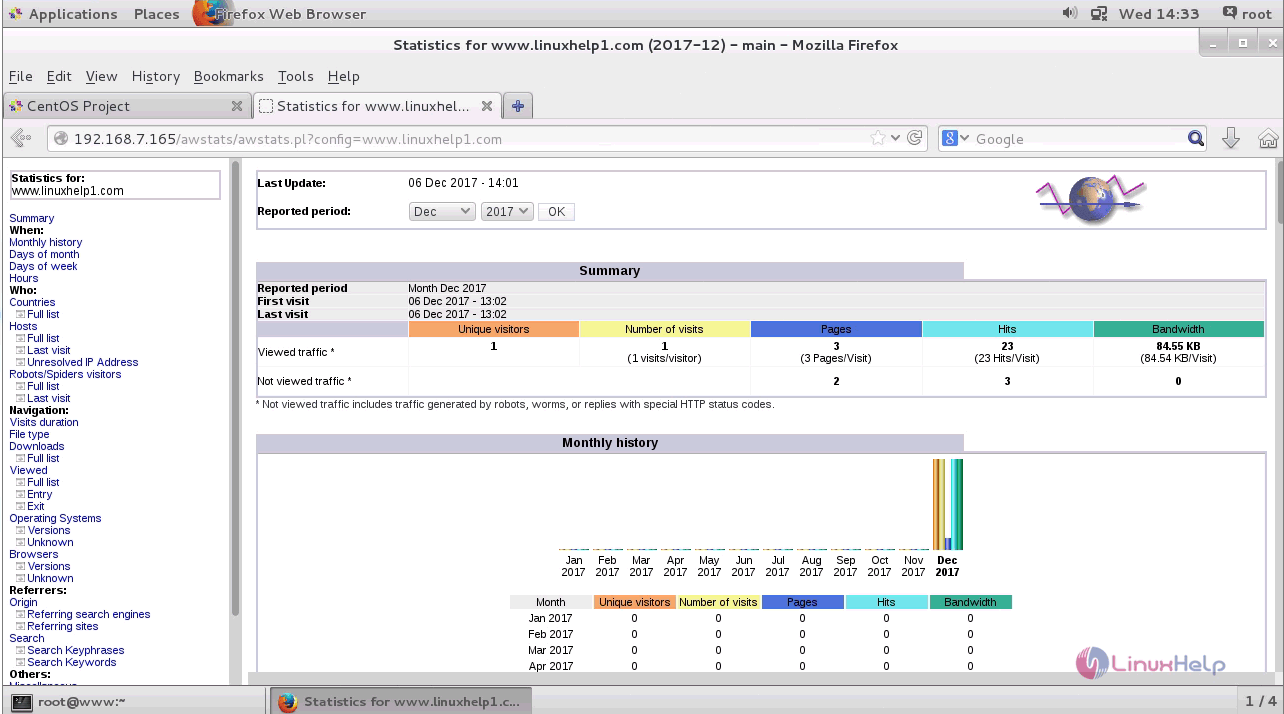
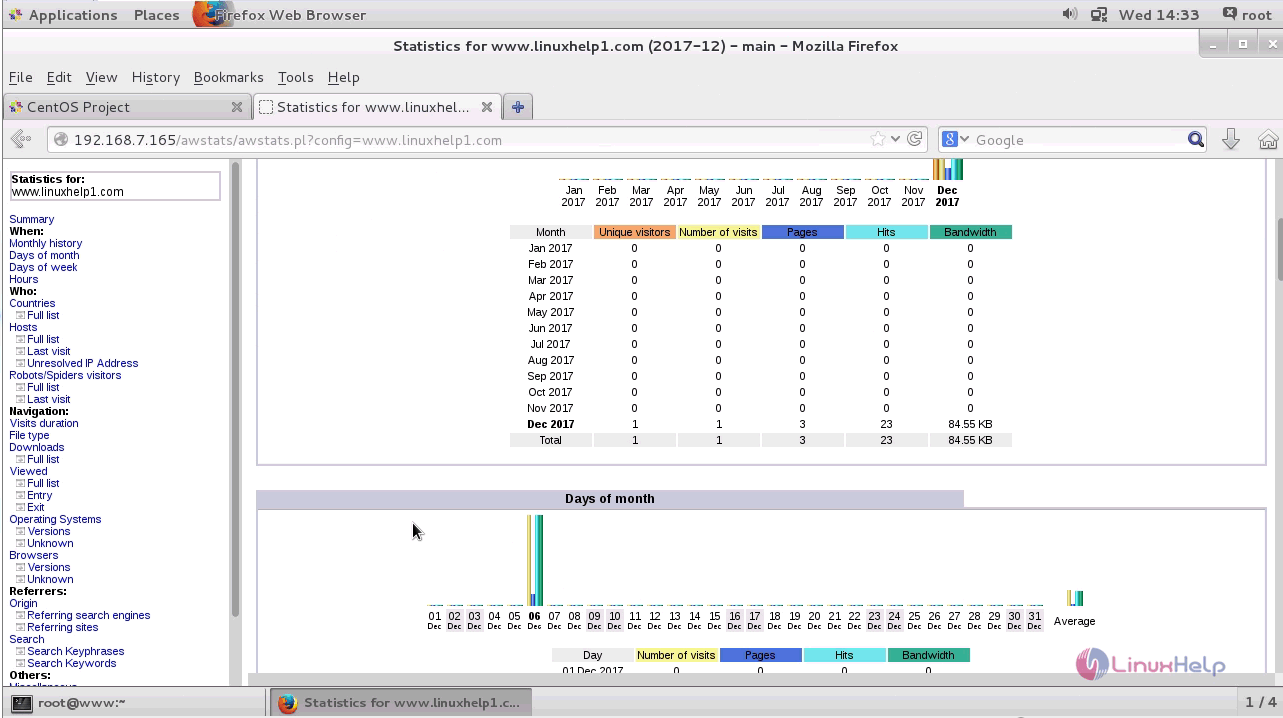
All the statistics are segmented based on the days and month, and are displayed graphically.
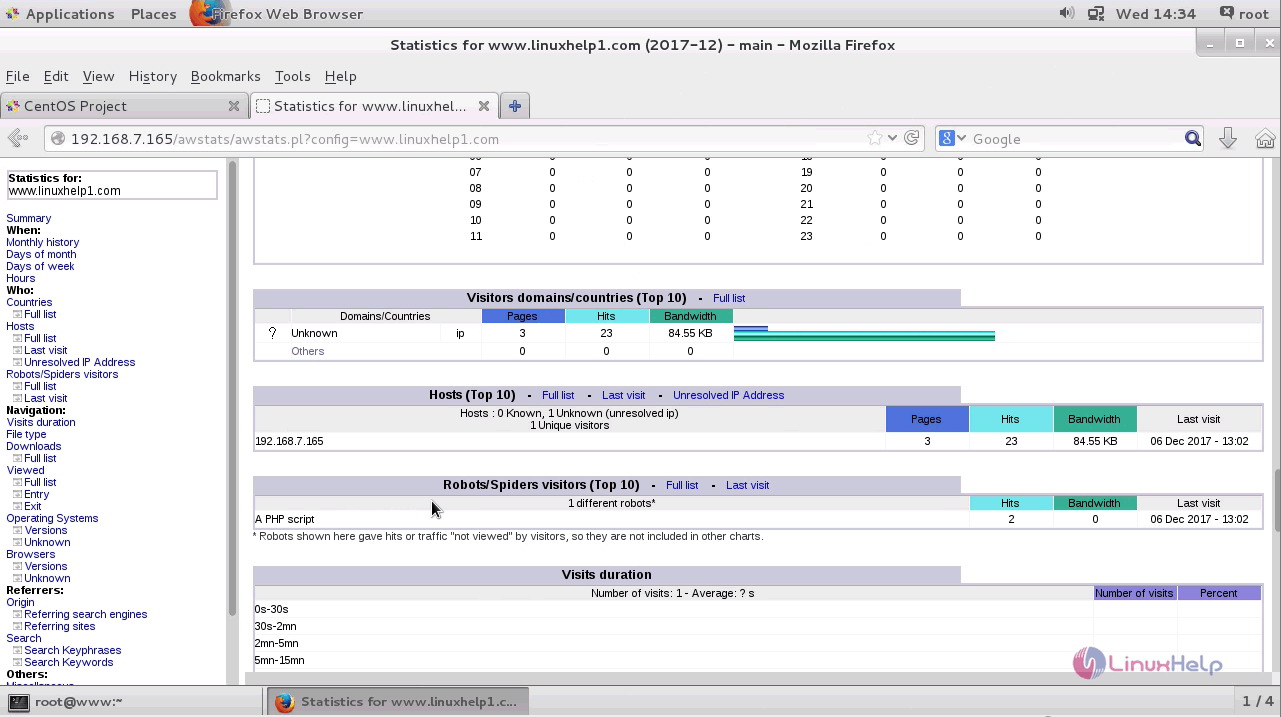
You can also check out the statistics of your site visitors.
With this, the installation of Awstats on CentOS 7 comes to an end.
Comments ( 1 )