How to install Clipper CMS 1.3.3 on Ubuntu 18.04
To install Clipper CMS 1.3.3 on Ubuntu 18.04
Clipper CMS is a flexible and powerful open source content management system. Clipper CMS is that allows you to create and publish your personal blogs and also complex and dynamic applications on the web. Although it can be used to web publishing and manage content on an intranet or on a single computer.
Prerequisites
To install LAMP(Apache, MariaDB, php7)
In MariaDB (create database and user and give privileges to that user )
Php installation with required following modules
add-apt-repository ppa:ondrej/php
apt-get update
apt-get install php7.0 php7.0-mysql php7.0-curl php7.0-json php7.0-cgi libapache2-mod-php7.0 php7.0-mcrypt php7.0-xmlrpc php7.0-gd php7.0-mbstring php7.0  php7.0-common  php7.0-xmlrpc php7.0-soap
php7.0-xml php7.0-intl  php7.0-cli  php7.0-ldap php7.0-zip php7.0-readline php7.0-imap php7.0-tidy php7.0-recode php7.0-sq php7.0-intl
Switch to the following directory
root@linuxhelp1:~# cd /home/user1/Downloads/
Download a Clipper CMS package using this following URL
root@linuxhelp1:/home/user1/Downloads# wget https://github.com/ClipperCMS/ClipperCMS/archive/clipper_1.3.3.zip
--2018-05-24 22:53:45--  https://github.com/ClipperCMS/ClipperCMS/archive/clipper_1.3.3.zip
Resolving github.com (github.com)... 192.30.253.113, 192.30.253.112
Connecting to github.com (github.com)|192.30.253.113|:443... connected.
.
.
HTTP request sent, awaiting response... 200 OK
Length: unspecified [application/zip]
Saving to: ‘ clipper_1.3.3.zip’

clipper_1.3.3.zip                   [                                               < =>    ]   5.89M   133KB/s    in 43s

2018-05-24 22:54:31 (140 KB/s) - ‘ clipper_1.3.3.zip’  saved [6173410]
The downloaded package is a zip file, so we need to unzip the file now
root@linuxhelp1:/home/user1/Downloads# unzip clipper_1.3.3.zip
Archive:  clipper_1.3.3.zip
0ee9f2cb5bafc683fb7424d484669356c0662ac4
   creating: ClipperCMS-clipper_1.3.3/
  inflating: ClipperCMS-clipper_1.3.3/.gitignore
  inflating: ClipperCMS-clipper_1.3.3/README.md
   creating: ClipperCMS-clipper_1.3.3/assets/
.
.
  inflating: ClipperCMS-clipper_1.3.3/manager/processors/save_user.processor.php
  inflating: ClipperCMS-clipper_1.3.3/manager/processors/save_web_user.processor.php
  inflating: ClipperCMS-clipper_1.3.3/manager/processors/undelete_content.processor.php
  inflating: ClipperCMS-clipper_1.3.3/manager/processors/unpublish_content.processor.php
  inflating: ClipperCMS-clipper_1.3.3/manager/processors/user_documents_permissions.class.php
  inflating: ClipperCMS-clipper_1.3.3/manager/processors/web_access_groups.processor.php
  inflating: ClipperCMS-clipper_1.3.3/sample-robots.txt
Move the extracted file into the following path
root@linuxhelp1:/home/user1/Downloads# mv ClipperCMS-clipper_1.3.3 /var/www/
Switch to the following directory
root@linuxhelp1:/home/user1/Downloads# cd /var/www/
Change the ownership and permission of the file
root@linuxhelp1:/var/www# chown -R www-data.www-data ClipperCMS-clipper_1.3.3
root@linuxhelp1:/var/www# chmod -R 775 ClipperCMS-clipper_1.3.3
Create a new virtual host configuration for accessing the Clipper CMS application
root@linuxhelp1:/var/www# vim /etc/apache2/sites-available/clipper.conf
< VirtualHost *:80>
ServerName www.linuxhelp1.com
DocumentRoot /var/www/ClipperCMS-clipper_1.3.3/

< Directory /var/www/ClipperCMS-clipper_1.3.3/>
AllowOverride All
allow from all
< /Directory>

< /VirtualHost>
Enable the site access
root@linuxhelp1:/var/www# a2ensite clipper.conf
Enabling site clipper.
To activate the new configuration, you need to run:
systemctl reload apache2
Disable the default access
root@linuxhelp1:/var/www# a2dissite 000-default.conf
Site 000-default disabled.
To activate the new configuration, you need to run:
systemctl reload apache2
Enable the rewrite module
root@linuxhelp1:/var/www# a2enmod rewrite
Enabling module rewrite.
To activate the new configuration, you need to run:
systemctl restart apache2
Restart the apache2 service
root@linuxhelp1:/var/www# systemctl restart apache2
Open a browser and type the following URL of http://local IP (or ) domain name

Choose the language for use the Clipper CMS

Choose the installation method

Configure the database detail and the Administration user credential

Choose the site modules, timezone, and Locales

verify the pre-installation validation

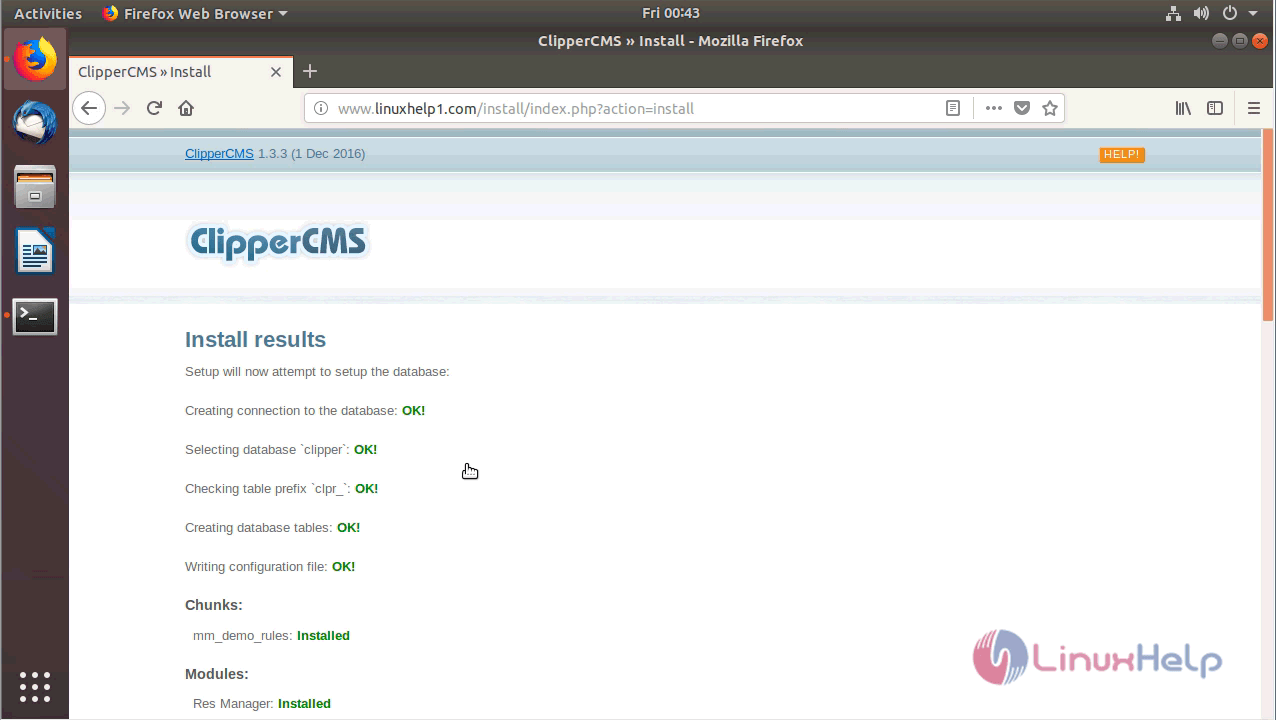
verify the installation results
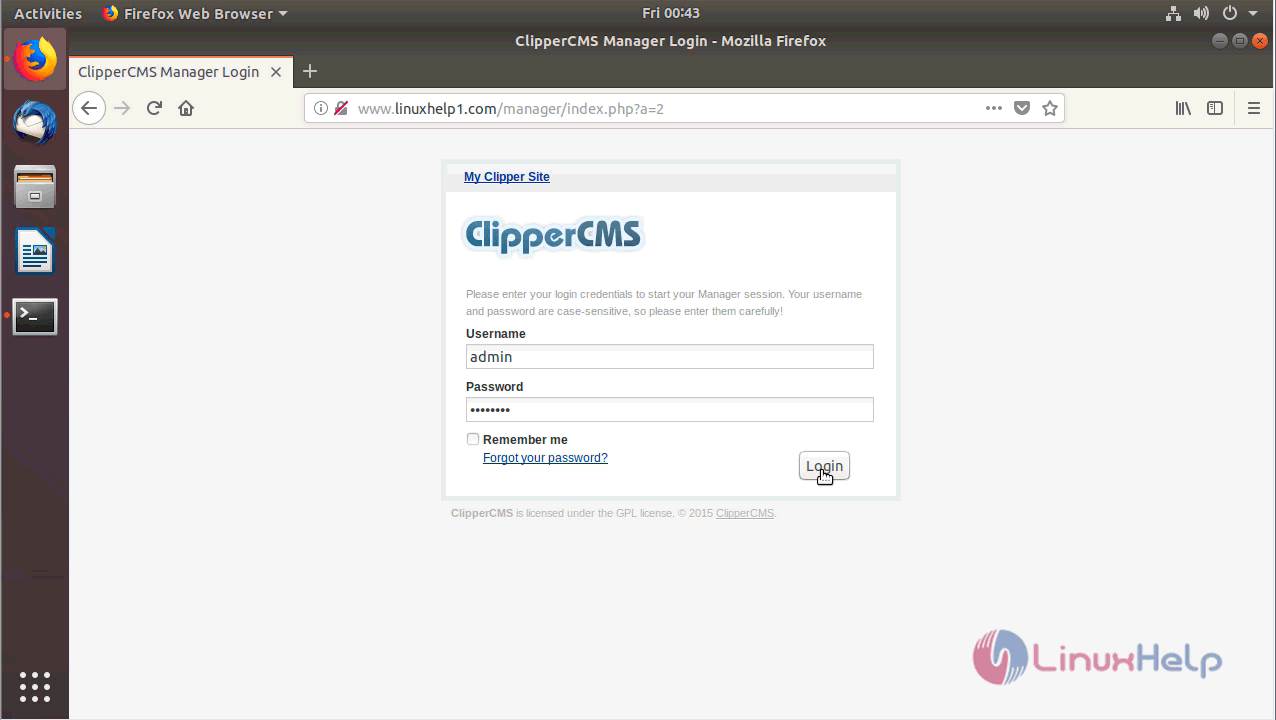
Log in using the admin user credentials
After the successful login, you will see the admin dashboard of clipperCMS as follows

with this, the method to install Clipper CMS 1.3.3 on Ubuntu 18.04 comes to an end.
Comments ( 0 )
No comments available