How to install e107 CMS on Ubuntu 22.04
- 00:37 lsb_release -a
- 01:02 apt install apache2 mysql-server php libapache2-mod-php php-json php-common php-gmp php-curl php-mysql php-opcache php-intl php-fpm php-xmlrpc php-bcmath php-zip php-imagick php-mbstring php-
- 03:37 systemctl status apache2 mysql
- 04:20 vim /etc/php/*/apache2/php.ini
- 06:00 systemctl restart apache2
- 06:09 mysql
- 06:23 create database e107;
- 06:52 create user 'e107_user'@'localhost' identified by '123456';
- 07:41 grant all on e107.* to 'e107_user'@'localhost' with grant option;
- 07:52 flush privileges;
- 07:58 \q
- 08:10 wget http://sourceforge.net/projects/e107/files/e107/e107%20v2.3.1/e107_2.3.1_full.zip
- 08:49 mkdir -p /var/www/e107cms
- 09:15 unzip e107_2.3.1_full.zip -d /var/www/e107cms
- 09:42 chown -R www-data: /var/www/e107cms
- 10:01 chmod -R 755 /var/www/e107cms
- 10:10 ufw allow 80
- 10:38 vim /etc/apache2/sites-available/e107cms.conf
- 11:14 a2ensite e107cms.conf
- 11:26 a2enmod rewrite
- 12:22 apachectl -t
- 12:36 systemctl restart apache2
To Install E107 CMS On Ubuntu 22.04
Introduction
e107 is an Open-Source and free website content management system. The e107 CMS is Powerful & Free Open-Source CMS Highly customizable and easy-to-use website content management application for bootstrap. Content creation without needing technical knowledge.
Procedure Steps:
Step 1: Check the OS version by using the below command
root@linuxhelp:~# lsb_release -a
No LSB modules are available.
Distributor ID:    Ubuntu
Description:    Ubuntu 22.04.3 LTS
Release:    22.04
Codename:    jammy
Step 2: Install all the required packages by using following command
root@linuxhelp:~# apt install apache2 mysql-server php libapache2-mod-php php-json php-common php-gmp php-curl php-mysql php-opcache php-intl php-fpm php-xmlrpc php-bcmath php-zip php-imagick php-mbstring php-gd php-cli php-xml php-zip wget unzip curl -y
Reading package lists... Done
Building dependency tree... Done
Reading state information... Done
Note, selecting 'php8.1-opcache' instead of 'php-opcache'
wget is already the newest version (1.21.2-2ubuntu1).
unzip is already the newest version (6.0-26ubuntu3.1).
unzip set to manually installed.
The following packages were automatically installed and are no longer required:
  libflashrom1 libftdi1-2 libllvm13
Use 'apt autoremove' to remove them.
The following additional packages will be installed:
  apache2-bin apache2-data apache2-utils gsfonts imagemagick-6-common libaio1 libaom3 libapache2-mod-php8.1
  libapr1 libaprutil1 libaprutil1-dbd-sqlite3 libaprutil1-ldap libcgi-fast-perl libcgi-pm-perl libcurl4
  libdav1d5 libde265-0 libevent-core-2.1-7 libevent-pthreads-2.1-7 libfcgi-bin libfcgi-perl libfcgi0ldbl
  libfftw3-double3 libheif1 libhtml-template-perl liblqr-1-0 libmagickcore-6.q16-6 libmagickwand-6.q16-6
  libmecab2 libonig5 libprotobuf-lite23 libx265-199 libxmlrpc-epi0 libzip4 mecab-ipadic mecab-ipadic-utf8

emitting double-array: 100% |###########################################|
reading /usr/share/mecab/dic/ipadic/matrix.def ... 1316x1316
emitting matrix      : 100% |###########################################|

done!
Step 3: Check the status of the MySQL and Apache by using the following command
root@linuxhelp:~# systemctl status apache2 mysql
● apache2.service - The Apache HTTP Server
     Loaded: loaded (/lib/systemd/system/apache2.service; enabled; vendor preset: enabled)
     Active: active (running) since Tue 2023-10-17 08:34:01 IST; 37s ago
       Docs: https://httpd.apache.org/docs/2.4/
   Main PID: 26542 (apache2)
      Tasks: 6 (limit: 4556)
     Memory: 14.9M
        CPU: 181ms
     CGroup: /system.slice/apache2.service
             ├─26542 /usr/sbin/apache2 -k start
             ├─26544 /usr/sbin/apache2 -k start
             ├─26545 /usr/sbin/apache2 -k start
             ├─26546 /usr/sbin/apache2 -k start
             ├─26547 /usr/sbin/apache2 -k start
             └─26548 /usr/sbin/apache2 -k start

Oct 17 08:34:01 linuxhelp systemd[1]: Starting The Apache HTTP Server...
Oct 17 08:34:01 linuxhelp apachectl[26541]: AH00558: apache2: Could not reliably determine the server's fully q>
Oct 17 08:34:01 linuxhelp systemd[1]: Started The Apache HTTP Server.

● mysql.service - MySQL Community Server
     Loaded: loaded (/lib/systemd/system/mysql.service; enabled; vendor preset: enabled)
     Active: active (running) since Tue 2023-10-17 08:33:46 IST; 52s ago
   Main PID: 23085 (mysqld)
     Status: "Server is operational"
      Tasks: 38 (limit: 4556)
     Memory: 363.3M
        CPU: 1.962s
     CGroup: /system.slice/mysql.service
             └─23085 /usr/sbin/mysqld

Oct 17 08:33:45 linuxhelp systemd[1]: Starting MySQL Community Server...
Step 4: Now increase the memory limit in the php.ini file
root@linuxhelp:~# vim /etc/php/*/apache2/php.ini
memory_limit = 256M
max_execution_time = 360
upload_max_filesize = 100M
post_max_size = 100M
Step 5: After the changes need to restart the Apache by using the following command
root@linuxhelp:~# systemctl restart apache2
Step 6: Login to the MySQL console with root privileges
root@linuxhelp:~# mysql
Welcome to the MySQL monitor.  Commands end with ; or \g.
Your MySQL connection id is 8
Server version: 8.0.34-0ubuntu0.22.04.1 (Ubuntu)

Copyright (c) 2000, 2023, Oracle and/or its affiliates.

Oracle is a registered trademark of Oracle Corporation and/or its
affiliates. Other names may be trademarks of their respective
owners.

Type 'help;' or '\h' for help. Type '\c' to clear the current input statement.
Step 7: Create a database by using the following command
mysql> create database e107;
Query OK, 1 row affected (0.00 sec)
Step 8: Create a user with the password
mysql> create user 'e107_user'@'localhost' identified by '123456';
Query OK, 0 rows affected (0.03 sec)
Step 9: Grant All privileges to the database for that user
mysql> grant all on e107.* to 'e107_user'@'localhost' with grant option;
Query OK, 0 rows affected (0.01 sec)
Step 10: Now flush the privileges by using the following command
mysql> flush privileges;
Query OK, 0 rows affected (0.00 sec)
Step 11: Exit from the MySQL console by using \q or exit;
mysql> \q
Bye
Step 12: Download the e107 CMS package by using wget command
root@linuxhelp:~# wget http://sourceforge.net/projects/e107/files/e107/e107%20v2.3.1/e107_2.3.1_full.zip
--2023-10-17 08:39:36--  http://sourceforge.net/projects/e107/files/e107/e107%20v2.3.1/e107_2.3.1_full.zip
Resolving sourceforge.net (sourceforge.net)... 172.64.150.145, 104.18.37.111, 2606:4700:4400::ac40:9691, ...
Connecting to sourceforge.net (sourceforge.net)|172.64.150.145|:80... connected.
HTTP request sent, awaiting response... 301 Moved Permanently
Location: https://sourceforge.net/projects/e107/files/e107/e107%20v2.3.1/e107_2.3.1_full.zip [following]
--2023-10-17 08:39:37--  https://sourceforge.net/projects/e107/files/e107/e107%20v2.3.1/e107_2.3.1_full.zip
Connecting to sourceforge.net (sourceforge.net)|172.64.150.145|:443... connected.
HTTP request sent, awaiting response... 301 Moved Permanently
Location: https://sourceforge.net/projects/e107/files/e107/e107%20v2.3.1/e107_2.3.1_full.zip/ [following]
--2023-10-17 08:39:37--  https://sourceforge.net/projects/e107/files/e107/e107%20v2.3.1/e107_2.3.1_full.zip/
Reusing existing connection to sourceforge.net:443.
HTTP request sent, awaiting response... 301 Moved Permanently
Location: https://sourceforge.net/projects/e107/files/e107/e107%20v2.3.1/e107_2.3.1_full.zip/download [following]
--2023-10-17 08:39:37--  https://sourceforge.net/projects/e107/files/e107/e107%20v2.3.1/e107_2.3.1_full.zip/download
Reusing existing connection to sourceforge.net:443.
HTTP request sent, awaiting response... 302 Found
Location: https://downloads.sourceforge.net/project/e107/e107/e107%20v2.3.1/e107_2.3.1_full.zip?ts=gAAAAABlLfrx0uEXIAc4lgElsitlToGtskqogfgcM40Jo7hV1U18ZORoHzr7Jf3KktbY_6bJjElWRsLZb8iPwyQkzVKzkMEj9g%3D%3D&use_mirror=excellmedia&r= [following]
--2023-10-17 08:39:38--  https://downloads.sourceforge.net/project/e107/e107/e107%20v2.3.1/e107_2.3.1_full.zip?ts=gAAAAABlLfrx0uEXIAc4lgElsitlToGtskqogfgcM40Jo7hV1U18ZORoHzr7Jf3KktbY_6bJjElWRsLZb8iPwyQkzVKzkMEj9g%3D%3D&use_mirror=excellmedia&r=
Resolving downloads.sourceforge.net (downloads.sourceforge.net)... 204.68.111.105
Connecting to downloads.sourceforge.net (downloads.sourceforge.net)|204.68.111.105|:443... connected.
HTTP request sent, awaiting response... 302 Found
Location: https://excellmedia.dl.sourceforge.net/project/e107/e107/e107%20v2.3.1/e107_2.3.1_full.zip [following]
--2023-10-17 08:39:39--  https://excellmedia.dl.sourceforge.net/project/e107/e107/e107%20v2.3.1/e107_2.3.1_full.zip
Resolving excellmedia.dl.sourceforge.net (excellmedia.dl.sourceforge.net)... 202.153.32.19, 2401:fb00:0:1fe:8000::5
Connecting to excellmedia.dl.sourceforge.net (excellmedia.dl.sourceforge.net)|202.153.32.19|:443... connected.
HTTP request sent, awaiting response... 200 OK
Length: 13165518 (13M) [application/octet-stream]
Saving to: ‘e107_2.3.1_full.zip’

e107_2.3.1_full.zip         100%[===========================================>]  12.55M  10.0MB/s    in 1.3s

2023-10-17 08:39:40 (10.0 MB/s) - ‘e107_2.3.1_full.zip’ saved [13165518/13165518]
Step 13: Create a Directory in the Apache document root directory location
root@linuxhelp:~# mkdir -p /var/www/e107cms
Step 14: Now extract the downloaded package to that directory by using following command
root@linuxhelp:~# unzip e107_2.3.1_full.zip -d /var/www/e107cms
Archive:  e107_2.3.1_full.zip
  inflating: /var/www/e107cms/favicon.ico
  inflating: /var/www/e107cms/metaweblog.php
  inflating: /var/www/e107cms/submitnews.php
   creating: /var/www/e107cms/e107_plugins/
   creating: /var/www/e107cms/e107_plugins/banner/
  inflating: /var/www/e107cms/e107_plugins/banner/banner.php
  inflating: /var/www/e107cms/e107_plugins/banner/banner_template.php
  inflating: /var/www/e107cms/e107_plugins/banner/banner_setup.php
  inflating: /var/www/e107cms/e107_plugins/banner/e_menu.php
  inflating: /var/www/e107cms/e107_plugins/banner/plugin.xml
  inflating: /var/www/e107cms/e107_plugins/banner/e_shortcode.php
  inflating: /var/www/e107cms/e107_plugins/banner/banner_sql.php
   creating: /var/www/e107cms/e107_plugins/banner/languages/
  inflating: /var/www/e107cms/e107_plugins/banner/languages/English_menu_banner.php
  inflating: /var/www/e107cms/e107_plugins/banner/languages/English_admin.php
  inflating: /var/www/e107cms/e107_plugins/banner/languages/English_global.php
  inflating: /var/www/e107cms/e107_plugins/banner/languages/English_front.php
  inflating: /var/www/e107cms/e107_plugins/banner/admin_banner.php
   creating: /var/www/e107cms/e107_plugins/banner/images/
 extracting: /var/www/e107cms/e107_plugins/banner/images/banners_16.png
 extracting: /var/www/e107cms/e107_plugins/banner/images/banner1.png
 extracting: /var/www/e107cms/e107_plugins/banner/images/banners_32.png
  inflating: /var/www/e107cms/e107_plugins/banner/banner_menu.php
  inflating: /var/www/e107cms/e107_plugins/banner/e_help.php
  inflating: /var/www/e107cms/gsitemap.php
  inflating: /var/www/e107cms/index.php
  inflating: /var/www/e107cms/upload.php
  inflating: /var/www/e107cms/sitedown.php
  inflating: /var/www/e107cms/e107.robots.txt
  inflating: /var/www/e107cms/rate.php
   creating: /var/www/e107cms/e107_system/
 extracting: /var/www/e107cms/e107_system/index.html
 extracting: /var/www/e107cms/e107_system/.htaccess
  inflating: /var/www/e107cms/e107_system/core_image.phar
Step 15: Change the ownership of the directory
root@linuxhelp:~# chown -R www-data: /var/www/e107cms
Step 16: Change the permission of the directory
root@linuxhelp:~# chmod -R 755 /var/www/e107cms
Step 17: Now allow 80 port in the firewall by using following command
root@linuxhelp:~# ufw allow 80
Rules updated
Rules updated (v6)
Step 18: Create a virtual host file for the e107cms
root@linuxhelp:~# vim /etc/apache2/sites-available/e107cms.conf
<VirtualHost *:80>

    ServerAdmin admin@example.com

    DocumentRoot /var/www/e107cms

    ServerName example.com

    ServerAlias www.example.com

     <Directory /var/www/e107cms/>

          Options FollowSymlinks

          AllowOverride All

          Require all granted

     </Directory>

     ErrorLog ${APACHE_LOG_DIR}/error.log

     CustomLog ${APACHE_LOG_DIR}/access.log combined

</VirtualHost>
Step 19: Now enable site configuration by using the following command
root@linuxhelp:~# a2ensite e107cms.conf
Enabling site e107cms.
To activate the new configuration, you need to run:
  systemctl reload apache2
Step 20: Enable the rewrite module
root@linuxhelp:~# a2enmod rewrite
Enabling module rewrite.
To activate the new configuration, you need to run:
  systemctl restart apache2
Step 21: Check the syntax of the Apache configuration
root@linuxhelp:~# apachectl -t
AH00558: apache2: Could not reliably determine the server's fully qualified domain name, using 127.0.1.1. Set the 'ServerName' directive globally to suppress this message
Syntax OK
Step 22: Restart the Apache service by using the following command
root@linuxhelp:~# systemctl restart apache2
Now go to the browser and search with your local IP or domain
 Click continue button
Enter the Database credential and click continue button

Click overwrite button to overwrite the previous database

In this process check the version and permission of the php and MySQL

Now create a Administrator user and click continue button

Enter a Site name and click continue button

Atlast ask for confirmation to installation

After the installation enter admin credentials and click Login

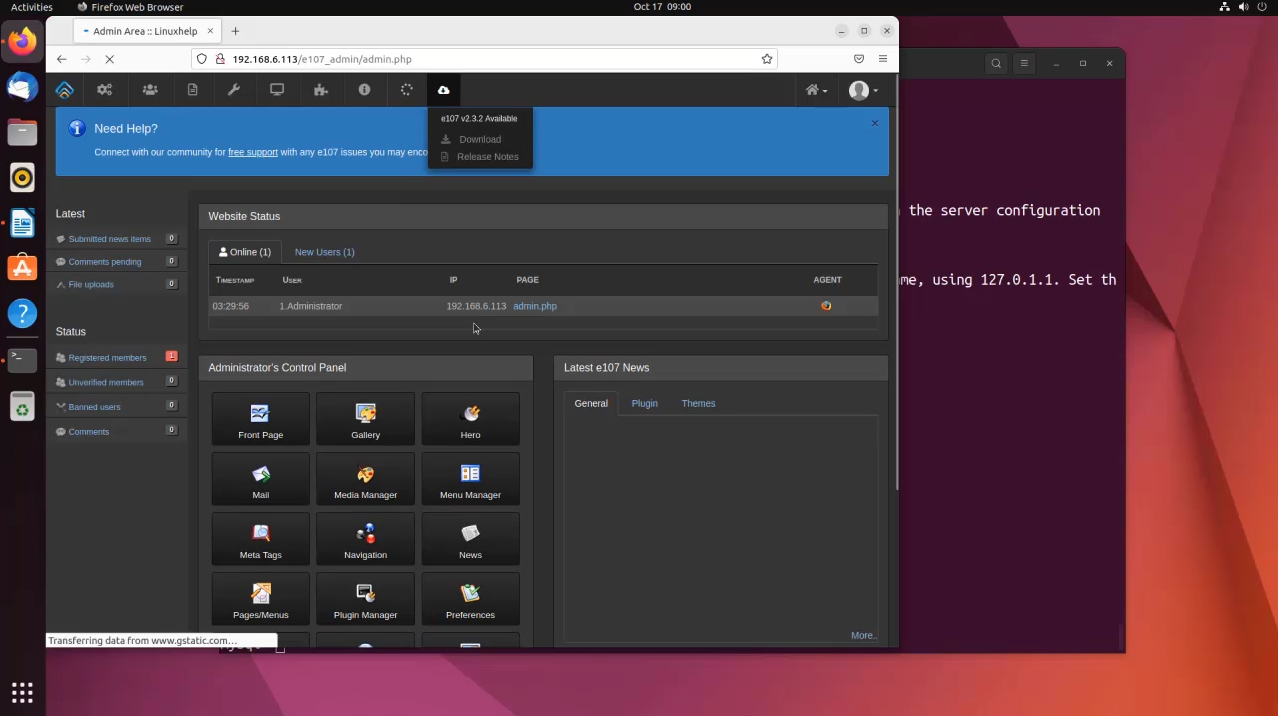
This is the Dashboard of your site
Conclusion:
We have reached the end of this article. In this guide, we have walked you through the steps required to Installation of E107 CMS on Ubuntu 22.04. Your feedback is much welcome.
Comments ( 0 )
No comments available