How To Install Fiyo CMS On CentOS 6.9
To Install Fiyo CMS on CentOS 6.9
Fiyo is an open source CMS tool used for building websites and attractive blogs. Adding and manipulating content using Fiyo CMS is quite easy as its installation. In this, article, you will be briefed about the installation of Fiyo CMS on CentOS7. But, before that, you need to make sure that you have certain per-requirements that are essential for smooth installation process.
Prerequirements
· Install Apache, MySQL-server, PHP
· In MySQL , create database, create user for database , give privilege to that user
Installing Fiyo CMS
If you want to download the Fiyo package, you can use the wget command followed by the download link as given below.
[root@linuxhelp1 fiyo]# wget https://excellmedia.dl.sourceforge.net/project/fiyo-cms/Fiyo%202.0/fiyo_cms_2.0.6.1.zip
--2017-09-18 13:56:18--  https://excellmedia.dl.sourceforge.net/project/fiyo-cms/Fiyo%202.0/fiyo_cms_2.0.6.1.zip
Resolving excellmedia.dl.sourceforge.net... 202.153.32.19
Connecting to excellmedia.dl.sourceforge.net|202.153.32.19|:443... connected.
HTTP request sent, awaiting response... 200 OK
Length: 6155206 (5.9M) [application/octet-stream]
Saving to: “ fiyo_cms_2.0.6.1.zip”

100%[======================================> ] 6,155,206    297K/s   in 12s

2017-09-18 13:56:55 (503 KB/s) - “ fiyo_cms_2.0.6.1.zip”  saved [6155206/6155206]
Once the package is downloaded, move it in html location. For that you need to run the following command.
[root@linuxhelp1 ~]# mv fiyo_cms_2.0.6.1.zip /var/www/html
Now, enter into html location as follows.
[root@linuxhelp1 ~]# cd /var/www/html/
Extract the downloaded file by executing the following command.
[root@linuxhelp1 html]# unzip fiyo_cms_2.0.6.1.zip
Archive:  fiyo_cms_2.0.6.1.zip
  inflating: index.php
  inflating: LICENSE.txt
.
.
 inflating: .htaccess
  inflating: installer.php
After that, you need to change the ownership of the file in html location. You can complete this action by executing the following command.
[root@linuxhelp1 html]# chown -R apache.apache /var/www/html
Once it is done, change the permission of the file in html location.
[root@linuxhelp1 html]# chmod -R 775 /var/www/html
You need to restart the Apache service now to give effect to all the modifications done earlier.
[root@linuxhelp1 html]# service httpd restart
Stopping httpd:                                            [  OK  ]
Starting httpd:                                            [  OK  ]
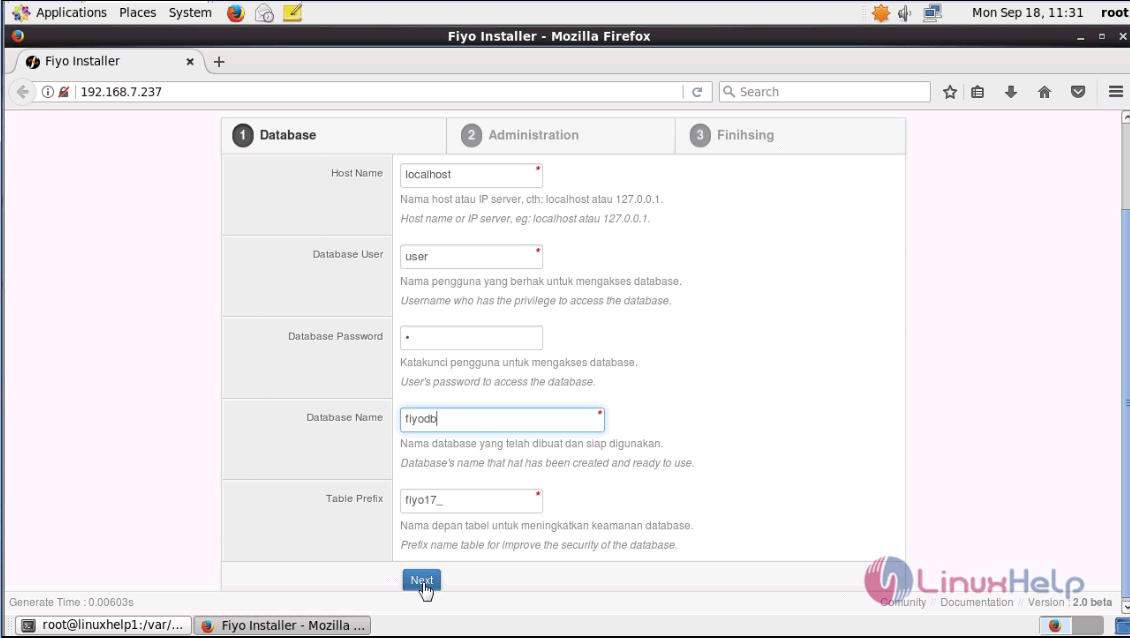
Now, the rest of the process ought to be done in GUI. So, switch over to your browser and enter your machine ip as URL. The installation setup appears on your screen, fill the database details and click next.

Here you will be asked to fill the admin details, enter the details and click next.

With this, the installation is complete. To open admin panel click ‘ Go to AdminPanel’

After that, you need to give admin privileges and click on Login.

Once you login, you will be taken to the Admin page of Fiyp CMS. The admin dashboard resembles the one present in the following image.

With this, the installation of Fiyo CMS on CentOS 6.9 is over.
Comments ( 0 )
No comments available