How to install GrandCMS in CentOS
To install GrandCMS in CentOS
GrandCMS is an open source Content Management System like Wordpress, which is used to create and build your own blog or website and publish it to the Internet easily. GrandCMS acts as a backend code for the sites you create by just using html codes. This article simplifies the installation procedure of GrandCMS in CentOS.
Features
- Has a responsible user admin interface.
- Has backup and restoring tools.
- Enables automatic image resizing.
- Can support Multiple Languages.
To install GrandCMS
GrandCMS requires prior installation of LAMP stack. Invoke the following command to install LAMP.
[root@linuxhelp ~]# yum install httpd mariadb-server mariadb php -y
Loaded plugins: fastestmirror, langpacks
Repodata is over 2 weeks old. Install yum-cron? Or run: yum makecache fast
Loading mirror speeds from cached hostfile
 * base: mirrors.viethosting.vn
 * extras: mirrors.viethosting.vn
 * updates: mirrors.viethosting.vn
Resolving Dependencies
-->  Running transaction check
--->  Package httpd.x86_64 0:2.4.6-40.el7.centos.4 will be installed
-->  Processing Dependency: httpd-tools = 2.4.6-40.el7.centos.4 for package: httpd-2.4.6-40.el7.centos.4.x86_64
-->  Processing Dependency: /etc/mime.types for package: httpd-2.4.6-40.el7.centos.4.x86_64
-->  Processing Dependency: libaprutil-1.so.0()(64bit) for package: httpd-2.4.6-40.el7.centos.4.x86_64
-->  Processing Dependency: libapr-1.so.0()(64bit) for package: httpd-2.4.6-40.el7.centos.4.x86_64
.
.
.
Dependency Installed:
  apr.x86_64 0:1.4.8-3.el7              apr-util.x86_64 0:1.5.2-6.el7                    httpd-tools.x86_64 0:2.4.6-40.el7.centos.4      libzip.x86_64 0:0.10.1-8.el7
  mailcap.noarch 0:2.1.41-2.el7         perl-Compress-Raw-Bzip2.x86_64 0:2.061-3.el7     perl-Compress-Raw-Zlib.x86_64 1:2.061-4.el7     perl-DBD-MySQL.x86_64 0:4.023-5.el7
  perl-DBI.x86_64 0:1.627-4.el7         perl-Data-Dumper.x86_64 0:2.145-3.el7            perl-IO-Compress.noarch 0:2.061-2.el7           perl-Net-Daemon.noarch 0:0.48-5.el7
  perl-PlRPC.noarch 0:0.2020-14.el7     php-cli.x86_64 0:5.4.16-36.3.el7_2               php-common.x86_64 0:5.4.16-36.3.el7_2

Dependency Updated:
  mariadb-libs.x86_64 1:5.5.50-1.el7_2

Complete!
Once LAMP is installed, start and enable MariaDB service by using the following command.
[root@linuxhelp ~]# systemctl start mariadb
[root@linuxhelp ~]# systemctl enable mariadb
ln -s ' /usr/lib/systemd/system/mariadb.service'  ' /etc/systemd/system/multi-user.target.wants/mariadb.service'
Now utilize the following command to set the root password for MariaDB
[root@linuxhelp ~]# mysql_secure_installation
/usr/bin/mysql_secure_installation: line 379: find_mysql_client: command not found

NOTE: RUNNING ALL PARTS OF THIS SCRIPT IS RECOMMENDED FOR ALL MariaDB
      SERVERS IN PRODUCTION USE!  PLEASE READ EACH STEP CAREFULLY!

In order to log into MariaDB to secure it, we' ll need the current
password for the root user.  If you' ve just installed MariaDB, and
you haven' t set the root password yet, the password will be blank,
so you should just press enter here.

Enter current password for root (enter for none):
OK, successfully used password, moving on...

Setting the root password ensures that nobody can log into the MariaDB
root user without the proper authorisation.

Set root password? [Y/n] y
New password:
Re-enter new password:
Password updated successfully!
Reloading privilege tables..
 ... Success!

By default, a MariaDB installation has an anonymous user, allowing anyone
to log into MariaDB without having to have a user account created for
them.  This is intended only for testing, and to make the installation
go a bit smoother.  You should remove them before moving into a
production environment.

Remove anonymous users? [Y/n] y
 ... Success!

Normally, root should only be allowed to connect from ' localhost' .  This
ensures that someone cannot guess at the root password from the network.

Disallow root login remotely? [Y/n] y
 ... Success!

By default, MariaDB comes with a database named ' test'  that anyone can
access.  This is also intended only for testing, and should be removed
before moving into a production environment.

Remove test database and access to it? [Y/n] y
 - Dropping test database...
 ... Success!
 - Removing privileges on test database...
 ... Success!

Reloading the privilege tables will ensure that all changes made so far
will take effect immediately.

Reload privilege tables now? [Y/n] y
 ... Success!

Cleaning up...

All done!  If you' ve completed all of the above steps, your MariaDB
installation should now be secure.

Thanks for using MariaDB!
Log into MariaDB to create a database and user for GrandCMS.
[root@linuxhelp ~]# mysql -u root -p
Enter password:
Welcome to the MariaDB monitor.  Commands end with   or g.
Your MariaDB connection id is 10
Server version: 5.5.50-MariaDB MariaDB Server

Copyright (c) 2000, 2016, Oracle, MariaDB Corporation Ab and others.

Type ' help '  or ' h'  for help. Type ' c'  to clear the current input statement.

MariaDB [(none)]>  CREATE DATABASE grandcms_db
Query OK, 1 row affected (0.16 sec)

MariaDB [(none)]>  CREATE USER ' grandcms_user' @' localhost'  IDENTIFIED BY ' 123'
Query OK, 0 rows affected (0.00 sec)

MariaDB [(none)]>  GRANT ALL PRIVILEGES ON `grandcms_db`.* TO ' grandcms_user' @' localhost'
Query OK, 0 rows affected (0.00 sec)

MariaDB [(none)]>  flush privileges
Query OK, 0 rows affected (0.00 sec)

MariaDB [(none)]>  exit
Bye
Download GrandCMS package from the document root with the following command.
[root@linuxhelp ~]# cd /var/www/html/
[root@linuxhelp html]# wget http://downloads.sourceforge.net/project/grandcms/grandcms_v0.2.0.1.1.zip
--2016-10-04 15:03:20--  http://downloads.sourceforge.net/project/grandcms/grandcms_v0.2.0.1.1.zip
Resolving downloads.sourceforge.net (downloads.sourceforge.net)... 216.34.181.59
Connecting to downloads.sourceforge.net (downloads.sourceforge.net)|216.34.181.59|:80... connected.
HTTP request sent, awaiting response... 302 Found
Location: http://liquidtelecom.dl.sourceforge.net/project/grandcms/grandcms_v0.2.0.1.1.zip [following]
--2016-10-04 15:03:21--  http://liquidtelecom.dl.sourceforge.net/project/grandcms/grandcms_v0.2.0.1.1.zip
Resolving liquidtelecom.dl.sourceforge.net (liquidtelecom.dl.sourceforge.net)... 197.155.77.8
Connecting to liquidtelecom.dl.sourceforge.net (liquidtelecom.dl.sourceforge.net)|197.155.77.8|:80... connected.
HTTP request sent, awaiting response... 200 OK
Length: 5606378 (5.3M) [application/octet-stream]
Saving to: ‘ grandcms_v0.2.0.1.1.zip’

100%[=========================================================================================================================================> ] 5,606,378    259KB/s   in 22s

2016-10-04 15:03:44 (250 KB/s) - ‘ grandcms_v0.2.0.1.1.zip’  saved [5606378/5606378]
And then extract the GrandCMS package by triggering unzip command.
[root@linuxhelp html]# unzip grandcms_v0.2.0.1.1.zip
Archive:  grandcms_v0.2.0.1.1.zip
   creating: upload/
  inflating: upload/.htaccess.txt
   creating: upload/admin/
  inflating: upload/admin/config-dist.php
   creating: upload/admin/controller/
   creating: upload/admin/controller/catalog/
  inflating: upload/admin/controller/catalog/download.php
  inflating: upload/admin/controller/catalog/information.php
  inflating: upload/admin/controller/catalog/information_category.php
  inflating: upload/admin/controller/catalog/menu.php
  inflating: upload/admin/controller/catalog/menu_group.php
  inflating: upload/admin/controller/catalog/review.php
.
.
.
inflating: upload/system/modification/index.html
  inflating: upload/system/modification.xml
  inflating: upload/system/startup.php
   creating: upload/system/upload/
  inflating: upload/system/upload/index.html
  inflating: install.txt
  inflating: license.txt
  inflating: README.txt
  inflating: upload/catalog/view/theme/default/template/common/header.tpl
Find the upload directory from your current directory and rename it to grandcms.
[root@linuxhelp html]# ls
upload
[root@linuxhelp html]# mv upload grandcms

Now configure the user and group ownership into the grandcms directory. Also, grant file permission and set Selinux Context as follows.  Utilize the following commands for the same.

[root@linuxhelp html]# chown -R apache:apache /var/www/html/grandcms/
[root@linuxhelp html]# chmod -R 775 /var/www/html/grandcms/
[root@linuxhelp html]# chcon -Rt httpd_sys_content_rw_t /var/www/html/grandcms/
Once the above procedure is done, configure Apache Virtual Host by running the following command.
[root@linuxhelp html]# vim /etc/httpd/conf.d/grandcms.conf
< VirtualHost *:80>
ServerAdmin [email protected]
DocumentRoot /var/www/html/grandcms/
ServerName linuxhelp.com
ServerAlias www.linuxhelp.com
< Directory /var/www/html/grandcms/>
Options FollowSymLinks
AllowOverride All
Order allow,deny
allow from all
< /Directory>
< /VirtualHost>
The Apache Virtual Host is configured, install the PHP extensions for GrandCMS with the following command.
[root@linuxhelp html]# yum install php-mysql php-gd php-mcrypt -y
Loaded plugins: fastestmirror, langpacks
Loading mirror speeds from cached hostfile
* base: mirrors.viethosting.vn
* epel: epel.mirror.net.in
* extras: mirrors.viethosting.vn
* updates: mirrors.viethosting.vn
Resolving Dependencies
-->  Running transaction check
--->  Package php-gd.x86_64 0:5.4.16-36.3.el7_2 will be installed
--->  Package php-mcrypt.x86_64 0:5.4.16-4.el7 will be installed
-->  Processing Dependency: libmcrypt.so.4()(64bit) for package: php-mcrypt-5.4.16-4.el7.x86_64
--->  Package php-mysql.x86_64 0:5.4.16-36.3.el7_2 will be installed
-->  Running transaction check
--->  Package libmcrypt.x86_64 0:2.5.8-13.el7 will be installed
-->  Finished Dependency Resolution
.
.
.
Installed:
php-gd.x86_64 0:5.4.16-36.3.el7_2 php-mcrypt.x86_64 0:5.4.16-4.el7 php-mysql.x86_64 0:5.4.16-36.3.el7_2

Dependency Installed:
libmcrypt.x86_64 0:2.5.8-13.el7

Complete!
Now move into GrandCMS directory to rename the files as mentioned below.
[root@linuxhelp html]# cd grandcms/
[root@linuxhelp grandcms]# mv config-dist.php config.php
[root@linuxhelp grandcms]# mv admin/config-dist.php admin/config.php
After renaming the files, restart the Apache service by triggering the following command.
[root@linuxhelp grandcms]# systemctl restart httpd
Once Apache service is restarted, open your browser and call your IP address.
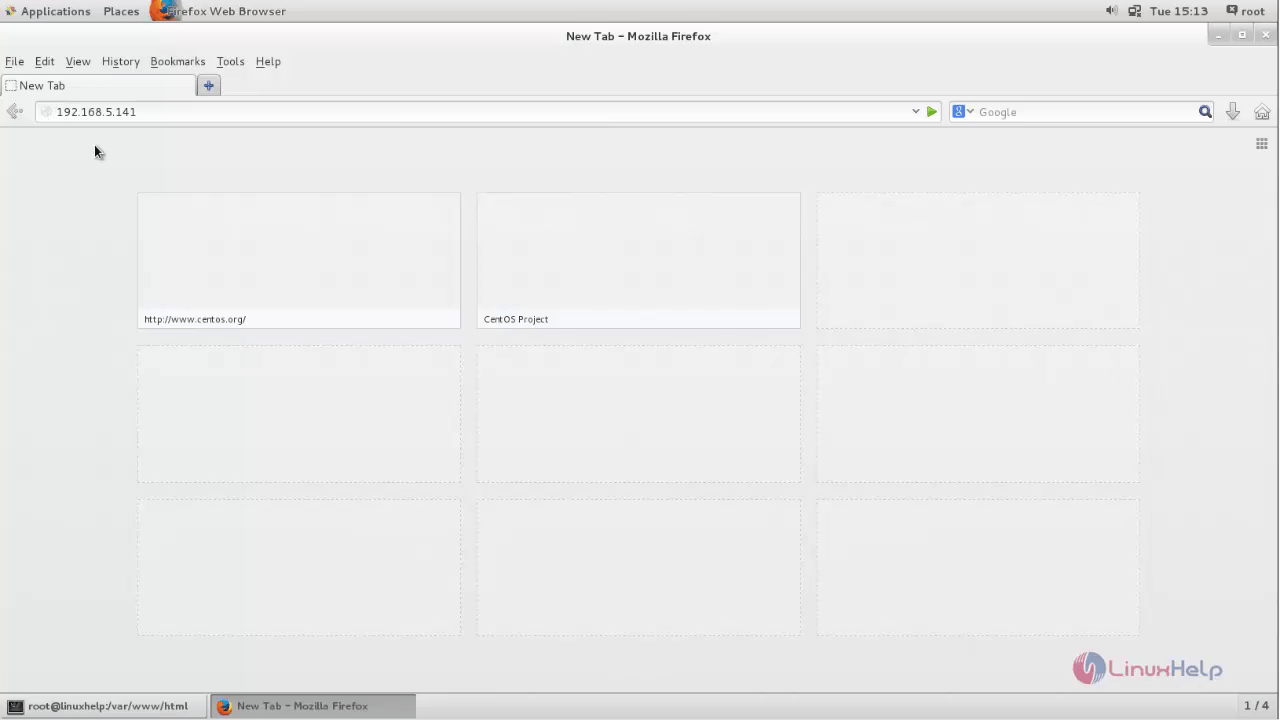
Your browser will take you to the GrandCMS installation wizard as below.
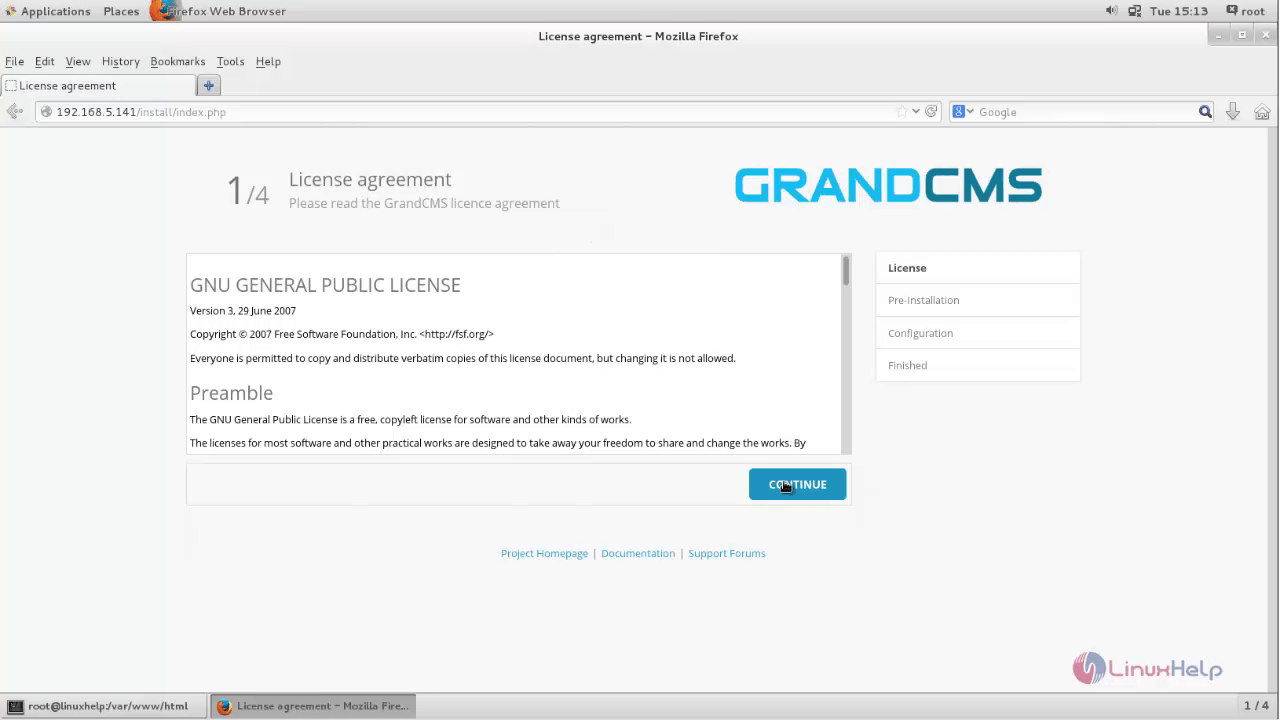
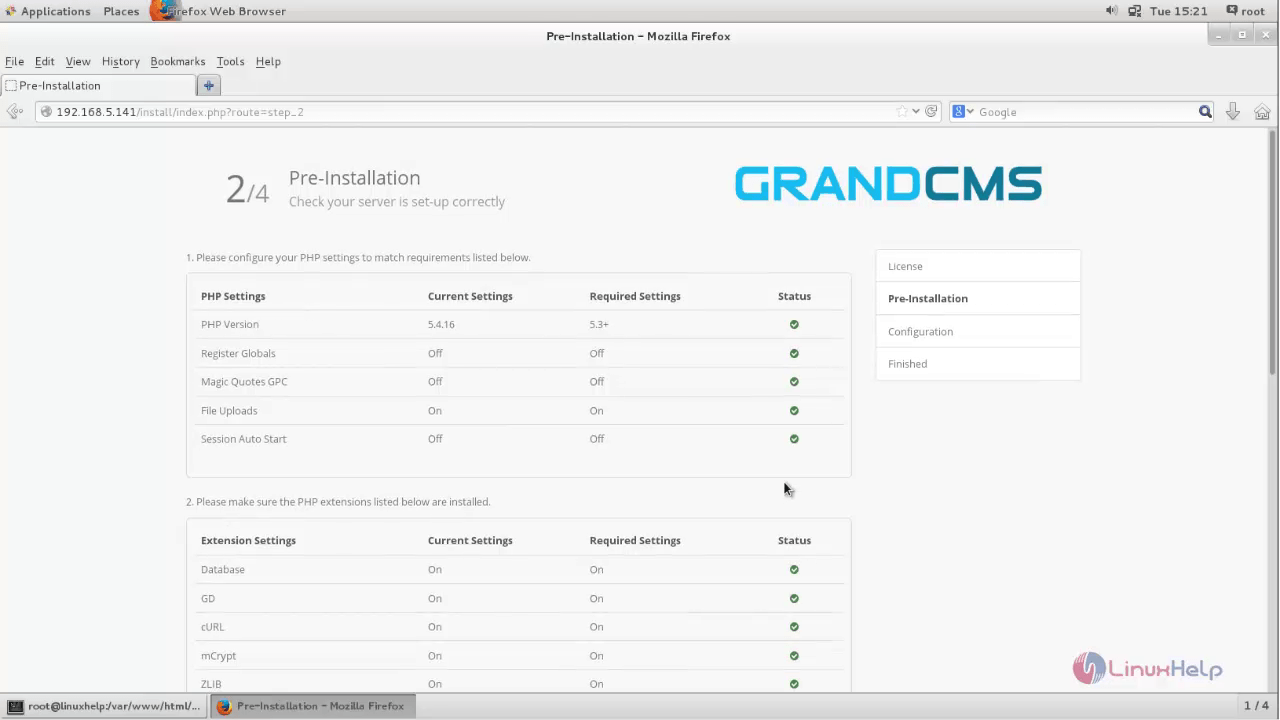
Click the Continue button.
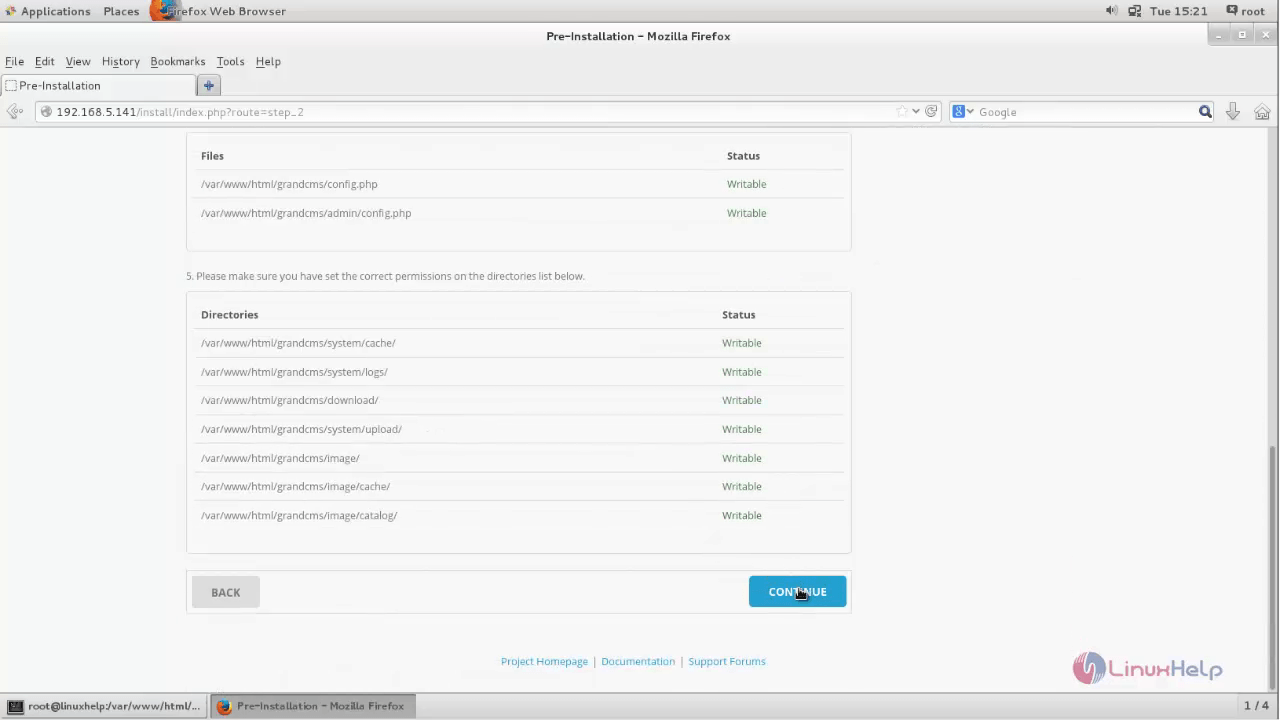
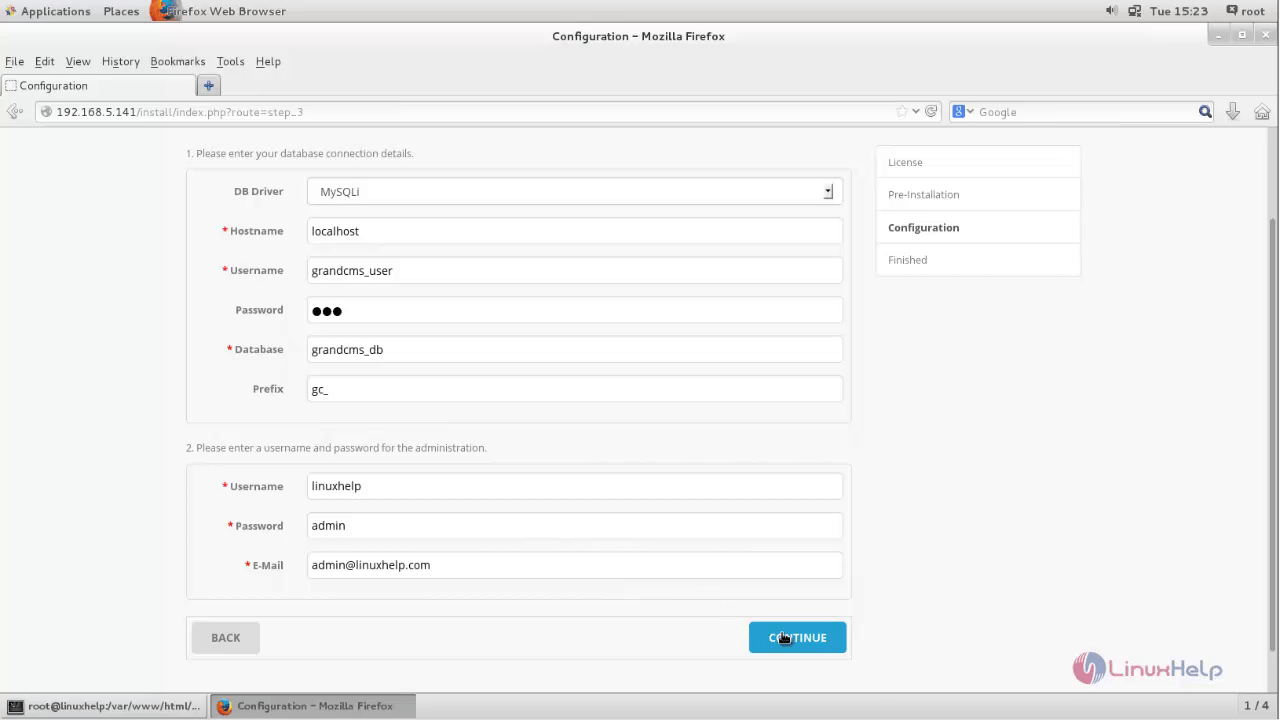
Configure the Database as below.
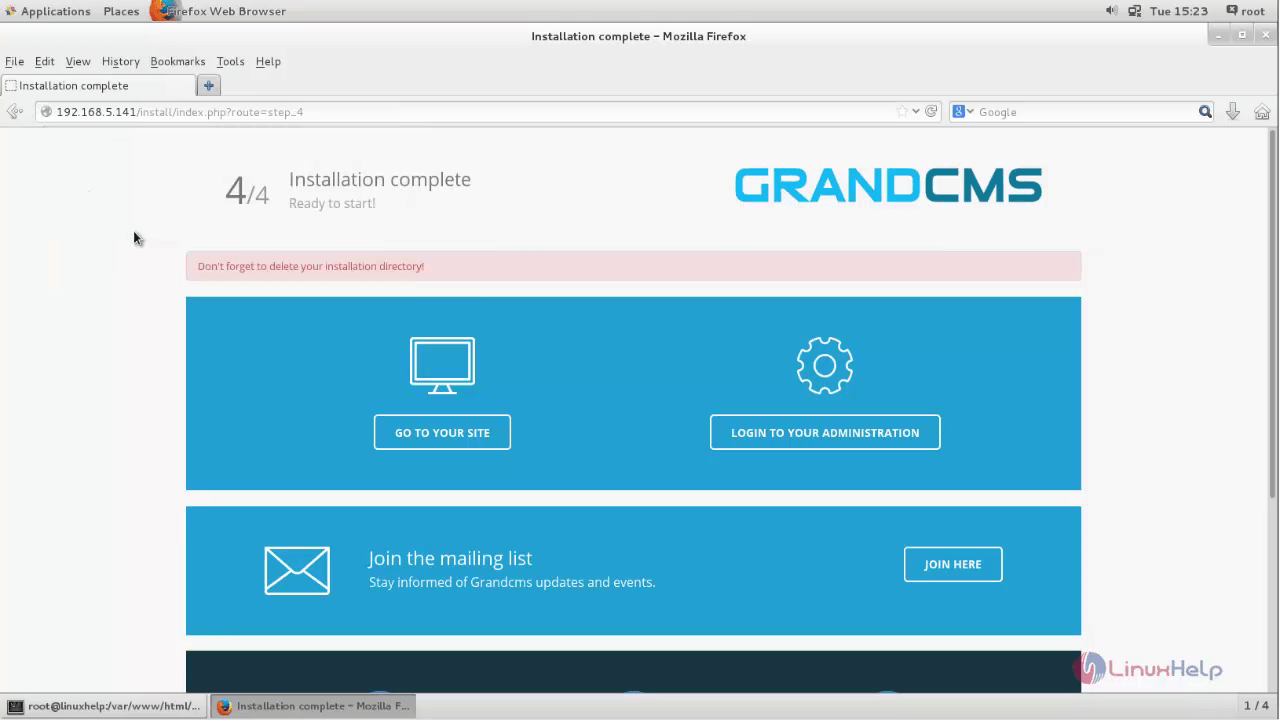
Now that the installation is complete, log into GrandCMS.
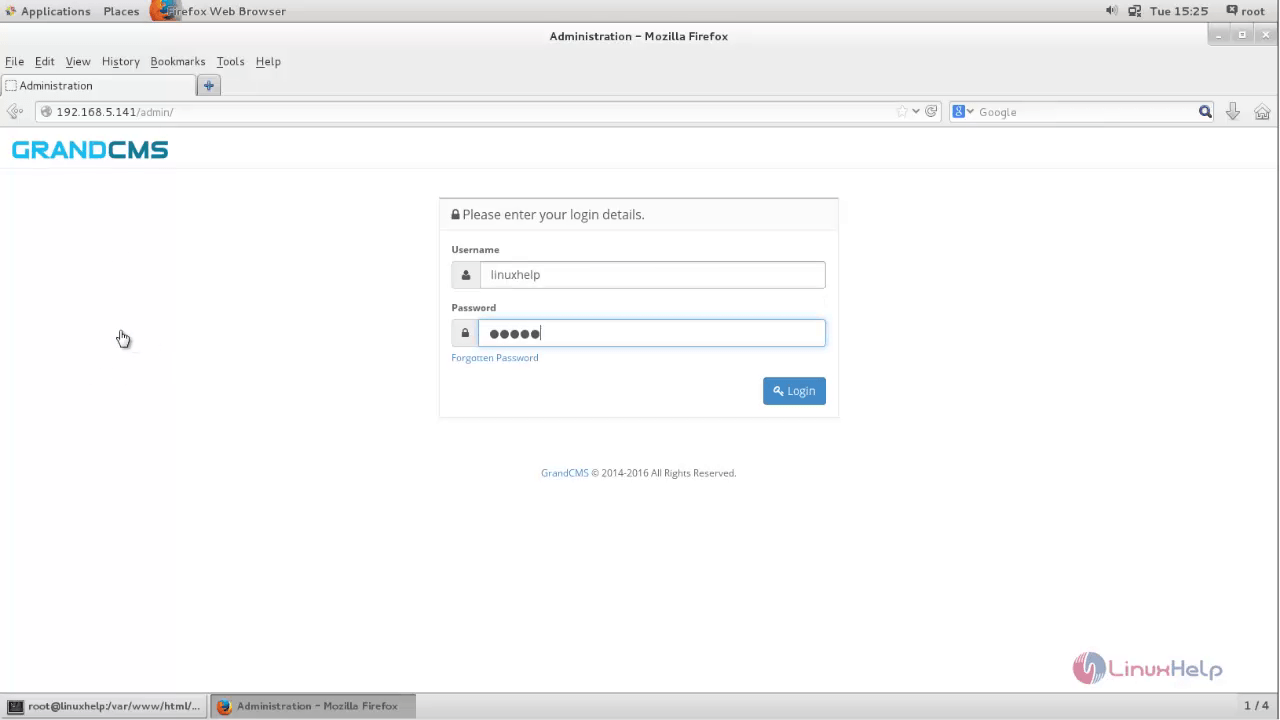
Enter your Login Credentials.
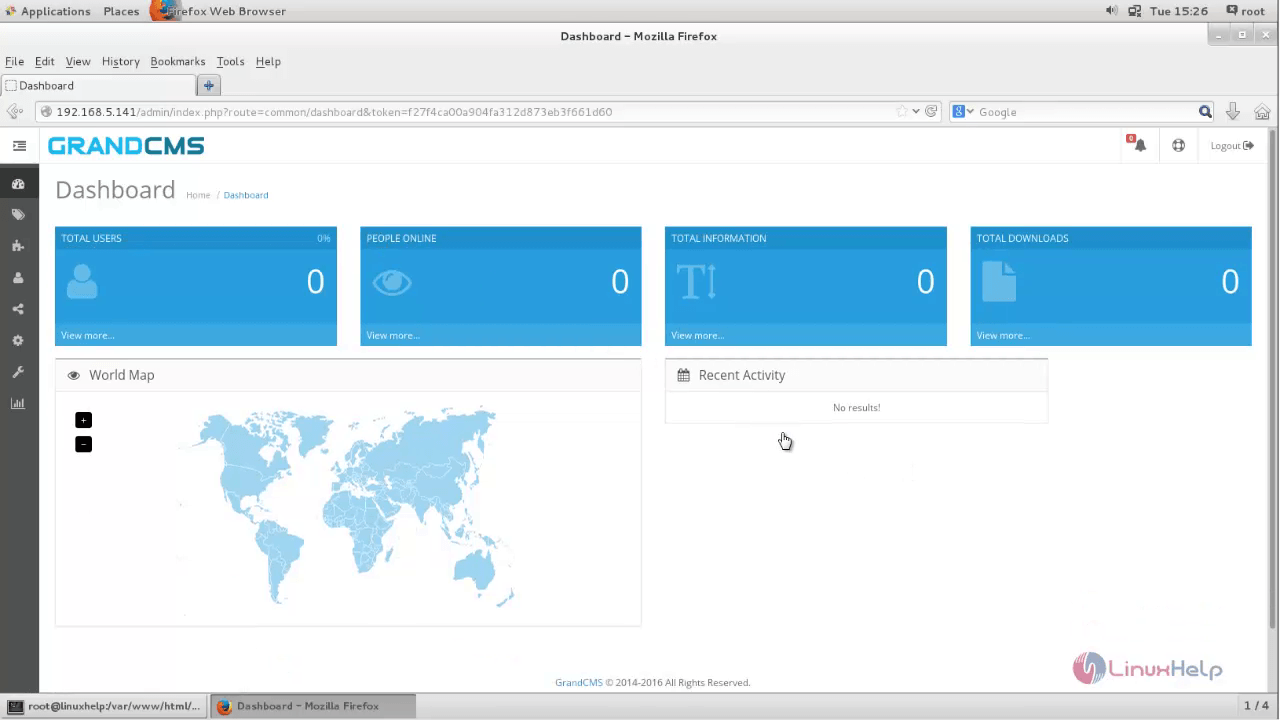
The GrandCMS dashboard will appear as shown below.
Comments ( 0 )
No comments available