How to install ISPConfig on Ubuntu 16.04
How to install ISPConfig on Ubuntu 16.04
ISPConfig is an open source control panel application for linux servers which can monitor, manage and control almost all task for the servers over web based interface. This is very useful tool for system administrators. Before going to install ISPConfig make sure Apparmor is not running on your server. Run the below command to stop the service and remove the package as follows
To install ISPConfig
root@linuxhelp:~# systemctl stop apparmor
root@linuxhelp:~# apt-get remove apparmor apparmor-utils -y
Reading package lists... Done
Building dependency tree
Reading state information... Done
Package ' apparmor-utils'  is not installed, so not removed
The following packages were automatically installed and are no longer required:
libapparmor-perl linux-headers-4.4.0-42 linux
.
.
.
Removing snapd (2.0.2) ...
Removing ubuntu-core-launcher (1.0.27.1) ...
Removing apparmor (2.10.95-0ubuntu2) ...
Processing triggers for man-db (2.7.5-1) ...
Now install the following required packages for ISPConfig
root@linuxhelp:~# apt-get install openssl apache2 apache2-utils apache2-doc libapache2-mod-php php7.0 php7.0-common php7.0-cli php7.0-mysql php7.0-sqlite3 php7.0-imap php7.0-gd php7.0-cgi php7.0-zip php7.0-mbstring php7.0-opcache php7.0-curl php7.0-intl php7.0-pspell php7.0-recode php7.0-tidy php7.0-xmlrpc php7.0-xsl libapache2-mod-fcgid php-auth apache2-suexec-pristine php-pear php7.0-mcrypt mcrypt imagemagick libruby memcached php-memcache php-imagick libapache2-mod-python php-gettext php-apcu mariadb-server mariadb-client phpmyadmin postfix postfix-mysql postfix-doc dovecot-imapd dovecot-pop3d dovecot-mysql dovecot-sieve dovecot-lmtpd postgrey amavisd-new spamassassin clamav clamav-daemon clamav-docs mailman roundcube roundcube-core roundcube-mysql roundcube-plugins roundcube-plugins-extra php-net-sieve tinymce getmail4 javascript-common libjs-jquery-mousewheel rkhunter binutils zoo zip unzip bzip2 vlogger webalizer awstats geoip-database libclass-dbi-mysql-perl bind9 dnsutils haveged daemon libio-string-perl libio-socket-ssl-perl libnet-ident-perl quota quotatool libnet-dns-perl pure-ftpd-common pure-ftpd-mysql cabextract apt-listchanges libnet-ldap-perl libauthen-sasl-perl arj nomarch lzop -y
Reading package lists... Done
Building dependency tree
Reading state information... Done
bzip2 is already the newest version (1.0.6-8).
geoip-database is already the newest version (20160408-1).
geoip-database set to manually installed.
libauthen-sasl-perl is already the newest version (2.1600-1).
libauthen-sasl-perl set to manually installed.
libio-socket-ssl-perl is already the newest version (2.024-1).
libio-socket-ssl-perl set to manually installed.
.
.
.
Processing triggers for ufw (0.35-0ubuntu2) ...
Processing triggers for dovecot-core (1:2.2.22-1ubuntu2.2) ...
Processing triggers for libapache2-mod-php7.0 (7.0.13-0ubuntu0.16.04.1) ...
Processing triggers for rkhunter (1.4.2-5) ...
[ Rootkit Hunter version 1.4.2 ]
File updated: searched for 178 files, found 150
During the installation process it will ask you some basic questions. For installing postfix service select Internet Site, then enter your server hostname, after that choose web server as apache2. It will also ask you to set root password for MySQL
Next enable the apache and php modules as shown below.
root@linuxhelp:~# a2enmod rewrite ssl cgi include actions suexec dav_fs dav auth_digest alias
Enabling module rewrite.
Considering dependency setenvif for ssl:
Module setenvif already enabled
Considering dependency mime for ssl:
Module mime already enabled
Considering dependency socache_shmcb for ssl:
Enabling module socache_shmcb.
Enabling module ssl.
See /usr/share/doc/apache2/README.Debian.gz on how to configure SSL and create self-signed certificates.
Enabling module cgi.
Considering dependency mime for include:
Module mime already enabled
Enabling module include.
Enabling module actions.
Enabling module suexec.
Considering dependency dav for dav_fs:
Enabling module dav.
Enabling module dav_fs.
Module dav already enabled
Considering dependency authn_core for auth_digest:
Module authn_core already enabled
Enabling module auth_digest.
Module alias already enabled
To activate the new configuration, you need to run the following command.
root@linuxhelp:~# service apache2 restart
root@linuxhelp:~# phpenmod mcrypt
To restart the apache service, run the following command.
root@linuxhelp:~# systemctl restart apache2
Next configure pure-ftpd service. Open the configuration file and edit the file to change value to VIRTUALCHROOT from false to true.
root@linuxhelp:~# vim /etc/default/pure-ftpd-common
VIRTUALCHROOT=true
To restart the pure-ftp service, run the following command.
root@linuxhelp:~# systemctl restart pure-ftpd-mysql
Next we need to configure postfix and mailman. Edit master configuration file as follows.
root@linuxhelp:~# vim /etc/postfix/master.cf
Now make sure you have the following line entered or enabled on the master configuration file
submission inet n       -       y       -       -       smtpd
  -o syslog_name=postfix/submission
  -o smtpd_tls_security_level=encrypt
  -o smtpd_sasl_auth_enable=yes
  -o smtpd_client_restrictions=permit_sasl_authenticated,reject
#  -o smtpd_reject_unlisted_recipient=no
#  -o smtpd_client_restrictions=$mua_client_restrictions
#  -o smtpd_helo_restrictions=$mua_helo_restrictions
#  -o smtpd_sender_restrictions=$mua_sender_restrictions
#  -o smtpd_recipient_restrictions=
#  -o smtpd_relay_restrictions=permit_sasl_authenticated,reject
#  -o milter_macro_daemon_name=ORIGINATING
smtps     inet  n       -       y       -       -       smtpd
  -o syslog_name=postfix/smtps
  -o smtpd_tls_wrappermode=yes
  -o smtpd_sasl_auth_enable=yes
  -o smtpd_client_restrictions=permit_sasl_authenticated,reject
#  -o smtpd_reject_unlisted_recipient=no
#  -o smtpd_client_restrictions=$mua_client_restrictions
#  -o smtpd_helo_restrictions=$mua_helo_restrictions
#  -o smtpd_sender_restrictions=$mua_sender_restrictions
#  -o smtpd_recipient_restrictions=
#  -o smtpd_relay_restrictions=permit_sasl_authenticated,reject
#  -o milter_macro_daemon_name=ORIGINATING
Create a new list for mailman as follows.
root@linuxhelp:~# newlist mailman
Enter the email of the person running the list: test@linuxhelp.com
Initial mailman password:
To finish creating your mailing list, you must edit your /etc/aliases (or equivalent) file by adding the following lines, and possibly running the`newaliases' program:
## mailman mailing list
mailman:              " |/var/lib/mailman/mail/mailman post mailman"
mailman-admin:        " |/var/lib/mailman/mail/mailman admin mailman"
mailman-bounces:      " |/var/lib/mailman/mail/mailman bounces mailman"
mailman-confirm:      " |/var/lib/mailman/mail/mailman confirm mailman"
mailman-join:         " |/var/lib/mailman/mail/mailman join mailman"
mailman-leave:        " |/var/lib/mailman/mail/mailman leave mailman"
mailman-owner:        " |/var/lib/mailman/mail/mailman owner mailman"
mailman-request:      " |/var/lib/mailman/mail/mailman request mailman"
mailman-subscribe:    " |/var/lib/mailman/mail/mailman subscribe mailman"
mailman-unsubscribe:  " |/var/lib/mailman/mail/mailman unsubscribe mailman"
Hit enter to notify mailman owner...
Next initialize the alias database and restart the services.
root@linuxhelp:~# newaliases
root@linuxhelp:~# systemctl restart mailman
root@linuxhelp:~# systemctl restart postfix
Then stop and disable spamassassin
root@linuxhelp:~# systemctl stop spamassassin
root@linuxhelp:~# systemctl disable spamassassin
Synchronizing state of spamassassin.service with SysV init with /lib/systemd/systemd-sysv-install...
Executing /lib/systemd/systemd-sysv-install disable spamassassin
insserv: warning: current start runlevel(s) (empty) of script `spamassassin'  overrides LSB defaults (2 3 4 5).
insserv: warning: current stop runlevel(s) (0 1 2 3 4 5 6) of script `spamassassin'  overrides LSB defaults (0 1 6).
remove /etc/cron.d/awstats file
root@linuxhelp:~# rm -f /etc/cron.d/awstats
Now the system is ready for the installation of ISPConfig, use the below command to download the package.
root@linuxhelp:~# wget -O ispconfig.tar.gz https://git.ispconfig.org/ispconfig/ispconfig3/repository/archive.tar.gz?ref=stable-3.1
--2017-02-01 16:25:40--  https://git.ispconfig.org/ispconfig/ispconfig3/repository/archive.tar.gz?ref=stable-3.1
Resolving git.ispconfig.org (git.ispconfig.org)... 144.76.136.121
Connecting to git.ispconfig.org (git.ispconfig.org)|144.76.136.121|:443... connected.
HTTP request sent, awaiting response... 200 OK
Length: 2931174 (2.8M) [application/octet-stream]
Saving to: ‘ ispconfig.tar.gz’
ispconfig.tar.gz                            100%[==========================================================================================> ]   2.79M  48.4KB/s    in 67s
2017-02-01 16:26:49 (42.7 KB/s) - ‘ ispconfig.tar.gz’  saved [2931174/2931174]
Extract the package and move to extracted directory there you can find a directory called “ install”
root@linuxhelp:~# tar xfz ispconfig.tar.gz
root@linuxhelp:~# cd ispconfig3-stable-3.1-30ead37e934986b792ec182e4ff8e6f63fe0720a/
root@linuxhelp:~/ispconfig3-stable-3.1-30ead37e934986b792ec182e4ff8e6f63fe0720a# cd install/
Now run the script for installing ISPConfig using the below command.
root@linuxhelp:~/ispconfig3-stable-3.1-30ead37e934986b792ec182e4ff8e6f63fe0720a/install# php -q install.php
while installation it will ask you for some basic information’ s fill all the information.
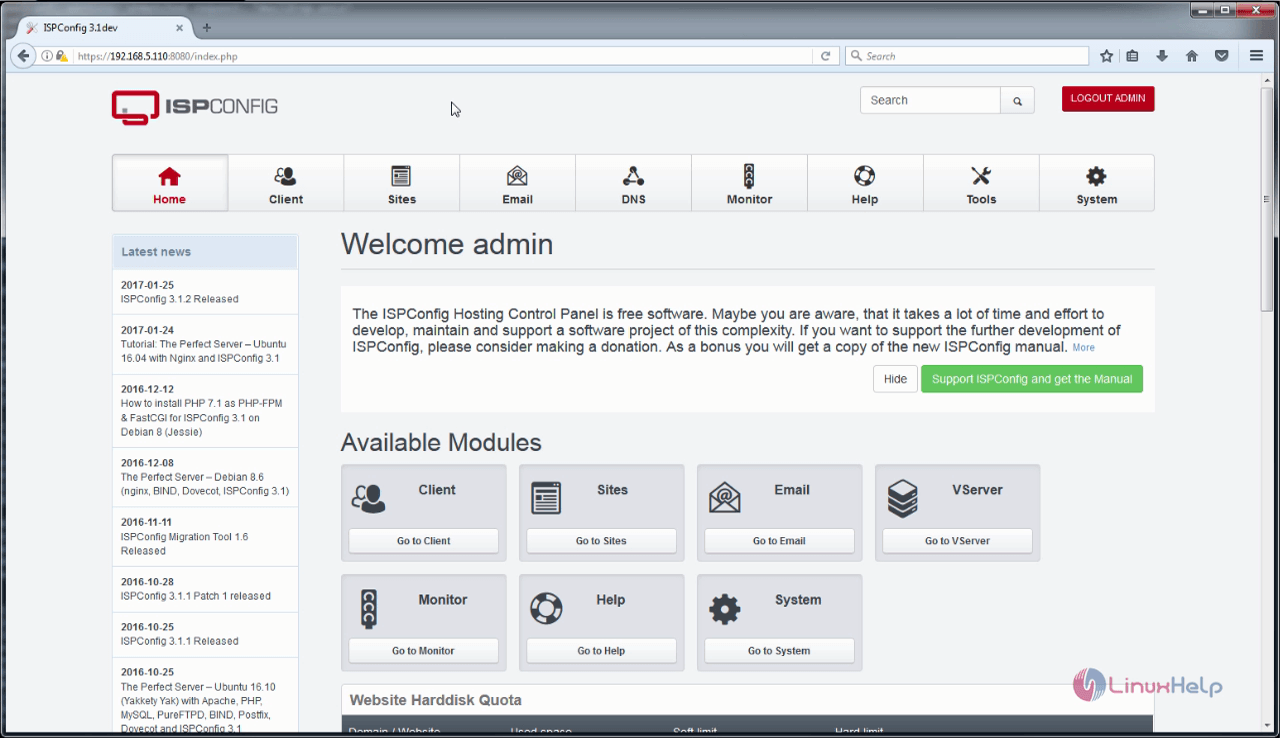
After the installation completes open your browser and call the link https://192.168.5.110:8080

Comments ( 0 )
No comments available