How to install LEMP on Ubuntu 17.04
How to install LEMP on Ubuntu 17.04
LEMP software stack is a group of software that can be used to serve dynamic web pages and web applications. This is an acronym that contains Linux, Nginx server, MySQL or MariaDB and PHP, Perl or Python. The backend data is stored in the MySQL database and dynamic processing is handled by PHP. This tutorial explains the installation procedure of LEMP on Ubuntu 17.04.
Installation procedure
To start the installation process, install Nginx by executing the below command and press y to continue with the installation procedure.
root@linuxhelp1:~# apt-get install nginx -y
Reading package lists... Done
Building dependency tree
Reading state information... Done
The following additional packages will be installed:
  libnginx-mod-http-geoip libnginx-mod-http-image-filter libnginx-mod-http-xslt-filter libnginx-mod-mail libnginx-mod-stream nginx-common nginx-core
Suggested packages:
  fcgiwrap nginx-doc
The following NEW packages will be installed:
  libnginx-mod-http-geoip libnginx-mod-http-image-filter libnginx-mod-http-xslt-filter libnginx-mod-mail libnginx-mod-stream nginx nginx-common nginx-core
0 upgraded, 8 newly installed, 0 to remove and 42 not upgraded.
Need to get 527 kB of archives.
After this operation, 1,819 kB of additional disk space will be used.
Get:1 http://in.archive.ubuntu.com/ubuntu zesty/main amd64 nginx-common all 1.10.3-1ubuntu3 [29.1 kB]
.
.
.
Setting up libnginx-mod-stream (1.10.3-1ubuntu3) ...
Setting up nginx-core (1.10.3-1ubuntu3) ...
Setting up nginx (1.10.3-1ubuntu3) ...
Processing triggers for ureadahead (0.100.0-19) ...
Processing triggers for ufw (0.35-4) ...
The Nginx is successfully installed in the target system. Start and enable Nginx service by running the following commands.
root@linuxhelp1:~# systemctl start nginx
root@linuxhelp1:~# systemctl enable nginx
Synchronizing state of nginx.service with SysV service script with /lib/systemd/systemd-sysv-install.
Executing: /lib/systemd/systemd-sysv-install enable nginx
The Nginx services were started and running successfully. Install MySQL server by executing the following command and press y to continue the installation procedure.
root@linuxhelp1:~# apt-get install mysql-server -y
Reading package lists... Done
Building dependency tree
Reading state information... Done
The following additional packages will be installed:
  libaio1 libevent-core-2.0-5 libhtml-template-perl mysql-client-5.7 mysql-client-core-5.7 mysql-common mysql-server-5.7 mysql-server-core-5.7
Suggested packages:
  libipc-sharedcache-perl mailx tinyca
The following NEW packages will be installed:
  libaio1 libevent-core-2.0-5 libhtml-template-perl mysql-client-5.7 mysql-client-core-5.7 mysql-common mysql-server mysql-server-5.7 mysql-server-core-5.7
0 upgraded, 9 newly installed, 0 to remove and 42 not upgraded.
Need to get 21.5 MB of archives.
After this operation, 170 MB of additional disk space will be used.
Get:1 http://in.archive.ubuntu.com/ubuntu zesty/main amd64 mysql-common all 5.8+1.0.2ubuntu1 [5,782 B]
.
.
.
Setting up mysql-server (5.7.18-0ubuntu0.17.04.1) ...
Processing triggers for libc-bin (2.24-9ubuntu2) ...
Processing triggers for ureadahead (0.100.0-19) ...
Processing triggers for systemd (232-21ubuntu2) ...
The MySQL is successfully installed. Start and enable the MySQL service as shown below.
root@linuxhelp1:~# systemctl start mysql
root@linuxhelp1:~# systemctl enable mysql
Synchronizing state of mysql.service with SysV service script with /lib/systemd/systemd-sysv-install.
Executing: /lib/systemd/systemd-sysv-install enable mysql
Next install the required PHP extensions and press y to continue with the installation procedure.
root@linuxhelp1:~# apt-get install php7.0-fpm php7.0-mbstring php7.0-xml php7.0-mysql php7.0-common php7.0-gd php7.0-json php7.0-cli php7.0-curl -y
Reading package lists... Done
Building dependency tree
Reading state information... Done
The following additional packages will be installed:
  php-common php7.0-opcache php7.0-readline
Suggested packages:
  php-pear
The following NEW packages will be installed:
  php-common php7.0-cli php7.0-common php7.0-curl php7.0-fpm php7.0-gd php7.0-json php7.0-mbstring php7.0-mysql php7.0-opcache php7.0-readline php7.0-xml
0 upgraded, 12 newly installed, 0 to remove and 94 not upgraded.
Need to get 4,295 kB of archives.
After this operation, 16.9 MB of additional disk space will be used.
Get:1 http://in.archive.ubuntu.com/ubuntu zesty/main amd64 php-common all 1:49 [11.9 kB]
.
.
.
Creating config file /etc/php/7.0/fpm/php.ini with new version
Created symlink /etc/systemd/system/multi-user.target.wants/php7.0-fpm.service &rarr  /lib/systemd/system/php7.0-fpm.service.
Processing triggers for ureadahead (0.100.0-19) ...
Processing triggers for systemd (232-21ubuntu2) ...
The PHP extensions are installed. Start and enable the fpm service by executing the following commands.
root@linuxhelp1:~# systemctl start php7.0-fpm
root@linuxhelp1:~# systemctl enable php7.0-fpm
Synchronizing state of php7.0-fpm.service with SysV service script with /lib/systemd/systemd-sysv-install.
Executing: /lib/systemd/systemd-sysv-install enable php7.0-fpm
Now remove default symlink in " sites-enabled" directory by running the following command.
root@linuxhelp1:~# rm /etc/nginx/sites-enabled/default
Create Nginx server block file and change the server name as the target system' s IP address. Save and exit from the file.
root@linuxhelp1:~# vim /etc/nginx/conf.d/default.conf
server {
  listen 80
  listen [::]:80
  server_name 192.168.7.232
  root /usr/share/nginx/html/
  index index.php index.html index.htm index.nginx-debian.html
  location / {
    try_files $uri $uri/ =404
  }
  error_page 404 /404.html
  error_page 500 502 503 504 /50x.html
  location = /50x.html {
   root /usr/share/nginx/html
  }
  location ~ .php$ {
    fastcgi_pass unix:/run/php/php7.0-fpm.sock
    fastcgi_param SCRIPT_FILENAME $document_root$fastcgi_script_name
    include fastcgi_params
    include snippets/fastcgi-php.conf
  }
  location ~ /.ht {
    deny all
  }
}
Restart the Nginx service by executing the following restart command.
root@linuxhelp1:~# systemctl restart nginx
Create a test.php file in Nginx document root and enter these lines of code in the file. Save and exit from the file.
root@linuxhelp1:~# vim /usr/share/nginx/html/test.php
< ?php
phpinfo()
?>
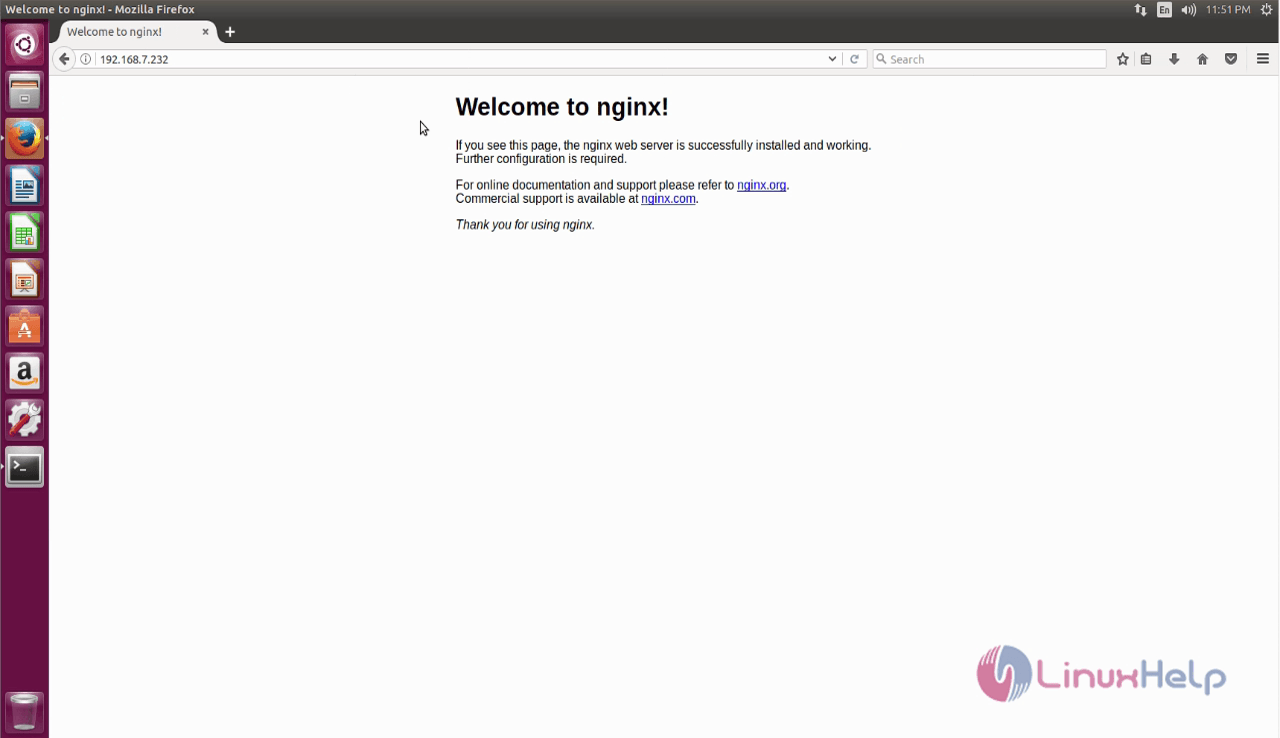
Now open the browser and type the target system IP address http://192.168.7.232 and run it. The default page of Nginx appears on screen.
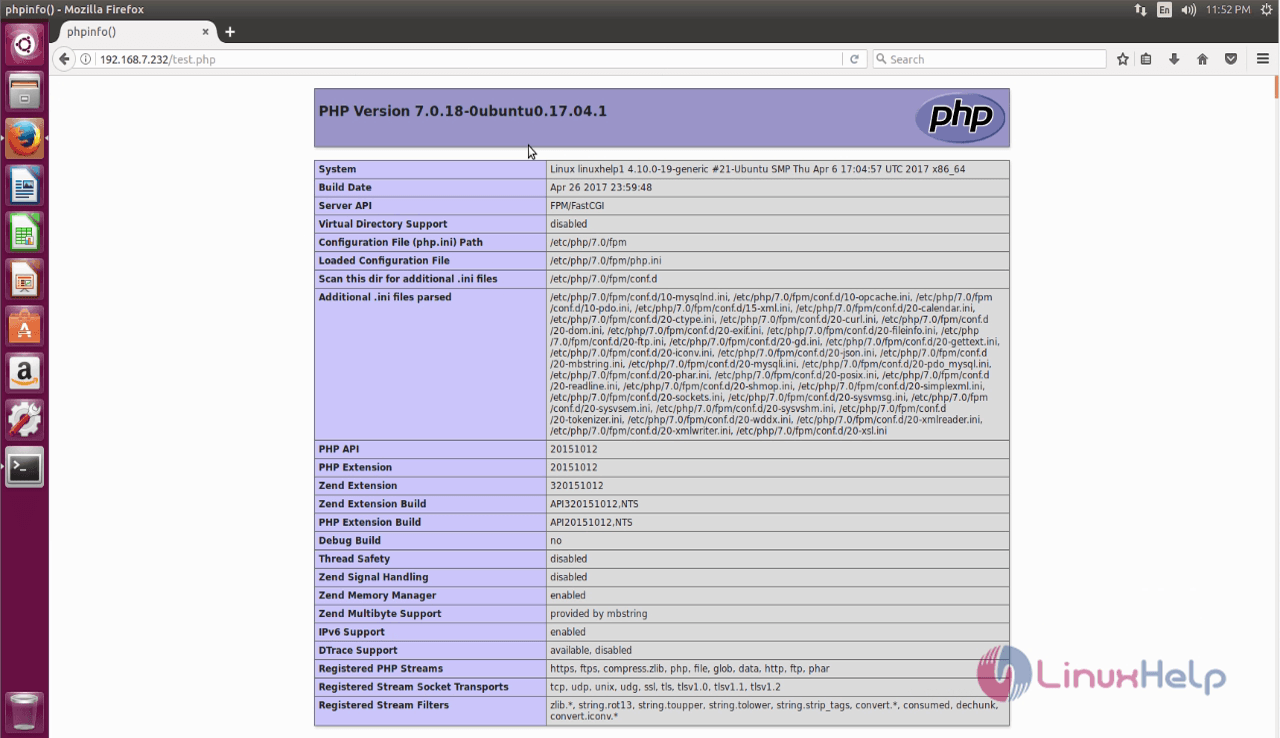
Type the target system IP address http://192.168.7.232/test.php along with the file name (test.php) that is created under the document root.
Wasn' t that an easy installation procedure? LEMP gives the user a very flexible foundation for serving web content to the website visitors.

Comments ( 0 )
No comments available