How to install Monitorix in Ubuntu
To install Monitorix in Ubuntu
Monitorix is a free, lightweight, open source monitoring tool designed to monitor many services and system resources as possible on servers and desktops. It mainly consists of two programs: a collector, called Monitorix, which is a Perl daemon that is started automatically as a system service, and a CGI script called monitorix.cgi. Since Monitorix 3.8.1 version includes its own HTTP server as built-in, so you aren' t forced to install a third-party web server to use it.
Features
- Global kernel usage
- Unlimited number of network ports supported.
- Unlimited number of Apache servers supported.
- Ability to define the number of graphs per row.
- Ability to enable traffic monthly reports.
- Ability to zoom in any graph.
- Ability to show network metrics in MBytes/sec or Mbits/sec.
- Monitors Disk drive temperatures and health.
- Filesystem usage and I/O activity of filesystems.
- Network traffic usage up to 10 network devices.
- Netstat statistics.
- System services demand (SSH, ProFTPD, Samba, CUPS, Fail2ban, IMAP, POP3, SMTP, etc&hellip )
- Squid Proxy Web Cache statistics.
- Built-in HTTP server.
- MTA Mail statistics including input and output connections
- Network port traffic including TCP, UDP, etc.
To install Monitorix
Add the required Monitorix repository by running the following command before starting with the Monitorix installation.
user1@linuxhelp:~$ sudo vim /etc/apt/sources.list
[sudo] password for user1:
Place the cursor to the end of the file and add this line:
deb http://apt.izzysoft.de/ubuntu generic universe

After adding the repository, download the PGP key and " install" it into the system by running the following command.
user1@linuxhelp:~$ wget http://apt.izzysoft.de/izzysoft.asc
--2016-09-24 01:43:08--  http://apt.izzysoft.de/izzysoft.asc
Resolving apt.izzysoft.de (apt.izzysoft.de)... 144.76.109.57
Connecting to apt.izzysoft.de (apt.izzysoft.de)|144.76.109.57|:80... connected.
HTTP request sent, awaiting response... 200 OK
Length: 1692 (1.7K) [text/plain]
Saving to: ‘ izzysoft.asc’

izzysoft.asc               100%[========================================> ]   1.65K  --.-KB/s    in 0.001s

2016-09-24 01:43:10 (2.86 MB/s) - ‘ izzysoft.asc’  saved [1692/1692]
Go to the directory where the .asc file is saved and run the following command.
user1@linuxhelp:~$ sudo apt-key add izzysoft.asc
OK
Then update the repository by running the following command.
user1@linuxhelp:~$ sudo apt-get update
Hit:1 http://in.archive.ubuntu.com/ubuntu xenial InRelease
Get:2 http://security.ubuntu.com/ubuntu xenial-security InRelease [94.5 kB]
Get:3 http://in.archive.ubuntu.com/ubuntu xenial-updates InRelease [95.7 kB]
Ign:4 http://apt.izzysoft.de/ubuntu generic InRelease
Get:5 http://apt.izzysoft.de/ubuntu generic Release [5,381 B]
Get:6 http://apt.izzysoft.de/ubuntu generic Release.gpg [198 B]
Get:7 http://apt.izzysoft.de/ubuntu generic/universe amd64 Packages [13.0 kB]
Hit:8 http://in.archive.ubuntu.com/ubuntu xenial-backports InRelease
Get:9 http://in.archive.ubuntu.com/ubuntu xenial-updates/main amd64 Packages [391 kB]
Get:10 http://apt.izzysoft.de/ubuntu generic/universe i386 Packages [13.6 kB]
Get:11 http://apt.izzysoft.de/ubuntu generic/universe all Packages [12.5 kB]
Get:12 http://security.ubuntu.com/ubuntu xenial-security/main amd64 DEP-11 Metadata [79.1 kB]
Get:13 http://security.ubuntu.com/ubuntu xenial-security/main DEP-11 64x64 Icons [62.9 kB]
Get:14 http://security.ubuntu.com/ubuntu xenial-security/universe amd64 DEP-11 Metadata [2,261 B]
Get:15 http://in.archive.ubuntu.com/ubuntu xenial-updates/main i386 Packages [385 kB]
Get:16 http://in.archive.ubuntu.com/ubuntu xenial-updates/universe amd64 Packages [329 kB]
Get:17 http://in.archive.ubuntu.com/ubuntu xenial-updates/universe i386 Packages [326 kB]
Fetched 1,810 kB in 8s (209 kB/s)
Reading package lists... Done
W: http://apt.izzysoft.de/ubuntu/dists/generic/Release.gpg: Signature by key F9E2FB41D6EB5EFDABB56315D744E9C2C9B9B62C uses weak digest algorithm (SHA1)
After updating the repository, run the following command to install Monitorix.
user1@linuxhelp:~$ sudo apt-get -y install monitorix apache2-utils
Reading package lists... Done
Building dependency tree
Reading state information... Done
The following additional packages will be installed:
  libapr1 libaprutil1 libconfig-general-perl libdbi-perl libdbi1 libemail-date-format-perl
  libhttp-server-simple-perl libmime-lite-perl libmime-types-perl librrd4 librrds-perl libxml-libxml-perl
  libxml-namespacesupport-perl libxml-sax-base-perl libxml-sax-expat-perl libxml-sax-perl
  libxml-simple-perl rrdtool webfs
Suggested packages:
  libmldbm-perl libnet-daemon-perl libsql-statement-perl default-mta | mail-transport-agent
  libmojolicious-perl
.
.
.
Setting up monitorix (3.8.1-izzy1) ...
[ ok ] Starting monitorix (via systemctl): monitorix.service.
Setting up webfs (1.21+ds1-11) ...

Creating config file /etc/webfsd.conf with new version
Processing triggers for libc-bin (2.23-0ubuntu3) ...
Processing triggers for ureadahead (0.100.0-19) ...
Processing triggers for systemd (229-4ubuntu4) ...
To configure Monitorix
Lets configure the monitorix.conf file by making the following changes.
user1@linuxhelp:~$ sudo vim /etc/monitorix/monitorix.conf
Search for the lines:
enabled = n
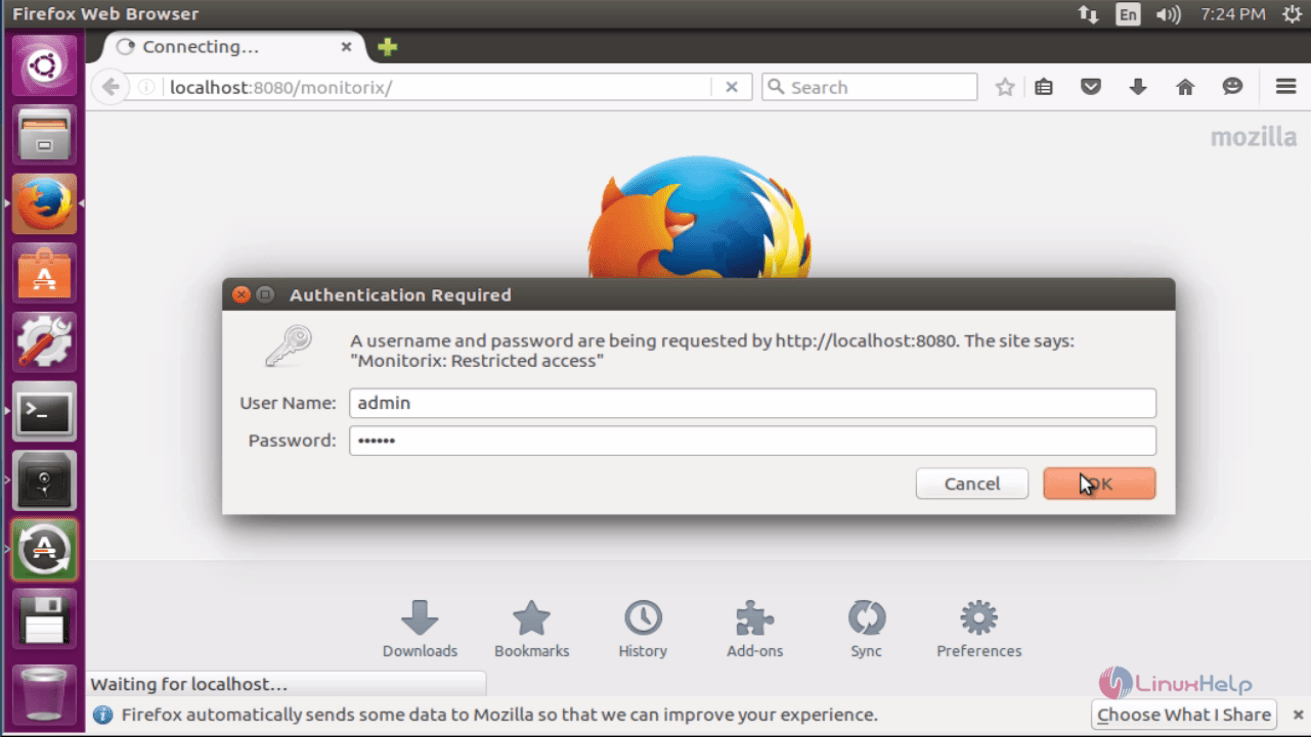
msg = Monitorix: Restricted access
htpasswd = /var/lib/monitorix/htpasswd
And enable authentication by changing it to " y" .
             enabled = y
                msg = Monitorix: Restricted access
                htpasswd = /var/lib/monitorix/htpasswd

After configuring, restart the monitorix service.
user1@linuxhelp:~$ sudo service monitorix restart
Create the password for Monitorix.
user1@linuxhelp:~$ sudo htpasswd -d -c /var/lib/monitorix/htpasswd admin
New password:
Re-type new password:
Adding password for user admin
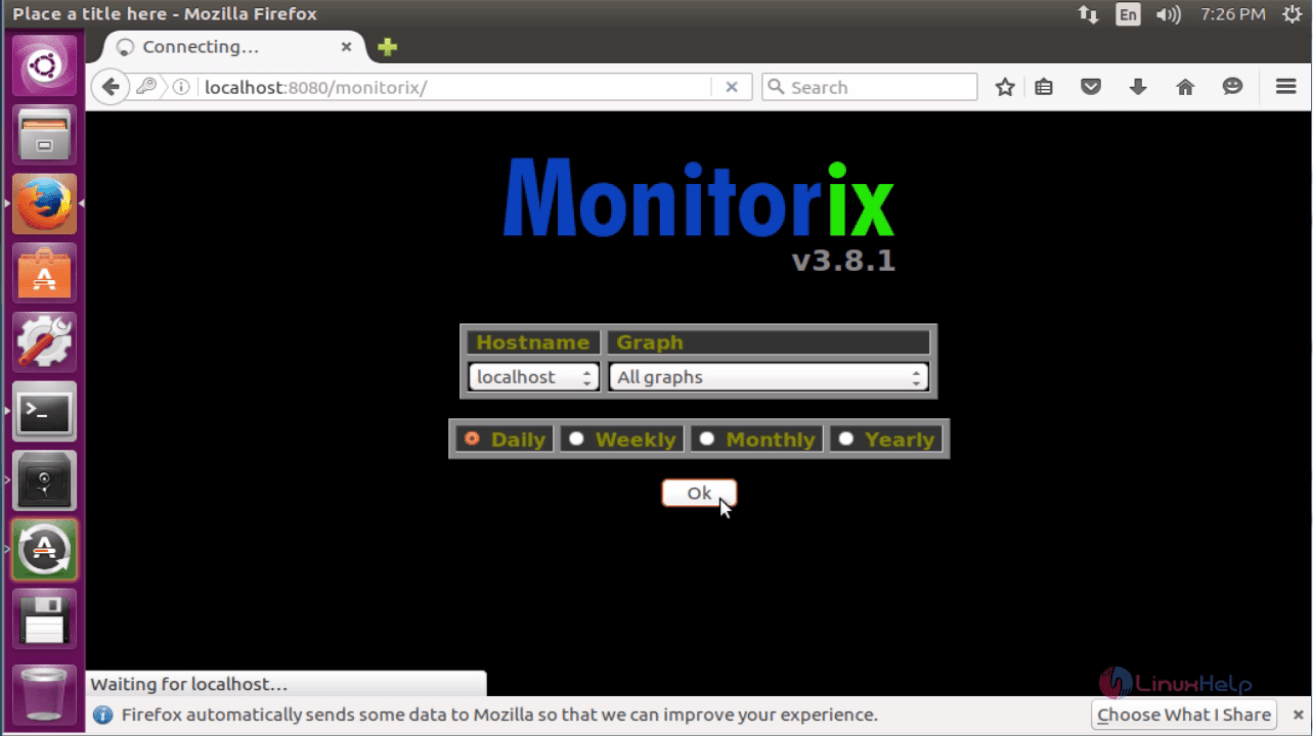
Open the browser and point to http://localhost:8080/monitorix/
Choose the type of monitoring to be performed and click OK.

Comments ( 0 )
No comments available