How to install Pimcore CMS with Nginx on CentOS 7
To install Pimcore CMS with Nginx on CentOS 7
Pimcore provides free and open source enterprise content management system. It is written in PHP and uses MySQL to store its database. Pimcore CMS is fully flexible and editable, you can personalize the site the way you want. Apart from all these, it has many enterprise class features which make it capable of supplying the demand of enterprise grade website. This tutorial covers the installation procedure of Pimcore CMS on with Nginx on CentOS 7.
Pre-Requisite
As a pre-requisite for installation procedure, install Nginx, PHP 7.1 and MariaDB. Also create a database to use specifically for pimcore application.
Installation procedure
To proceed with the installation procedure, apply some configurations in PHP. Open the PHP configuration file named php.ini using vim editor.
[root@linuxhelp11 ~]# vim /etc/php.ini
Find the following line in php.ini file, uncomment the following lines and set the timezone according to your region.
[Date]
  Defines the default timezone used by the date functions
  http://php.net/date.timezone
date.timezone = Asia/Kolkata
Also search for the following line named upload_max_filesize and change the value from 2M to 100M.
upload_max_filesize = 2M
Search for the following line named post_max_size and change the value from 8M to 100M. Save the file and exit from the file
post_max_size = 8M
Open the PHP-FPM configuration file named www.conf using vim editor.
[root@linuxhelp11 ~]# vim /etc/php-fpm.d/www.conf
Find the following lines and change the user and group value from Apache to Nginx.
user = apache
group = apache
Now find the following lines and change the owner, group and mode to the following changes.
 listen.owner = nobody
 listen.group = nobody
 listen.mode = 0660
Uncomment the given lines and change nobody to Nginx.
find:
listen = 127.0.0.1:9000
Comment out the above line and add the following line below it.
listen = /var/run/php-fpm/php-fpm.sock
Start the PHP-FPM service and enable it by executing the following commands.
[root@linuxhelp11 ~]# systemctl start php-fpm
[root@linuxhelp11 ~]# systemctl enable php-fpm
Create a Symlink from /etc/systemd/system/multi-user.target.wants/php-fpm.service to /usr/lib/systemd/system/php-fpm.service.
To install the required dependency, install following repo by executing the following command.
[root@linuxhelp11 ~]# rpm -Uvh https://download1.rpmfusion.org/free/el/rpmfusion-free-release-7.noarch.rpm
Retrieving https://download1.rpmfusion.org/free/el/rpmfusion-free-release-7.noarch.rpm
warning: /var/tmp/rpm-tmp.9I5laL: Header V4 RSA/SHA1 Signature, key ID f5cf6c1e: NOKEY
Preparing...                          ################################# [100%]
Updating / installing...
   1:rpmfusion-free-release-7-1       ################################# [100%]
Next install the following dependencies by running the following command and press y to continue with the installation.
[root@linuxhelp11 ~]# yum -y install ffmpeg libreoffice libreoffice-math xorg-x11-fonts-75dpi poppler-utils inkscape libXrender ghostscript fontconfig wkhtmltopdf
Loaded plugins: fastestmirror, langpacks
rpmfusion-free-updates                                   | 3.0 kB     00:00
rpmfusion-free-updates/x86_64/primary_db                   | 227 kB   00:02
Loading mirror speeds from cached hostfile
 * base: mirror.nbrc.ac.in
.
.
 gnome-settings-daemon-updates.x86_64 0:3.8.6.1-9.el7
  totem-mozplugin.x86_64 1:3.8.2-5.el7

Complete!
Enter into Apache Root directory named /var/www.
[root@linuxhelp11 ~]# cd /var/www
Download the pimcore package by executing the wget command followed by the download link.
[root@linuxhelp11 www]# wget https://www.pimcore.org/download/pimcore-data.zip
--2017-09-05 12:34:29--  https://www.pimcore.org/download/pimcore-data.zip
Resolving www.pimcore.org (www.pimcore.org)... 62.138.199.172
Connecting to www.pimcore.org (www.pimcore.org)|62.138.199.172|:443... connected.
HTTP request sent, awaiting response... 200 OK
Length: 117399659 (112M) [application/zip]
Saving to: ‘ pimcore-data.zip’

100%[======================================> ] 117,399,659  798KB/s   in 5m 8s

2017-09-05 12:39:39 (372 KB/s) - ‘ pimcore-data.zip’  saved [117399659/117399659]
Next unzip the downloaded file by running the following command.
[root@linuxhelp11 www]# unzip pimcore*.zip -d pimcore
Archive:  pimcore-data.zip
   creating: pimcore/pimcore/
   creating: pimcore/pimcore/lib/
  inflating: pimcore/pimcore/lib/simple_html_dom.php
   creating: pimcore/pimcore/lib/Pimcore/
   creating: pimcore/pimcore/lib/Pimcore/Video/
.
.
 inflating: pimcore/constants.example.php
  inflating: pimcore/.htaccess
Change the ownership of file by executing the following command.
[root@linuxhelp11 www]# chown -R nginx:nginx /var/www/pimcore
Add the required services in the firewall and run the following command.
[root@linuxhelp11 www]# firewall-cmd --zone=public --permanent --add-service=http
success
Reload the firewall.
[root@linuxhelp11 www]# firewall-cmd --reload
success
Create a virtual host for pimcore named cms.linuxhelp11.com.conf using vim editor and add the following contents in the file. Save and exit the file.
[root@linuxhelp11 www]# vim /etc/nginx/conf.d/cms.linuxhelp11.com.conf

server {
    root /var/www/pimcore
    index index.php
    server_name cms.yourdomain.com
    listen 80
    access_log  /var/www/pimcore/website/var/log/nginx_access.log
    error_log   /var/www/pimcore/website/var/log/nginx_error.log error

    set $getassets " "
    if ($uri ~* ^/website/var/assets)   { set $getassets " ${getassets}A"   }
    if ($request_method = GET)      { set $getassets " ${getassets}B"   }
    if ($getassets = " AB" ) {
        rewrite ^ $uri$args last
    }

  location ~* ^(/plugins/(?!.*/static).*|^/pimcore/(?!(static|modules/3rdparty)).*|/website/var/(?!tmp|assets|areas)|/modules/(?!.*/static).*|^(vendor|tests|node_modules|phing)/.*|^(bower|package|composer|gulpfile).) {
        return 403
    }

    location / {
        try_files $uri $uri/ /index.php$is_args$args
        index index.php
    }

    location ~ .php$ {
        try_files $uri =404
        fastcgi_pass   unix:/var/run/php-fpm/php-fpm.sock
        fastcgi_index  index.php
        fastcgi_split_path_info ^(.+.php)(/.+)$
        fastcgi_param  SCRIPT_FILENAME    $document_root$fastcgi_script_name
        include        fastcgi_params
        fastcgi_read_timeout 60
    }

    location ~* .(jpe?g|gif|png|bmp|ico|css|js|pdf|zip|htm|html|docx?|xlsx?|pptx?|txt|wav|swf|svg|avi|mpd)$ {
        access_log off
        log_not_found off
        try_files $uri $uri/ /website/var/assets$uri /index.php$is_args$args
        expires 1w
    }


    rewrite ^/cache-buster-d+(.*) $1 break

    location /fpm-ping {
        access_log off
        include fastcgi_params
        fastcgi_pass unix:/var/run/php-fpm/php-fpm.sock
    }

    location /fpm-status {
        allow 127.0.0.1
        deny all
        access_log off
        include fastcgi_params
        fastcgi_pass unix:/var/run/php-fpm/php-fpm.sock
    }
    location /nginx-status {
        allow 127.0.0.1
        deny all
        access_log off
        stub_status
    }
}
Restart the Nginx service by running the following command.
[root@linuxhelp11 www]# systemctl restart nginx
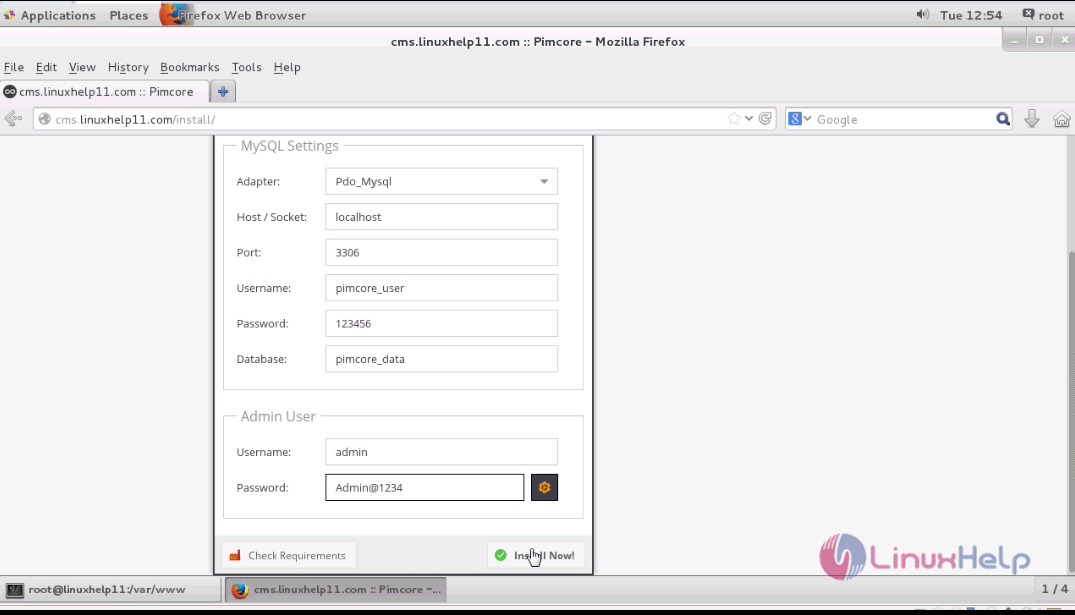
Switch over to the browser and enter the machine' s IP address, it will lead to the pimcore' s installation page. Fill the required MySQL and admin details and click install option.
Enter the required admin credentials and click login.
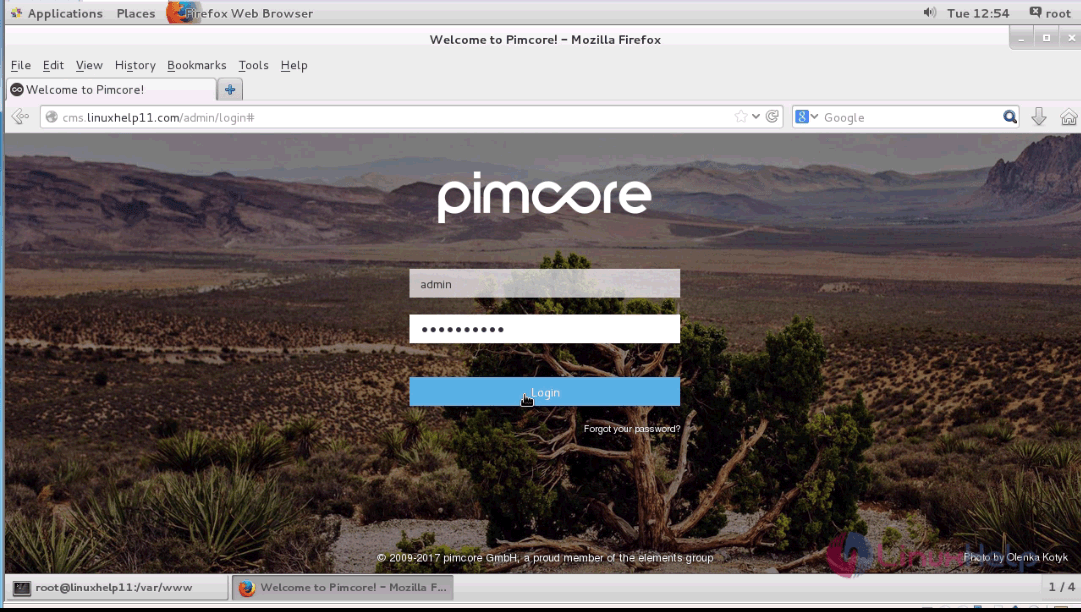
The admin page is shown on the screen. Now you can use pimcore CMS for various content management works.

The installation procedure of Pimcore CMS with Nginx on CentOS 7 is done successfully.
Comments ( 0 )
No comments available