How to Install Xrdp Server (Remote Desktop) on Rocky Linux 8.6
To Install Xrdp Server (Remote Desktop) on Rocky Linux 8.6
Introduction:
Xrdp is an open-source application of the Microsoft Remote Desktop Protocol (RDP) that allows us to graphically control a remote system. With RDP, we can log in to the remote machine and build a real desktop session the same as if you had logged in to a local machine.
Step 1: Check the installed version of OS by using the below command
[root@linuxhelp ~]# cat /etc/os-release
NAME="Rocky Linux"
VERSION="8.6 (Green Obsidian)"
ID="rocky"
ID_LIKE="rhel centos fedora"
VERSION_ID="8.6"
PLATFORM_ID="platform:el8"
PRETTY_NAME="Rocky Linux 8.6 (Green Obsidian)"
ANSI_COLOR="0;32"
CPE_NAME="cpe:/o:rocky:rocky:8:GA"
HOME_URL="https://rockylinux.org/"
BUG_REPORT_URL="https://bugs.rockylinux.org/"
ROCKY_SUPPORT_PRODUCT="Rocky Linux"
ROCKY_SUPPORT_PRODUCT_VERSION="8"
REDHAT_SUPPORT_PRODUCT="Rocky Linux"
REDHAT_SUPPORT_PRODUCT_VERSION="8"
Step 2: Install Gnome on your remote machine by using the below command
[root@linuxhelp ~]# dnf groupinstall "server with GUI"
Rocky Linux 8 - AppStream                                       4.2 MB/s | 8.8 MB     00:02
Rocky Linux 8 - BaseOS                                          1.4 MB/s | 3.7 MB     00:02
Rocky Linux 8 - Extras                                          9.8 kB/s |  11 kB     00:01
Last metadata expiration check: 0:00:01 ago on Wed 13 Jul 2022 06:20:52 PM EDT.
No match for group package "hpijs"
Upgraded:
  NetworkManager-1:1.36.0-7.el8_6.x86_64
  NetworkManager-adsl-1:1.36.0-7.el8_6.x86_64
  NetworkManager-bluetooth-1:1.36.0-7.el8_6.x86_64
  NetworkManager-config-server-1:1.36.0-7.el8_6.noarch
  NetworkManager-libnm-1:1.36.0-7.el8_6.x86_64
  NetworkManager-team-1:1.36.0-7.el8_6.x86_64
  NetworkManager-tui-1:1.36.0-7.el8_6.x86_64
  NetworkManager-wifi-1:1.36.0-7.el8_6.x86_64
  NetworkManager-wwan-1:1.36.0-7.el8_6.x86_64
  alsa-sof-firmware-1.9.3-4.el8_6.noarch
  bpftool-4.18.0-372.13.1.el8_6.x86_64
Step 3: Now install EPEL repository by using the below command
[root@linuxhelp ~]# dnf install epel-release
Last metadata expiration check: 0:03:29 ago on Wed 13 Jul 2022 06:20:52 PM EDT.
Dependencies resolved.
================================================================================================
 Package                   Architecture        Version                Repository           Size
================================================================================================
Installing:
 epel-release              noarch              8-13.el8               extras               23 k

Transaction Summary
================================================================================================
Install  1 Package

Total download size: 23 k

Complete!

Step 4: Install the Xrdp package by using the below command

[root@linuxhelp ~]# dnf install xrdp
Extra Packages for Enterprise Linux 8 - x86_64                  7.3 MB/s |  12 MB     00:01
Extra Packages for Enterprise Linux Modular 8 - x86_64          713 kB/s | 1.0 MB     00:01
Last metadata expiration check: 0:00:01 ago on Wed 13 Jul 2022 06:25:12 PM EDT.
Dependencies resolved.
================================================================================================
 Package                  Architecture       Version                     Repository        Size
================================================================================================
Installing:
 xrdp                     x86_64             1:0.9.19-1.el8              epel             470 k


Installing dependencies:
 imlib2                   x86_64             1.4.9-8.el8                 epel             222 k
Installing weak dependencies:
 xrdp-selinux             x86_64             1:0.9.19-1.el8              epel              24 k

Transaction Summary
================================================================================================
Install  3 Packages

Total download size: 716 k
Installed size: 2.8 M
Is this ok [y/N]: y
Downloading Packages:
(1/3): xrdp-selinux-0.9.19-1.el8.x86_64.rpm                     161 kB/s |  24 kB     00:00
(2/3): imlib2-1.4.9-8.el8.x86_64.rpm                            625 kB/s | 222 kB     00:00
Is this ok [y/N]: y
Key imported successfully
Running transaction check
Transaction check succeeded.
Running transaction test
Transaction test succeeded.
Step 5: Start the Xrdp service and enable it by using the below command
[root@linuxhelp ~]# systemctl start xrdp
[root@linuxhelp ~]# systemctl enable xrdp
Created symlink /etc/systemd/system/multi-user.target.wants/xrdp.service → /usr/lib/systemd/system/xrdp.service.
Step 6: Check the status of firewalld by using the below command
[root@linuxhelp ~]# systemctl status firewalld.service
● firewalld.service - firewalld - dynamic firewall daemon
   Loaded: loaded (/usr/lib/systemd/system/firewalld.service; enabled; vendor preset: enabled)
   Active: active (running) since Mon 2022-06-27 08:49:28 EDT; 2 weeks 2 days ago

     Docs: man:firewalld(1)
 Main PID: 1037 (firewalld)
    Tasks: 3 (limit: 17274)
   Memory: 34.6M
   CGroup: /system.slice/firewalld.service
           └─1037 /usr/libexec/platform-python -s /usr/sbin/firewalld --nofork --nopid
Step 7: Stop the firewalld service by using the below command
[root@linuxhelp ~]# systemctl stop firewalld.service
Step 8: Check the status of Xrdp by using the below command
[root@linuxhelp ~]# systemctl status xrdp
● xrdp.service - xrdp daemon
   Loaded: loaded (/usr/lib/systemd/system/xrdp.service; enabled; vendor preset: disabled)
   Active: active (running) since Wed 2022-07-13 18:26:54 EDT; 44s ago
     Docs: man:xrdp(8)
           man:xrdp.ini(5)
 Main PID: 43046 (xrdp)
    Tasks: 1 (limit: 17274)
   Memory: 1.0M
   CGroup: /system.slice/xrdp.service
           └─43046 /usr/sbin/xrdp --nodaemon
Step 9: Check the IP Address of the system by using the below command
[root@linuxhelp ~]# ifconfig
ens33: flags=4163<UP,BROADCAST,RUNNING,MULTICAST>  mtu 1500
        inet 192.168.6.122  netmask 255.255.254.0  broadcast 192.168.7.255
        inet6 fe80::20c:29ff:feb8:f7db  prefixlen 64  scopeid 0x20<link>
        ether 00:0c:29:b8:f7:db  txqueuelen 1000  (Ethernet)
        RX packets 359113  bytes 537991751 (513.0 MiB)
        RX errors 0  dropped 0  overruns 0  frame 0
        TX packets 31454  bytes 2329677 (2.2 MiB)
        TX errors 0  dropped 0 overruns 0  carrier 0  collisions 0


lo: flags=73<UP,LOOPBACK,RUNNING>  mtu 65536
        inet 127.0.0.1  netmask 255.0.0.0
        inet6 ::1  prefixlen 128  scopeid 0x10<host>
        loop  txqueuelen 1000  (Local Loopback)
        RX packets 2048  bytes 179576 (175.3 KiB)
        RX errors 0  dropped 0  overruns 0  frame 0
        TX packets 2048  bytes 179576 (175.3 KiB)
        TX errors 0  dropped 0 overruns 0  carrier 0  collisions 0

virbr0: flags=4099<UP,BROADCAST,MULTICAST>  mtu 1500
        inet 192.168.122.1  netmask 255.255.255.0  broadcast 192.168.122.255
        ether 52:54:00:f2:20:6b  txqueuelen 1000  (Ethernet)
        RX packets 0  bytes 0 (0.0 B)
        RX errors 0  dropped 0  overruns 0  frame 0
        TX packets 0  bytes 0 (0.0 B)
        TX errors 0  dropped 0 overruns 0  carrier 0  collisions 0
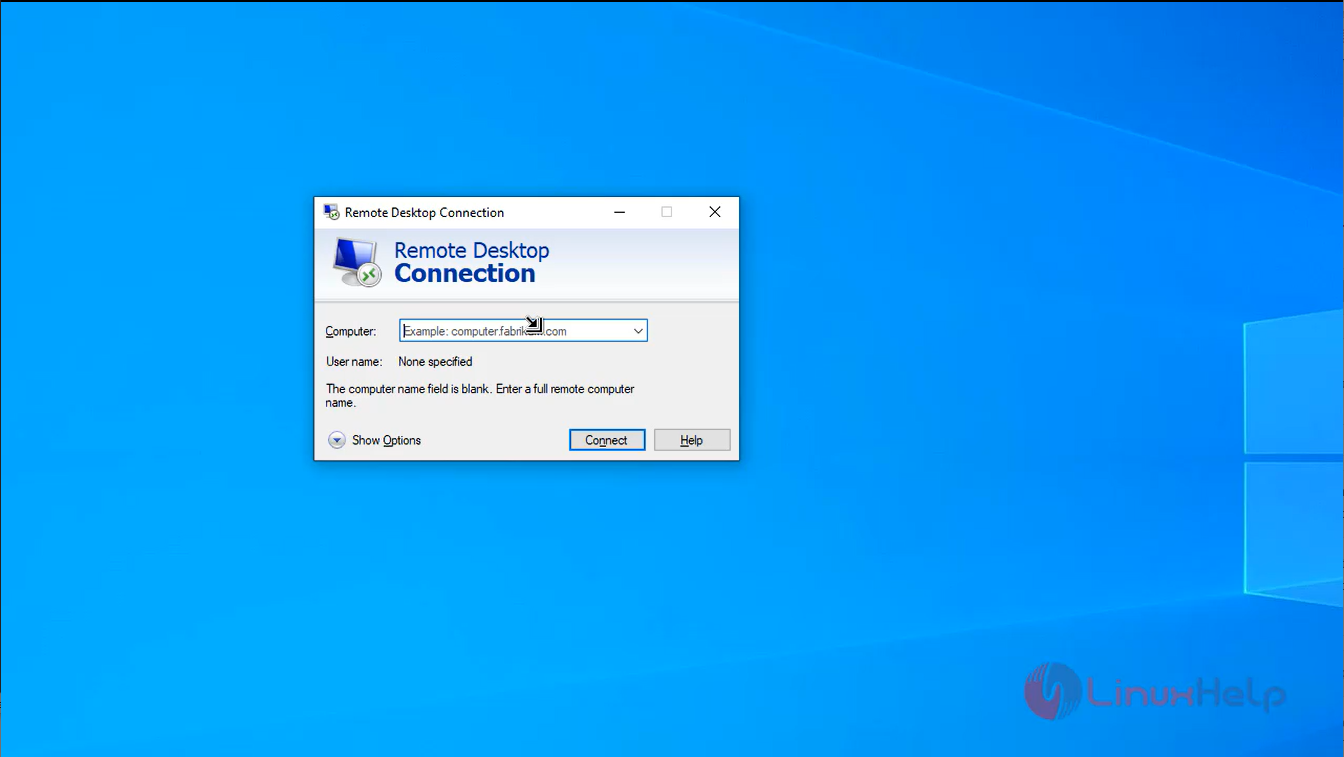
Step 10: Open your local Xrdp client and connect to the remote as shown in the below image
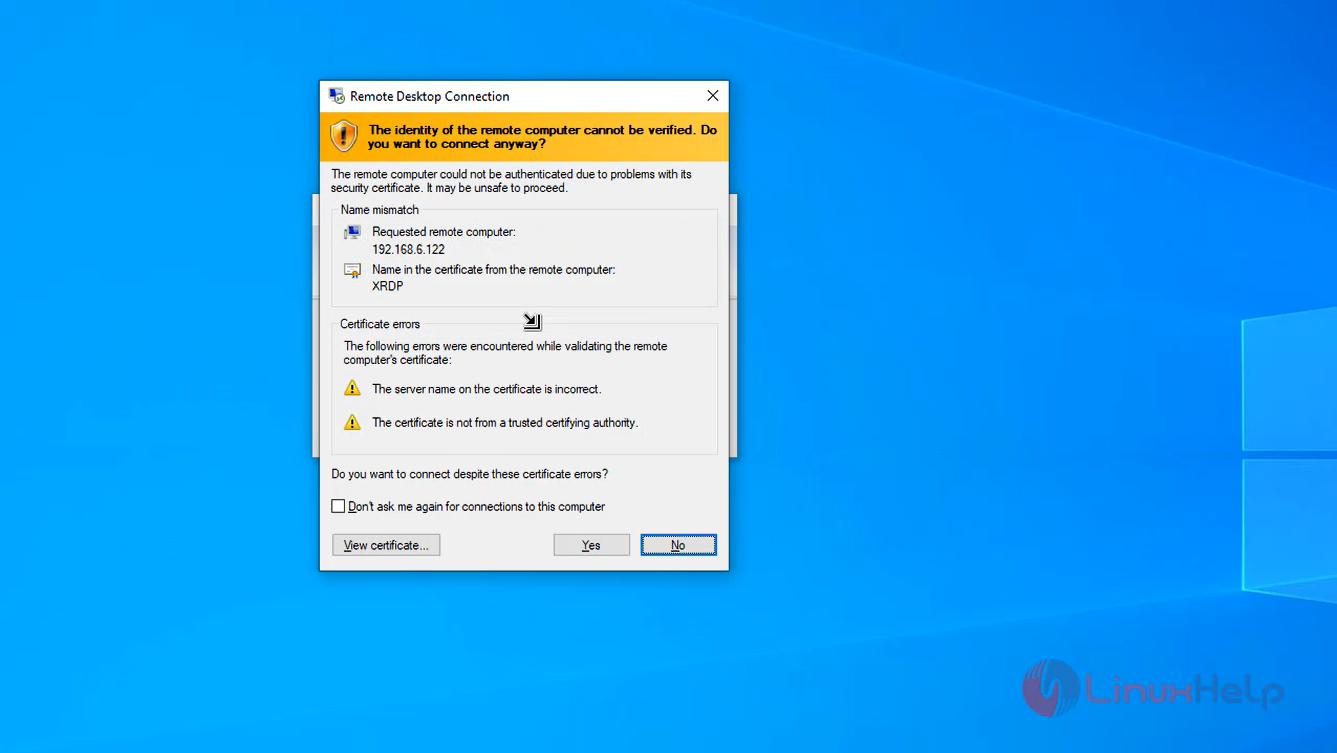
Step 11: On the login screen, enter click “YES” as shown in the below image
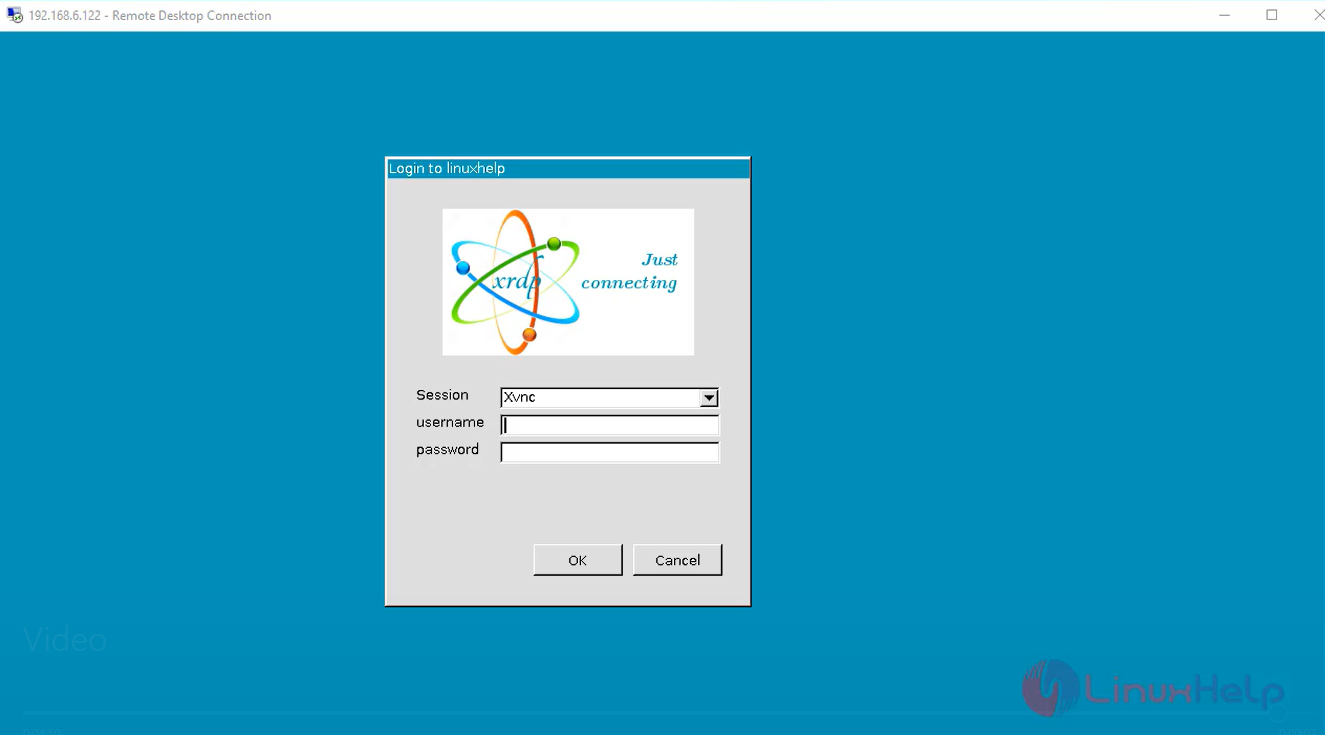
Step 12: you should see the default Gnome desktop as shown in the below image
Conclusion:
We have reached the end of this article. In this guide, we have walked you through the steps required to Install Xrdp Server (Remote Desktop) on Rocky Linux 8.6. Your feedback is much welcome.
Comments ( 0 )
No comments available