How to setup a ip based Virtual host on linuxmint 18.3
To set up an IP based Virtual host on linuxmint 18.3
Virtual hosting is a method for hosting multiple domain names on a single server. The are two types of virtual hosting: “ Name-based virtual hosting” and “ IP-based virtual hosting.” IP-based virtual hosting is a technique to apply different directives based on the IP address and port a request is received on. You can assign a separate IP for each domain on a single server using IP-based virtual hosting. Mostly this is used to host different websites on different ports or IP' s
Requirements
- Linuxmint 18.3 with apache installed
- Two Ipaddress
- Three Domain names
setup network
To setup IP-based virtual hosting, you must have more than one IP address assigned to your Linux machine
To do this, you need to edit the “ /etc/network/interfaces” file.
linuxhelp ~ # nano /etc/network/interfaces

auto ens33
iface ens33 inet static
address 192.168.7.234
netmask 255.255.255.0
gateway 192.168.7.1
dns-nameserver 8.8.8.8

auto ens33:1
iface ens33:1 inet static
address 192.168.7.233
netmask 255.255.255.0
Save and close the file then restart network service to make these changes take effect
linuxhelp ~ # /etc/init.d/networking restart
[ ok ] Restarting networking (via systemctl): networking.service.
By default, Apache listens on port 80. For port-based virtual hosting, you need to tell Apache to listen to IP “ 192.168.7.234” and “ 192.168.7.233” on port 80 and IP “ 192.168.7.233” on port 8080
To setup multiple ports, you need to edit “ /etc/apache2/ports.conf”
linuxhelp ~ # nano /etc/apache2/ports.conf
Listen 80

< IfModule ssl_module>
        Listen 443
< /IfModule>

< IfModule mod_gnutls.c>
        Listen 443
< /IfModule>

Listen 192.168.7.234:80
Listen 192.168.7.233:80
Listen 192.168.7.233:8080
Save and close the file, then restart Apache to make these changes take effect.
linuxhelp ~ # /etc/init.d/apache2 restart
[ ok ] Restarting apache2 (via systemctl): apache2.service.
Create three directories for websites “ www.ipvhost1.com” , “ www.ipvhost2.com” and “ www.portvhost.com” under Apache default Document Root directory
linuxhelp ~ # mkdir -p /var/www/html/www.ipvhost1.com
linuxhelp ~ # mkdir -p /var/www/html/www.ipvhost2.com
linuxhelp ~ # mkdir -p /var/www/html/www.portvhost.com
Create an “ index.html” file for each website that identifies specific IPs and Port.
Create an index.html file for “ www.ipvhost1.com” virtual host
linuxhelp ~ # nano  /var/www/html/www.ipvhost1.com/index.html

< html>
< head>
< title> www.ipvhost1.com< /title>
< /head>
< body>
< h1> The ipvhost1.com ip virtual host is working!< /h1>
< /body>
< /html>
Save and close the file when you are finished. Create an “ index.html” file for “ www.ipvhost2.com” virtual host
linuxhelp ~ # nano  /var/www/html/www.ipvhost2.com/index.html

< html>
< head>
< title> www.ipvhost2.com< /title>
< /head>
< body>
< h1> The ipvhost2.com ip virtual host is working!< /h1>
< /body>
< /html>
Save and close the file when you are finished.Create an “ index.html” file for “ www.portvhost.com” virtual host
linuxhelp ~ # nano  /var/www/html/www.portvhost.com/index.html
< html>
< head>
< title> www.portvhost.com< /title>
< /head>
< body>
< h1> The portvhost.com port virtual host is working!< /h1>
< /body>
< /html>
Save and close the file when you are finished
By default, Apache service runs as a “ www-data” user in Ubuntu. You must change the ownership of these three virtual directories to “ www-data” so that Apache can read and write data
linuxhelp ~ # chown -R www-data:www-data /var/www/html/www.ipvhost1.com
linuxhelp ~ # chown -R www-data:www-data /var/www/html/www.ipvhost2.com
linuxhelp ~ # chown -R www-data:www-data /var/www/html/www.portvhost.com
Also, you need to make sure the Apache web root (/var/www/html) directory is readable so that everyone can read files from it.
linuxhelp ~ # chmod -R 755 /var/www/html
Create Virtual Host files
By default, Apache comes with a default virtual host file called “ 000-default.conf” . You need to disable this virtual host file first.To do this, run the following command.
linuxhelp ~ # a2dissite 000-default.conf
Site 000-default disabled.
To activate the new configuration, you need to run:
  service apache2 reload
The next step is to create a virtual host configuration file for each website. The name of each configuration file must end with “ .conf” . Create a virtual host file for website “ www.ipvhost1.com”
linuxhelp ~ # nano /etc/apache2/sites-available/www.ipvhost1.com.conf
< VirtualHost 192.168.7.234:80>
ServerAdmin admin@ipvhost1.com
ServerName  www.ipvhost1.com
DocumentRoot /var/www/html/www.ipvhost1.com

ErrorLog ${APACHE_LOG_DIR}/www.ipvhost1.com_error.log
CustomLog ${APACHE_LOG_DIR}/www.ipvhost1.com_access.log combined

< /VirtualHost>
Save and close the file. Create a virtual host file for website “ www.ipvhost2.com”
linuxhelp ~ # nano /etc/apache2/sites-available/www.ipvhost2.com.conf
< VirtualHost 192.168.7.233:80>

ServerAdmin admin@ipvhost2.com
ServerName  www.ipvhost2.com
DocumentRoot /var/www/html/www.ipvhost2.com

ErrorLog ${APACHE_LOG_DIR}/www.ipvhost2.com_error.log
CustomLog ${APACHE_LOG_DIR}/www.ipvhost2.com_access.log combined

< /VirtualHost>
Save and close the file. Create a virtual host file for website “ www.portvhost.com” .
linuxhelp ~ # nano /etc/apache2/sites-available/www.portvhost.com.conf
< VirtualHost 192.168.7.233:8080>

ServerAdmin admin@portvhost.com
ServerName  www.portvhost.com
DocumentRoot /var/www/html/www.portvhost.com

ErrorLog ${APACHE_LOG_DIR}/www.portvhost.com_error.log
CustomLog ${APACHE_LOG_DIR}/www.portvhost.com_access.log combined

< /VirtualHost>
Save and close the file. After creating the virtual host files, you need to enable the virtual hosts.
You can do this by running.
linuxhelp ~ # a2ensite www.ipvhost1.com.conf
Enabling site www.ipvhost1.com.
To activate the new configuration, you need to run:
  service apache2 reload
linuxhelp ~ # a2ensite www.ipvhost2.com.conf
Enabling site www.ipvhost2.com.
To activate the new configuration, you need to run:
  service apache2 reload
linuxhelp ~ # a2ensite www.portvhost.com.conf
Enabling site www.portvhost.com.
To activate the new configuration, you need to run:
  service apache2 reload
Finally, restart the Apache service.
linuxhelp ~ # /etc/init.d/apache2 restart
[ ok ] Restarting apache2 (via systemctl): apache2.service.
Testing Virtual Hosts
Now, it’ s time to test the IP Virtual host. On a computer, open your web browser and navigate to URLs “ http://192.168.7.234:80” and “ http://192.168.1.233:80” . You should see sample demo pages for IP-based virtual hosting that look like this:


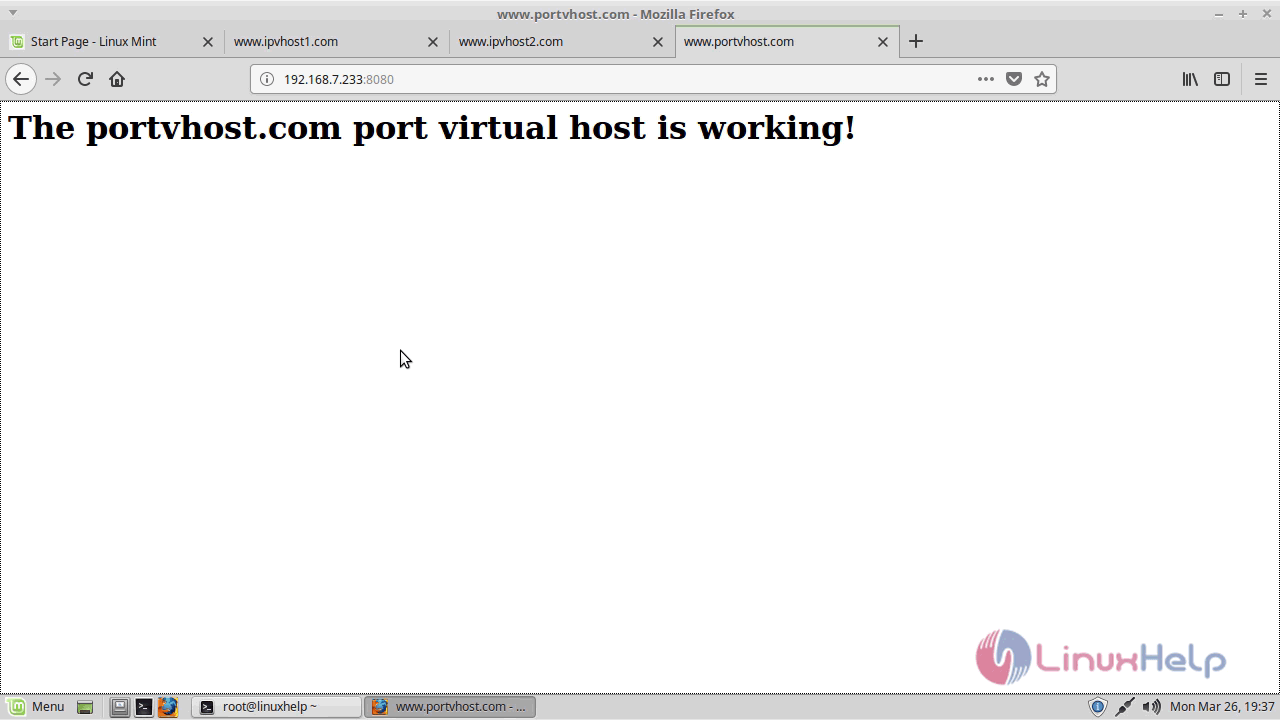
Similarly, to test Port Virtualhost, open your web browser and navigate to URL “ http://192.168.7.233:8080” . You should see a sample demo page for Port-based virtual hosting that looks like this:
with this, the method to set up an IP based Virtual host on linuxmint 18.3 comes to an end.
Comments ( 0 )
No comments available