How to setup LAMP stack on Docker with Rocky Linux 9.3
- 00:38 cat /etc/os-release
- 00:55 dnf config-manager --add-repo
- 01:04 dnf install docker-ce docker-ce-cli containerd.io
- 02:53 systemctl start docker
- 03:07 systemctl enable docker
- 03:19 systemctl status docker
- 03:35 dnf install git
- 04:03 cd /
- 04:08 git clone https://github.com/jcavat/docker-lamp.git
- 04:18 ll
- 04:31 cd docker-lamp/
- 04:38 ll
- 04:45 vim docker-compose.yml
- 05:10 vim Dockerfile
- 05:25 cd www/
- 05:30 ll
- 05:39 vim index.php
- 05:51 cd ..
- 06:01 docker compose up -d
- 06:49 docker ps -a
- 09:17 docker compose exec db mysql -u root -p
- 10:59 docker compose down
- 11:03 docker ps -a
To Setup LAMP Stack On Docker Using Rocky Linux 9.3
Introduction:
A Docker LAMP stack is a software bundle that includes Linux as the operating system, Apache as the web server, MySQL as the database management system, and PHP as the server-side scripting language. It is containerized using Docker which makes it easy to deploy and manage.
Procedure:-
Step 1: Check the OS version by using the below command
[root@linuxhelp ~]# cat /etc/os-release
NAME="Rocky Linux"
VERSION="9.3 (Blue Onyx)"
ID="rocky"
ID_LIKE="rhel centos fedora"
VERSION_ID="9.3"
PLATFORM_ID="platform:el9"
PRETTY_NAME="Rocky Linux 9.3 (Blue Onyx)"
ANSI_COLOR="0;32"
LOGO="fedora-logo-icon"
CPE_NAME="cpe:/o:rocky:rocky:9::baseos"
HOME_URL="https://rockylinux.org/"
BUG_REPORT_URL="https://bugs.rockylinux.org/"
SUPPORT_END="2032-05-31"
ROCKY_SUPPORT_PRODUCT="Rocky-Linux-9"
ROCKY_SUPPORT_PRODUCT_VERSION="9.3"
REDHAT_SUPPORT_PRODUCT="Rocky Linux"
REDHAT_SUPPORT_PRODUCT_VERSION="9.3"
Step 2: Add the official Docker repository by using the below command
[root@linuxhelp ~]# dnf config-manager --add-repo https://download.docker.com/linux/centos/docker-ce.repo
Adding repo from: https://download.docker.com/linux/centos/docker-ce.repo
Step 3: After the repository added, install Docker, which is composed of three packages using the below command
[root@linuxhelp ~]# dnf install docker-ce docker-ce-cli containerd.io
Docker CE Stable - x86_64                                                            71 kB/s |  41 kB     00:00
Rocky Linux 9 - BaseOS                                                              4.6 kB/s | 4.1 kB     00:00
Rocky Linux 9 - BaseOS                                                              1.3 MB/s | 2.2 MB     00:01
Rocky Linux 9 - AppStream                                                           4.1 kB/s | 4.5 kB     00:01
Rocky Linux 9 - AppStream                                                           3.4 MB/s | 7.4 MB     00:02
Rocky Linux 9 - Extras                                                              3.5 kB/s | 2.9 kB     00:00
Dependencies resolved.
====================================================================================================================
 Package                              Architecture      Version                   Repository                   Size
====================================================================================================================
Installing:
 containerd.io                        x86_64            1.6.28-3.2.el9            docker-ce-stable             34 M
 docker-ce                            x86_64            3:26.0.0-1.el9            docker-ce-stable             27 M
 docker-ce-cli                        x86_64            1:26.0.0-1.el9            docker-ce-stable            7.3 M
Installing weak dependencies:
 docker-buildx-plugin                 x86_64            0.13.1-1.el9              docker-ce-stable             13 M
 docker-ce-rootless-extras            x86_64            26.0.0-1.el9              docker-ce-stable            4.0 M
 docker-compose-plugin                x86_64            2.25.0-1.el9              docker-ce-stable             13 M

Transaction Summary
====================================================================================================================
Install  6 Packages

Total download size: 98 M
Installed size: 384 M
Is this ok [y/N]: y
Downloading Packages:
(1/6): docker-buildx-plugin-0.13.1-1.el9.x86_64.rpm                                 3.2 MB/s |  13 MB     00:04
(2/6): docker-ce-cli-26.0.0-1.el9.x86_64.rpm                                        3.3 MB/s | 7.3 MB     00:02
(3/6): docker-ce-26.0.0-1.el9.x86_64.rpm                                            3.4 MB/s |  27 MB     00:07
(4/6): docker-ce-rootless-extras-26.0.0-1.el9.x86_64.rpm                            2.6 MB/s | 4.0 MB     00:01
(5/6): containerd.io-1.6.28-3.2.el9.x86_64.rpm                                      3.6 MB/s |  34 MB     00:09
(6/6): docker-compose-plugin-2.25.0-1.el9.x86_64.rpm                                5.6 MB/s |  13 MB     00:02
-------------------------------------------------------------------------------------------------------------Total                                                                               9.6 MB/s |  98 MB     00:10
Docker CE Stable - x86_64                                                           9.2 kB/s | 1.6 kB     00:00
Importing GPG key 0x621E9F35:
 Userid     : "Docker Release (CE rpm) <docker@docker.com>"
 Fingerprint: 060A 61C5 1B55 8A7F 742B 77AA C52F EB6B 621E 9F35
 From       : https://download.docker.com/linux/centos/gpg
Is this ok [y/N]: y
Key imported successfully
Running transaction check
Transaction check succeeded.
Running transaction test
Transaction test succeeded.
Running transaction
  Preparing        :                                                                                            1/1
  Installing       : docker-compose-plugin-2.25.0-1.el9.x86_64                                                  1/6
  Running scriptlet: docker-compose-plugin-2.25.0-1.el9.x86_64                                                  1/6
  Installing       : docker-buildx-plugin-0.13.1-1.el9.x86_64                                                   2/6
  Running scriptlet: docker-buildx-plugin-0.13.1-1.el9.x86_64                                                   2/6
  Installing       : docker-ce-cli-1:26.0.0-1.el9.x86_64                                                        3/6
  Running scriptlet: docker-ce-cli-1:26.0.0-1.el9.x86_64                                                        3/6
  Installing       : containerd.io-1.6.28-3.2.el9.x86_64                                                        4/6
  Running scriptlet: containerd.io-1.6.28-3.2.el9.x86_64                                                        4/6
  Installing       : docker-ce-rootless-extras-26.0.0-1.el9.x86_64                                              5/6
  Running scriptlet: docker-ce-rootless-extras-26.0.0-1.el9.x86_64                                              5/6
  Installing       : docker-ce-3:26.0.0-1.el9.x86_64                                                            6/6
  Running scriptlet: docker-ce-3:26.0.0-1.el9.x86_64                                                            6/6
  Verifying        : containerd.io-1.6.28-3.2.el9.x86_64                                                        1/6
  Verifying        : docker-buildx-plugin-0.13.1-1.el9.x86_64                                                   2/6
  Verifying        : docker-ce-3:26.0.0-1.el9.x86_64                                                            3/6
  Verifying        : docker-ce-cli-1:26.0.0-1.el9.x86_64                                                        4/6
  Verifying        : docker-ce-rootless-extras-26.0.0-1.el9.x86_64                                              5/6
  Verifying        : docker-compose-plugin-2.25.0-1.el9.x86_64                                                  6/6

Installed:
  containerd.io-1.6.28-3.2.el9.x86_64                        docker-buildx-plugin-0.13.1-1.el9.x86_64
  docker-ce-3:26.0.0-1.el9.x86_64                            docker-ce-cli-1:26.0.0-1.el9.x86_64
  docker-ce-rootless-extras-26.0.0-1.el9.x86_64              docker-compose-plugin-2.25.0-1.el9.x86_64
Complete!
Step 4: After installation has completed, start and enable the Docker daemon by using the below command
[root@linuxhelp ~]# systemctl start docker
[root@linuxhelp ~]# systemctl enable docker
Created symlink /etc/systemd/system/multi-user.target.wants/docker.service → /usr/lib/systemd/system/docker.service.
Step 5: Now check the status of docker by using the below command
[root@linuxhelp ~]# systemctl status docker
● docker.service - Docker Application Container Engine
     Loaded: loaded (/usr/lib/systemd/system/docker.service; enabled; preset: disabled)
     Active: active (running) since Thu 2024-03-21 07:51:56 IST; 22s ago
TriggeredBy: ● docker.socket
       Docs: https://docs.docker.com
   Main PID: 7561 (dockerd)
      Tasks: 7
     Memory: 29.8M
        CPU: 490ms
     CGroup: /system.slice/docker.service
             └─7561 /usr/bin/dockerd -H fd:// --containerd=/run/containerd/containerd.sock
Mar 21 07:51:52 linuxhelp systemd[1]: Starting Docker Application Container Engine...
Mar 21 07:51:52 linuxhelp dockerd[7561]: time="2024-03-21T07:51:52.991397895+05:30" level=info msg="Starting up"
Mar 21 07:51:53 linuxhelp dockerd[7561]: time="2024-03-21T07:51:53.151801318+05:30" level=info msg="Loading contain>
Mar 21 07:51:55 linuxhelp dockerd[7561]: time="2024-03-21T07:51:55.711766440+05:30" level=info msg="Firewalld: inte>
Mar 21 07:51:56 linuxhelp dockerd[7561]: time="2024-03-21T07:51:56.376521621+05:30" level=info msg="Loading contain>
Mar 21 07:51:56 linuxhelp dockerd[7561]: time="2024-03-21T07:51:56.469903792+05:30" level=info msg="Docker daemon" >
Mar 21 07:51:56 linuxhelp dockerd[7561]: time="2024-03-21T07:51:56.477953354+05:30" level=info msg="Daemon has comp>
Mar 21 07:51:56 linuxhelp dockerd[7561]: time="2024-03-21T07:51:56.580878560+05:30" level=info msg="API listen on />
Mar 21 07:51:56 linuxhelp systemd[1]: Started Docker Application Container Engine.
lines 1-21/21 (END)
Step 6: Install Git and download for LAMP stack by using the below command
[root@linuxhelp ~]# dnf install git
Last metadata expiration check: 0:02:37 ago on Thursday 21 March 2024 07:50:17 AM.
Dependencies resolved.
====================================================================================================================
 Package                         Architecture          Version                       Repository                Size
====================================================================================================================
Installing:
 git                             x86_64                2.39.3-1.el9_2                appstream                 61 k
Installing dependencies:
 git-core-doc                    noarch                2.39.3-1.el9_2                appstream                2.6 M
 perl-Git                        noarch                2.39.3-1.el9_2                appstream                 37 k
 perl-TermReadKey                x86_64                2.38-11.el9                   appstream                 36 k

Transaction Summary
====================================================================================================================
Install  4 Packages

Total download size: 2.7 M
Installed size: 17 M
Is this ok [y/N]: y
Downloading Packages:
(1/4): perl-TermReadKey-2.38-11.el9.x86_64.rpm                                       93 kB/s |  36 kB     00:00
(2/4): perl-Git-2.39.3-1.el9_2.noarch.rpm                                            95 kB/s |  37 kB     00:00
(3/4): git-2.39.3-1.el9_2.x86_64.rpm                                                1.2 MB/s |  61 kB     00:00
(4/4): git-core-doc-2.39.3-1.el9_2.noarch.rpm                                       3.6 MB/s | 2.6 MB     00:00
-------------------------------------------------------------------------------------------------------------
Total                                                                               1.9 MB/s | 2.7 MB     00:01
Running transaction check
Transaction check succeeded.
Running transaction test
Transaction test succeeded.
Running transaction
  Preparing        :                                                                                            1/1
  Installing       : git-core-doc-2.39.3-1.el9_2.noarch                                                         1/4
  Installing       : perl-TermReadKey-2.38-11.el9.x86_64                                                        2/4
  Installing       : perl-Git-2.39.3-1.el9_2.noarch                                                             3/4
  Installing       : git-2.39.3-1.el9_2.x86_64                                                                  4/4
  Running scriptlet: git-2.39.3-1.el9_2.x86_64                                                                  4/4
  Verifying        : perl-TermReadKey-2.38-11.el9.x86_64                                                        1/4
  Verifying        : perl-Git-2.39.3-1.el9_2.noarch                                                             2/4
  Verifying        : git-core-doc-2.39.3-1.el9_2.noarch                                                         3/4
  Verifying        : git-2.39.3-1.el9_2.x86_64                                                                  4/4
Installed:
  git-2.39.3-1.el9_2.x86_64               git-core-doc-2.39.3-1.el9_2.noarch     perl-Git-2.39.3-1.el9_2.noarch
  perl-TermReadKey-2.38-11.el9.x86_64
Complete!
Step 7: Clone the LAMP from github by using “git clone” command.
[root@linuxhelp ~]# cd /
[root@linuxhelp /]# git clone https://github.com/jcavat/docker-lamp.git
Cloning into 'docker-lamp'...
remote: Enumerating objects: 93, done.
remote: Counting objects: 100% (3/3), done.
remote: Compressing objects: 100% (3/3), done.
remote: Total 93 (delta 0), reused 1 (delta 0), pack-reused 90
Receiving objects: 100% (93/93), 15.69 KiB | 502.00 KiB/s, done.
Resolving deltas: 100% (37/37), done.
Step 8: Long list the file and verify the downloaded LAMP directory by using the below command.
[root@linuxhelp /]# ll
total 28
dr-xr-xr-x.   2 root root    6 May 16  2022 afs
lrwxrwxrwx.   1 root root    7 May 16  2022 bin -> usr/bin
dr-xr-xr-x.   5 root root 4096 Mar 15 16:59 boot
drwxr-xr-x.  20 root root 3420 Mar 15 16:58 dev
drwxr-xr-x.   6 root root  129 Mar 21 07:54 docker-lamp
drwxr-xr-x. 149 root root 8192 Mar 21 07:53 etc
drwxr-xr-x.   3 root root   23 Mar 15 14:07 home
lrwxrwxrwx.   1 root root    7 May 16  2022 lib -> usr/lib
lrwxrwxrwx.   1 root root    9 May 16  2022 lib64 -> usr/lib64
drwxr-xr-x.   2 root root    6 May 16  2022 media
drwxr-xr-x.   3 root root   18 Mar 15 13:56 mnt
drwxr-xr-x.   3 root root   24 Mar 21 07:51 opt
dr-xr-xr-x. 300 root root    0 Mar 15 16:58 proc
dr-xr-x---.  14 root root 4096 Mar 21 07:52 root
drwxr-xr-x.  54 root root 1500 Mar 21 07:52 run
lrwxrwxrwx.   1 root root    8 May 16  2022 sbin -> usr/sbin
drwxr-xr-x.   2 root root    6 May 16  2022 srv
dr-xr-xr-x.  13 root root    0 Mar 15 16:58 sys
drwxrwxrwt.  20 root root 4096 Mar 21 07:53 tmp
drwxr-xr-x.  12 root root  144 Mar 15 13:55 usr
drwxr-xr-x.  23 root root 4096 Mar 15 14:44 var
Step 9: Now go to the LAMP directory and long list the LAMP files by using the below command
[root@linuxhelp /]# cd docker-lamp/
[root@linuxhelp docker-lamp]# ll
total 16
drwxr-xr-x. 2 root root   22 Mar 21 07:54 conf
-rw-r--r--. 1 root root  974 Mar 21 07:54 docker-compose.yml
-rw-r--r--. 1 root root  291 Mar 21 07:54 Dockerfile
drwxr-xr-x. 2 root root   22 Mar 21 07:54 dump
-rw-r--r--. 1 root root 1210 Mar 21 07:54 LICENSE
-rw-r--r--. 1 root root  615 Mar 21 07:54 README.md
drwxr-xr-x. 2 root root   23 Mar 21 07:54 www
Step 10: Open “docker-compose.yml” file and verify the version and port number for LAMP then save and quit from the file by using the below command
[root@linuxhelp docker-lamp]# vim docker-compose.yml
Step 11: Next open “Dockerfile” and verify the installation command for LAMP then save and quit from the file by using the below command
[root@linuxhelp docker-lamp]# vim Dockerfile
Step 12: Now go the document root location inside the LAMP directory by using the below command
[root@linuxhelp docker-lamp]# cd www/
[root@linuxhelp www]# ll
total 4
-rw-r--r--. 1 root root 1194 Mar 21 07:54 index.php
Step 13: We can keep our web files in www directory by using the below command
[root@linuxhelp www]# vim index.php
Step 14: Now use the docker compose command to pull images and create containers and required networks for that go to LAMP directory by using the below command
[root@linuxhelp www]# cd ..
[root@linuxhelp docker-lamp]# docker compose up -d
WARN[0000] /docker-lamp/docker-compose.yml: `version` is obsolete
[+] Running 31/31
 ✔ phpmyadmin 18 layers [⣿⣿⣿⣿⣿⣿⣿⣿⣿⣿⣿⣿⣿⣿⣿⣿⣿⣿]      0B/0B      Pulled                                          212.3s
   ✔ faef57eae888 Pull complete                                                                                8.6s
   ✔ 989a1d6c052e Pull complete                                                                                1.1s
   ✔ 0705c9c2f22d Pull complete                                                                               36.7s
   ✔ 621478e043ce Pull complete                                                                                2.4s
   ✔ 98246dcca987 Pull complete                                                                                9.8s
   ✔ bfed8c155cb6 Pull complete                                                                               10.0s
   ✔ 7a7c2e908867 Pull complete                                                                               11.1s
   ✔ d176994b625c Pull complete                                                                               16.6s
   ✔ 2d8ace6a2716 Pull complete                                                                               12.4s
   ✔ c70df516383c Pull complete                                                                               17.7s
   ✔ 15e1b44fe4c7 Pull complete                                                                               18.1s
   ✔ 65e50d44e95a Pull complete                                                                               19.2s
   ✔ 77f68910bc0a Pull complete                                                                               19.3s
   ✔ 605dd3a6e332 Pull complete                                                                               21.2s
   ✔ 99ce27188f07 Pull complete                                                                               20.5s
   ✔ 74d64e32c5d5 Pull complete                                                                               26.2s
   ✔ ef5fc9928b9f Pull complete                                                                               22.5s
   ✔ 163f3256e112 Pull complete                                                                               23.7s
 ✔ db 11 layers [⣿⣿⣿⣿⣿⣿⣿⣿⣿⣿⣿]      0B/0B      Pulled                                                         205.1s
   ✔ 9a5c778f631f Pull complete                                                                               49.1s
   ✔ 6c09b1c7d50d Pull complete                                                                               26.4s
   ✔ 7d5a6697daf1 Pull complete                                                                               28.2s
   ✔ 06f40b0c53d7 Pull complete                                                                               31.8s
   ✔ 0a6fdbb420ff Pull complete                                                                               33.0s
   ✔ 964da5c649e2 Pull complete                                                                               34.3s
   ✔ 9bd68fed9302 Pull complete                                                                               64.2s
   ✔ 87f88f90d943 Pull complete                                                                               37.6s
   ✔ f9d9e6ae336c Pull complete                                                                               67.6s
   ✔ 6c3624bb597f Pull complete                                                                               50.8s
   ✔ dba5c5a90ca7 Pull complete                                                                               52.4s
[+] Building 368.7s (8/8) FINISHED                                                                   docker:default
 => [www internal] load build definition from Dockerfile                                                       0.1s
 => => transferring dockerfile: 387B                                                                           0.0s
 => [www internal] load metadata for docker.io/library/php:7.2-apache                                          3.2s
 => [www internal] load .dockerignore                                                                          0.0s
 => => transferring context: 2B                                                                                0.0s
 => [www 1/4] FROM docker.io/library/php:7.2-apache@sha256:4dc0f0115acf8c2f0df69295ae822e49f5ad5fe849725847f  58.2s
 => => resolve docker.io/library/php:7.2-apache@sha256:4dc0f0115acf8c2f0df69295ae822e49f5ad5fe849725847f15aa0  0.1s
 => => sha256:4dc0f0115acf8c2f0df69295ae822e49f5ad5fe849725847f15aa0e5802b55f8 1.65kB / 1.65kB                 0.0s
 => => sha256:25417b6c9c2e1a52b551ba89087f4d07c216f58784773c9e7a1710a1f6e2b4a1 3.24kB / 3.24kB                 0.0s
 => => sha256:6ec7b7d162b24bd6df88abde89ceb6d7bbc2be927f025c9dd061af2b0c328cfe 27.10MB / 27.10MB               5.3s
 => => sha256:c61d277263e19d2ce30a6bae41115c811eb0f9274a601a5e3ee621e54c8a74f7 13.18kB / 13.18kB               0.0s
 => => sha256:db606474d60ce31604505c7d6dad9a66cb42f3818fca738832db2f2091cf89c9 225B / 225B                     0.9s
 => => sha256:afb30f0cd8e0ff78b5eecdc2d9365a50441ad83c5db5f1e87942d6426237fa56 76.65MB / 76.65MB              15.8s
 => => sha256:3bb2e805159413e5278b859f7fbb86ddfc99e667cb705d5d5aec0a7c8ffcf1b5 225B / 225B                     2.1s
 => => sha256:4c761b44e2ccbff3f10b254b21bb00a52dfd26919ad9e3f7efcd569196e6c26b 18.68MB / 18.68MB               8.3s
 => => sha256:c2199db96575122fd559c29b619a2773fe9069e0266312a6369ac95f4464b1dd 434B / 434B                     6.0s
 => => extracting sha256:6ec7b7d162b24bd6df88abde89ceb6d7bbc2be927f025c9dd061af2b0c328cfe                     17.8s
 => => sha256:1b9a9381eea8f93068e8043f18ea59b709c07256e2f90962931a1433fbdf5e79 487B / 487B                     6.6s
 => => sha256:fd07bbc59d347c16686f107676436a2281e4128033f105ca7a602aa195bcbe04 12.65MB / 12.65MB              11.1s
 => => sha256:72b73ab27698b55aa309173abd0cdd758291b9feaac31342c48ff12f3be14876 494B / 494B                     8.8s
 => => sha256:983308f4f0d6304dc6cecde8fd66ba5a94a08873a3b8205eb5ff1ea98b419dbc 13.82MB / 13.82MB              12.9s
 => => sha256:6c13f026e6da09e10ca2edb704b335a62bac29e549a2d0b35e535c9aa8dbeeba 2.27kB / 2.27kB                11.5s
 => => sha256:e5e6cd16368920e691da5b8791184d7a8d579dd5cd5e8c533ad2bf0b82c2d0fc 248B / 248B                    12.2s
 => => sha256:5c5516e56582a30bd2e69c32d17a169ed7227900318e9d7b5949c8fb447308f5 210B / 210B                    12.8s
 => => sha256:154729f6ba8609ef7d5af1bfad81efe814cbbca18509834908735c9aced174d3 897B / 897B                    13.2s
 => => extracting sha256:db606474d60ce31604505c7d6dad9a66cb42f3818fca738832db2f2091cf89c9                      0.0s
 => => extracting sha256:afb30f0cd8e0ff78b5eecdc2d9365a50441ad83c5db5f1e87942d6426237fa56                     21.9s
 => => extracting sha256:3bb2e805159413e5278b859f7fbb86ddfc99e667cb705d5d5aec0a7c8ffcf1b5                      0.0s
 => => extracting sha256:4c761b44e2ccbff3f10b254b21bb00a52dfd26919ad9e3f7efcd569196e6c26b                      4.9s
 => => extracting sha256:c2199db96575122fd559c29b619a2773fe9069e0266312a6369ac95f4464b1dd                      0.0s
 => => extracting sha256:1b9a9381eea8f93068e8043f18ea59b709c07256e2f90962931a1433fbdf5e79                      0.0s
 => => extracting sha256:fd07bbc59d347c16686f107676436a2281e4128033f105ca7a602aa195bcbe04                      0.7s
 => => extracting sha256:72b73ab27698b55aa309173abd0cdd758291b9feaac31342c48ff12f3be14876                      0.0s
 => => extracting sha256:983308f4f0d6304dc6cecde8fd66ba5a94a08873a3b8205eb5ff1ea98b419dbc                      4.8s
 => => extracting sha256:6c13f026e6da09e10ca2edb704b335a62bac29e549a2d0b35e535c9aa8dbeeba                      0.0s
 => => extracting sha256:e5e6cd16368920e691da5b8791184d7a8d579dd5cd5e8c533ad2bf0b82c2d0fc                      0.0s
 => => extracting sha256:5c5516e56582a30bd2e69c32d17a169ed7227900318e9d7b5949c8fb447308f5                      0.0s
 => => extracting sha256:154729f6ba8609ef7d5af1bfad81efe814cbbca18509834908735c9aced174d3                      0.0s
 => [www 2/4] RUN a2enmod rewrite                                                                              3.4s
 => [www 3/4] RUN docker-php-ext-install pdo pdo_mysql                                                        77.0s
 => [www 4/4] RUN apt-get update     && apt-get install -y libzip-dev     && apt-get install -y zlib1g-dev   225.9s
 => [www] exporting to image                                                                                   0.6s
 => => exporting layers                                                                                        0.6s
 => => writing image sha256:699676f72b95c6834c54158b0695cfe643c6751e3a488a80ef32d5d180ffb151                   0.0s
 => => naming to docker.io/library/docker-lamp-www                                                             0.0s
[+] Running 3/5
 ⠙ Network docker-lamp_default         Created                                                                11.1s
 ⠙ Volume "docker-lamp_persistent"     Created                                                                 9.1s
 ✔ Container docker-lamp-db-1          Started                                                                 3.1s
 ✔ Container docker-lamp-phpmyadmin-1  Started                                                                 7.8s
 ✔ Container docker-lamp-www-1         Started                                                                 8.8s
Step 15: Check the Container status by using the below command
[root@linuxhelp docker-lamp]# docker ps -a
CONTAINER ID   IMAGE                   COMMAND                  CREATED          STATUS          PORTS                                                  NAMES
e149c9bc409c   phpmyadmin/phpmyadmin   "/docker-entrypoint.…"   33 seconds ago   Up 24 seconds   0.0.0.0:8000->80/tcp, :::8000->80/tcp                  docker-lamp-phpmyadmin-1
658dc77a8597   docker-lamp-www         "docker-php-entrypoi…"   33 seconds ago   Up 23 seconds   0.0.0.0:8001->80/tcp, :::8001->80/tcp                  docker-lamp-www-1
9dafff4b4dfa   mysql:8.0               "docker-entrypoint.s…"   33 seconds ago   Up 29 seconds   0.0.0.0:3306->3306/tcp, :::3306->3306/tcp, 33060/tcp   docker-lamp-db-1
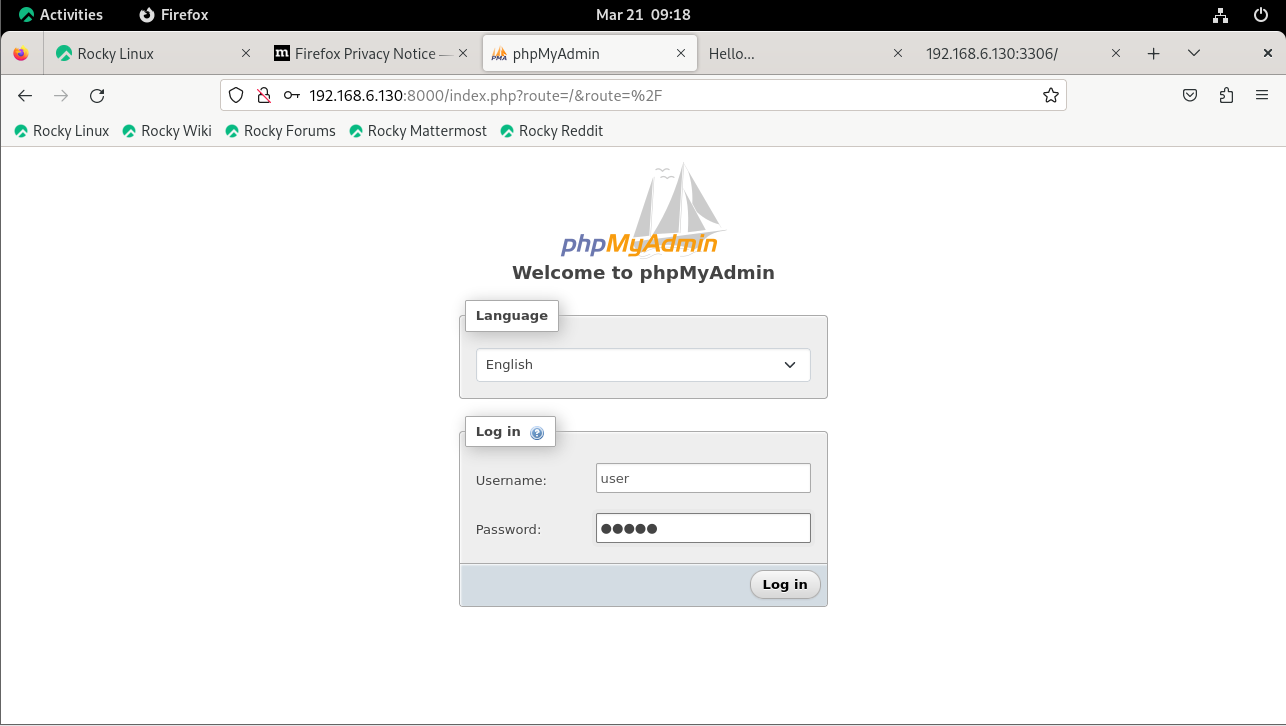
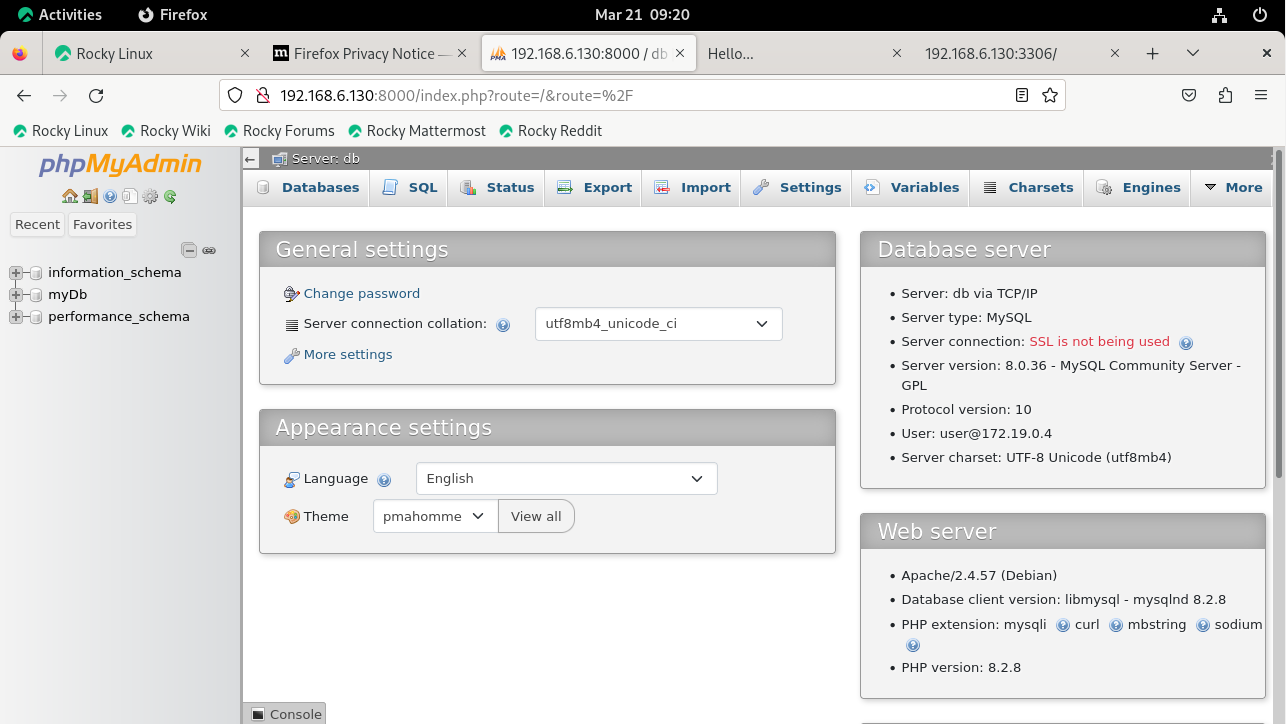
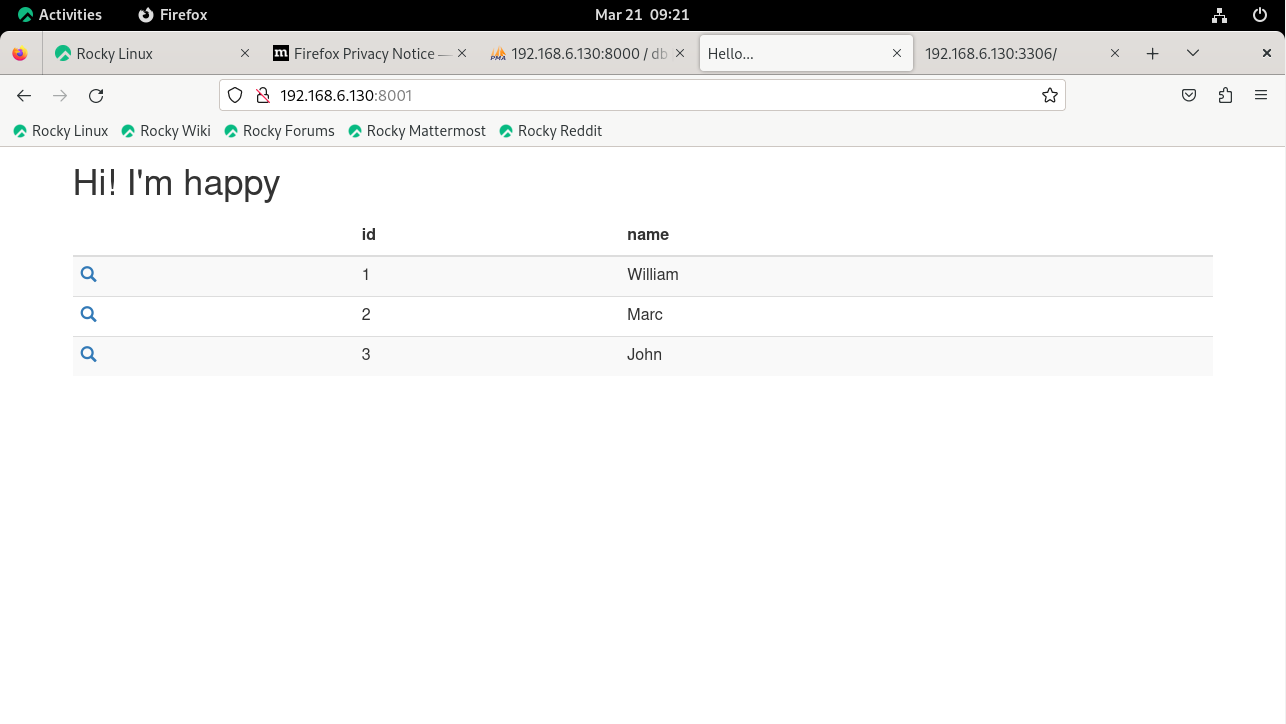
Step 16: Now go the web browser and check the LAMP Service Status by using our server IP address with LAMP Service ports by using the below command
•	phpmyadmin: 8000
•	Apache: 8001
•	mysql: 3306
http://<IP Address>:8000
http://<IP Address>:8001
http://<IP Address>:3306
Step 17: Now you can change MySQL password for that Login MySQL container and change DB root password by using the following command.
[root@linuxhelp docker-lamp]# docker compose exec db mysql -u root -p
WARN[0000] /docker-lamp/docker-compose.yml: `version` is obsolete
Enter password:
Welcome to the MySQL monitor.  Commands end with ; or \g.
Your MySQL connection id is 27
Server version: 8.0.36 MySQL Community Server - GPL

Copyright (c) 2000, 2024, Oracle and/or its affiliates.

Oracle is a registered trademark of Oracle Corporation and/or its
affiliates. Other names may be trademarks of their respective
owners.
Type 'help;' or '\h' for help. Type '\c' to clear the current input statement.
mysql>
mysql> show databases;
+--------------------+
| Database           |
+--------------------+
| information_schema |
| myDb               |
| mysql              |
| performance_schema |
| sys                |
+--------------------+
5 rows in set (0.01 sec)
mysql> ALTER USER 'root'@'localhost' IDENTIFIED BY 'Linuxhelp@123';
Query OK, 0 rows affected (0.02 sec)
mysql> flush privileges;
Query OK, 0 rows affected (0.02 sec)
mysql> \q
Bye
Step 18: If you want to stop containers, run the below command
[root@linuxhelp docker-lamp]# docker compose down
WARN[0000] /docker-lamp/docker-compose.yml: `version` is obsolete
[+] Running 4/4
 ✔ Container docker-lamp-www-1         Removed                                                                 2.3s
 ✔ Container docker-lamp-phpmyadmin-1  Removed                                                                 3.1s
 ✔ Container docker-lamp-db-1          Removed                                                                 2.5s
 ✔ Network docker-lamp_default         Removed                                                                 1.4s
Step 19: Now check the container status by using the below command
[root@linuxhelp docker-lamp]# docker ps -a
CONTAINER ID   IMAGE     COMMAND   CREATED   STATUS    PORTS     NAMES
Now the containers are not in running state.
Conclusion:
We have reached the end of this article. In this guide, we have walked you through the steps required to setup LAMP stack on Docker with Rocky Linux 9.3. Your feedback is much welcome.
Comments ( 0 )
No comments available